
Recovering deleted files from the Recycle Bin isn’t a cause for concern if you haven’t emptied the folder yet. But if you’ve already permanently deleted your files or you have emptied the Recycle Bin, it becomes trickier. You now have two primary options for data recovery in this scenario: restoring from a backup if you have one or using data recovery software.
Data recovery software, such as Disk Drill, leverages the fact that when Windows “deletes” data, it only marks the space the file occupies as available for incoming data. This implies that you can recover your original file using data recovery apps, but only until it’s overwritten by new data. Therefore, it’s crucial to act promptly to maximize your chances of successful recovery.
If you haven’t backed up your files before the data loss, proceed directly to the recovery guide.
Alternatively, explore our methods that rely on backups to recover files from the emptied Recycle Bin without software.
How to Recover Data from the Recycle Bin BEFORE Empty
It’s always the easiest to recover lost data before the Recycle Bin has been emptied. If you haven’t made any recovery attempts yet, we highly recommend you start with the two simple methods described below. You might get lucky and successfully undelete all lost files without having to download and use a third-party data recovery software application.
Method 1: Try the CTRL + Z Shortcut
The Windows operating system remembers your actions, allowing you to undo recent changes, such as the deletion of an important file or folder. How? By pressing a single keyboard shortcut: CTRL + Z.
Unfortunately, the history of your actions is automatically erased when you restart your computer, so this method is useful only if you apply it immediately after noticing that important files are missing.
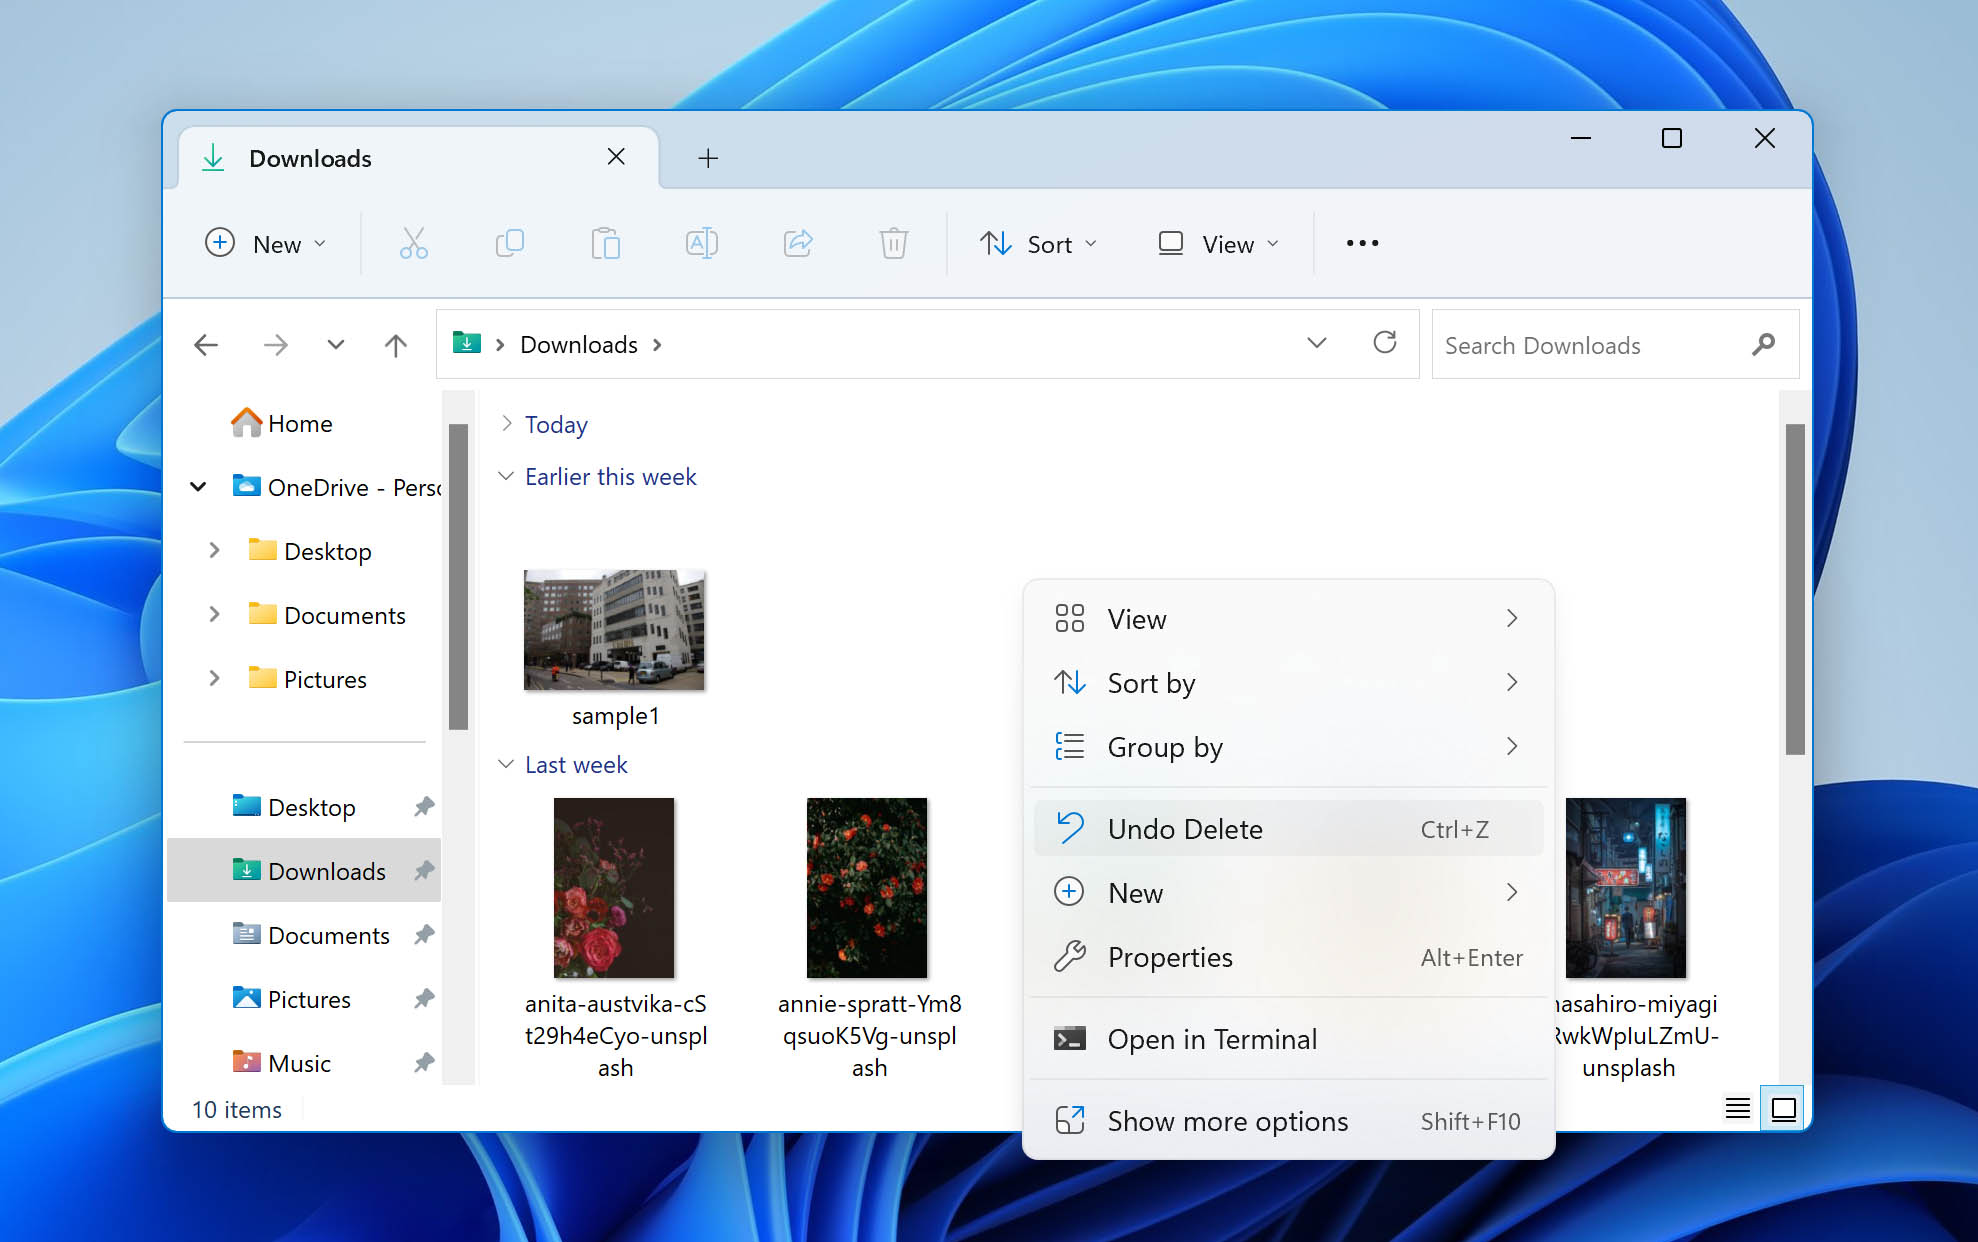
Method 2: Check the Recycle Bin One Last Time
You’ve probably already done that, but practice shows that many users often forget to check the Recycle Bin to see if the files have actually been deleted. So, to recover data directly from the Recycle Bin:
- Open the Recycle Bin by double-clicking on its icon.
- Locate the items that you want to recover.
- Check the box next to the files or folders you want to retrieve.
- Right-click and select Restore to recover the items to their original locations.
Method 3: Check Your OneDrive
OneDrive is seamlessly integrated into Windows, with its backup and restore features easily accessible. If you have an existing backup of your deleted files on your OneDrive account, you can access and restore your backup by logging into your OneDrive account.
You can access your OneDrive account online or using the File Explorer > OneDrive – Personal. Then, search for the files you want to recover and download or copy them to your local drive.
Is Recycle Bin Recovery Possible?
No luck so far? Then you might be wondering if Recycle Bin recovery after empty is even possible at all. The answer will make you happy: yes, files deleted from the Recycle Bin can still be recovered because they remain physically present on the storage device until overwritten by new data.
The only issue is that Windows doesn’t come with a built-in data recovery application to restore access to permanently deleted files, unless, of course, you consider the Windows File Recovery tool – but even that isn’t truly native. Consequently, you’ll often need to rely on third-party data recovery software.
Here’s a 30-second explanation of how it works:
- Data recovery software analyzes your storage devices, looking for all recoverable files.
- The software then lets you specify which files you want to restore.
- The restored files are moved to a safe location, and the logical links to them are restored.
All this sounds simple in theory, but there are many factors that may influence your recovery success rate, including the cause of the data loss, the quality of the selected data recovery application, the amount of time passed since the data loss incident took place, and the type of storage device on which the deleted files were stored.
As we already said, to achieve the best results, you should begin the data recovery process as soon as possible and use the best recovery tool available.
Note: As of 2023/2024, it’s likely that over 95% of new laptops and around 55-60% of new PCs use SSDs as their system disks, a trend that is expected to increase over time. It’s important to note that if you’re using an SSD as your system disk (where your Recycle Bin is located), your chances of recovering data might be significantly reduced due to TRIM. Nonetheless, we still recommend using the method described below to scan all disks and devices where your files were previously located, even before they were moved to the Recycle Bin.
How to Recover Deleted Files from the Recycle Bin After Empty
Just because you’ve already emptied the Recycle Bin folder doesn’t mean that your files are gone for good. If you act quickly enough and closely follow the instructions below, you should be able to get them back in no time.
For the purposes of this article, we’ve chosen to use Disk Drill as our preferred data recovery software, and there are several compelling reasons for this choice. We will list all of them below to save your time. Personally, I am a huge fan of Disk Drill and use it as my go-to software for most of my data recovery tasks. You’ll also find a link to my review of the tool below.
![]()
Step 1: Download, Install, and Launch Disk Drill to Start Recycle Bin Recovery
First, you need to download Disk Drill and install it on your computer (make sure to avoid installing it on your system drive, which is where the Recycle Bin is located). Then launch the application by double-clicking its newly created desktop icon.
Step 2: Choose the Location and Start Scanning for Lost Files
Disk Drill’s main window will display all the disks that are available for recovery. Clicking the Search for lost data button after selecting the disk on which the Recycle Bin resides (this is usually your computer’s main internal drive) initiates the scanning procedure, which defaults to using all available scanning methods in the optimal order, which is what we recommend.
Step 3: Preview and Select Files for Recovery
Once Disk Drill finishes scanning your disk, you’ll be able to preview the files available for restoration in the recovery panel.
Files are grouped by type, such as Pictures or Documents, to streamline this process. You can view all files inside a folder and nested subfolders by holding the ALT key and clicking on the top folder. To preview a file, simply hover your mouse over it and click the preview icon (a small eye). Generally, all files that can be previewed can also be successfully recovered. Just keep in mind that the preview feature can only preview file formats supported by Windows and/or third-party file viewers/openers installed on your system.
When you find a file or folder that you want to recover, click the checkbox next to it to add it to the recovery queue.
Step 4: Click 'Recover' to Initiate the Recovery
After making your selections, click the Recover button and you will be prompted to choose a recovery destination for the selected files. Avoid using the same disk to minimize the chances of file corruption during recovery. Disk Drill will confirm that you’ve selected a suitable destination. Click Next to proceed.
Step 5: View the Recovered Files
It should take just a short while for Disk Drill to recover your files and display the “Data recovery complete” message. To view the recovered files, click the Show recovered data in Explorer button.
If you’re not satisfied with your recovery results, you can return to the list of all the disks that are available for recovery and try to rescan the disk or scan another disk. You can also try other software solutions, but our experience shows that Disk Drill has one of the highest recovery rates on the market, if not the highest.
So, here’s why we believe Disk Drill is an excellent software to begin your data recovery journey with:
- 🤗 Easy to Use: Disk Drill has an intuitive and polished user interface that reduces the entire data recovery process into a single click on the Recover button.
- 🦾 Powerful: It supports hundreds of file formats and can restore them from all storage devices and file systems, making it a professional-grade data recovery solution loved by over 500,000 PRO clients and used by many world-famous companies.
- ⏱ Fast: With Quick Scan, you can discover all files deleted from the Recycle Bin in no time, and Deep Scan can find files that are likely missing their original file names and locations.
- 🛡️ Secure: Disk Drill recovers your files in the safest manner possible, taking great care not to cause more harm than good. It warns against recovering files to the same storage device on which they were originally located.
- 🆓 Free Trial: The free version of Disk Drill enables you to recover up to 500 MB of data, and the Pro Edition has no limitation on the amount of data that can be recovered.
- 📁 Original Name Recovery: Disk Drill can recover files with original names and directory structures using advanced algorithms that analyze file system metadata and other information. This is only possible if the metadata wasn’t erased or damaged during data loss.
Interested in learning more about Disk Drill? Read our full review. If Disk Drill doesn’t resonate with you, explore other options from our curated list of top data recovery software.
How to Recover Files Deleted From the Recycle Bin after Empty Without Software
You actually don’t need to download and install a third-party software solution to recover files deleted from the Recycle Bin if you had enabled one of the built-in data backup features in Windows prior to data loss.
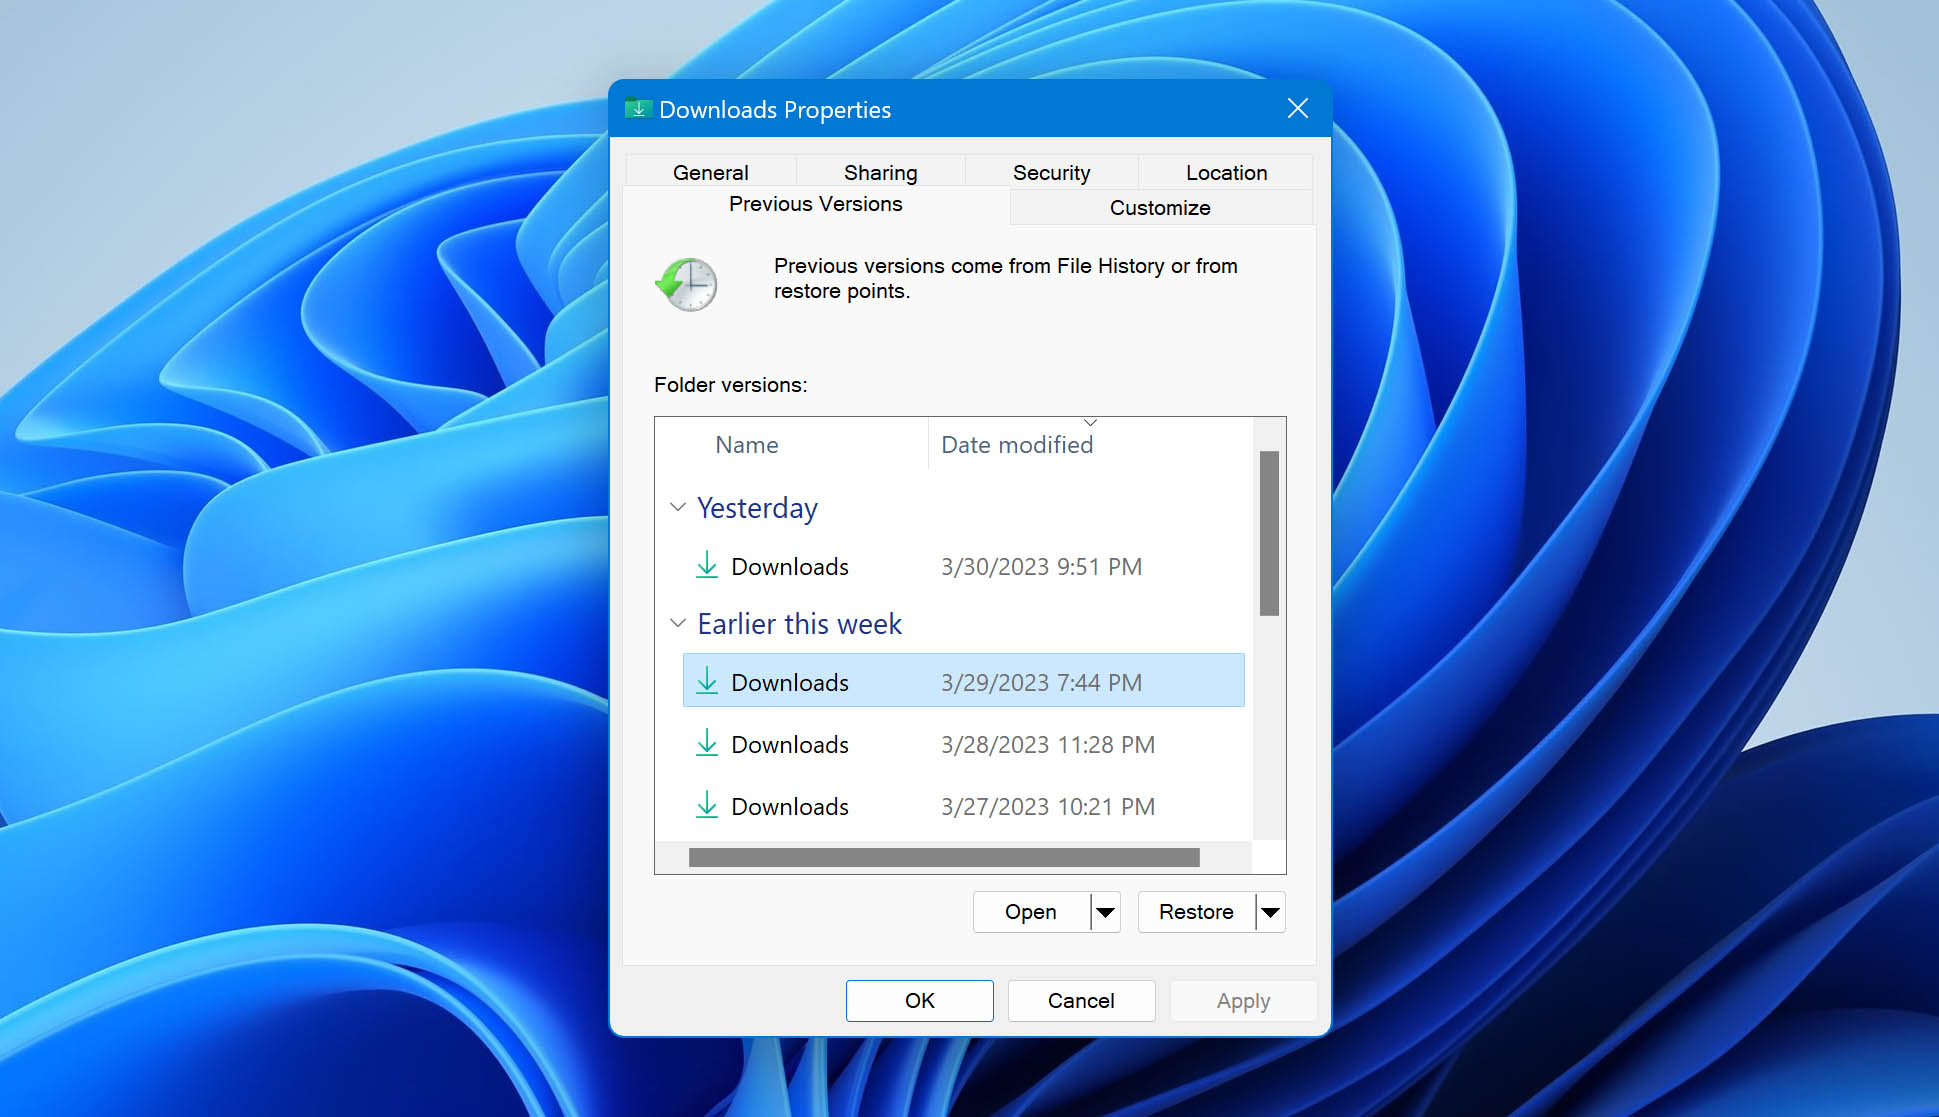
Method 1: Restore a Previous Version from File History
Recent versions of the Windows operating system come with a backup feature called File History. When enabled, File History takes regular backups of files stored in the Documents, Music, Pictures, Videos, and Desktop folders.
As its name suggests, File History creates incremental backups of files that can be restored at a later date, allowing you to go back in time and get back an older version of a file that has been overwritten a long time ago.
Here’s what you need to do to recover previous versions of files from File History:
- Right-click on the folder that contained the deleted file.
- Choose Restore previous version from the menu.
- Select the version you want to restore and click the Restore button.
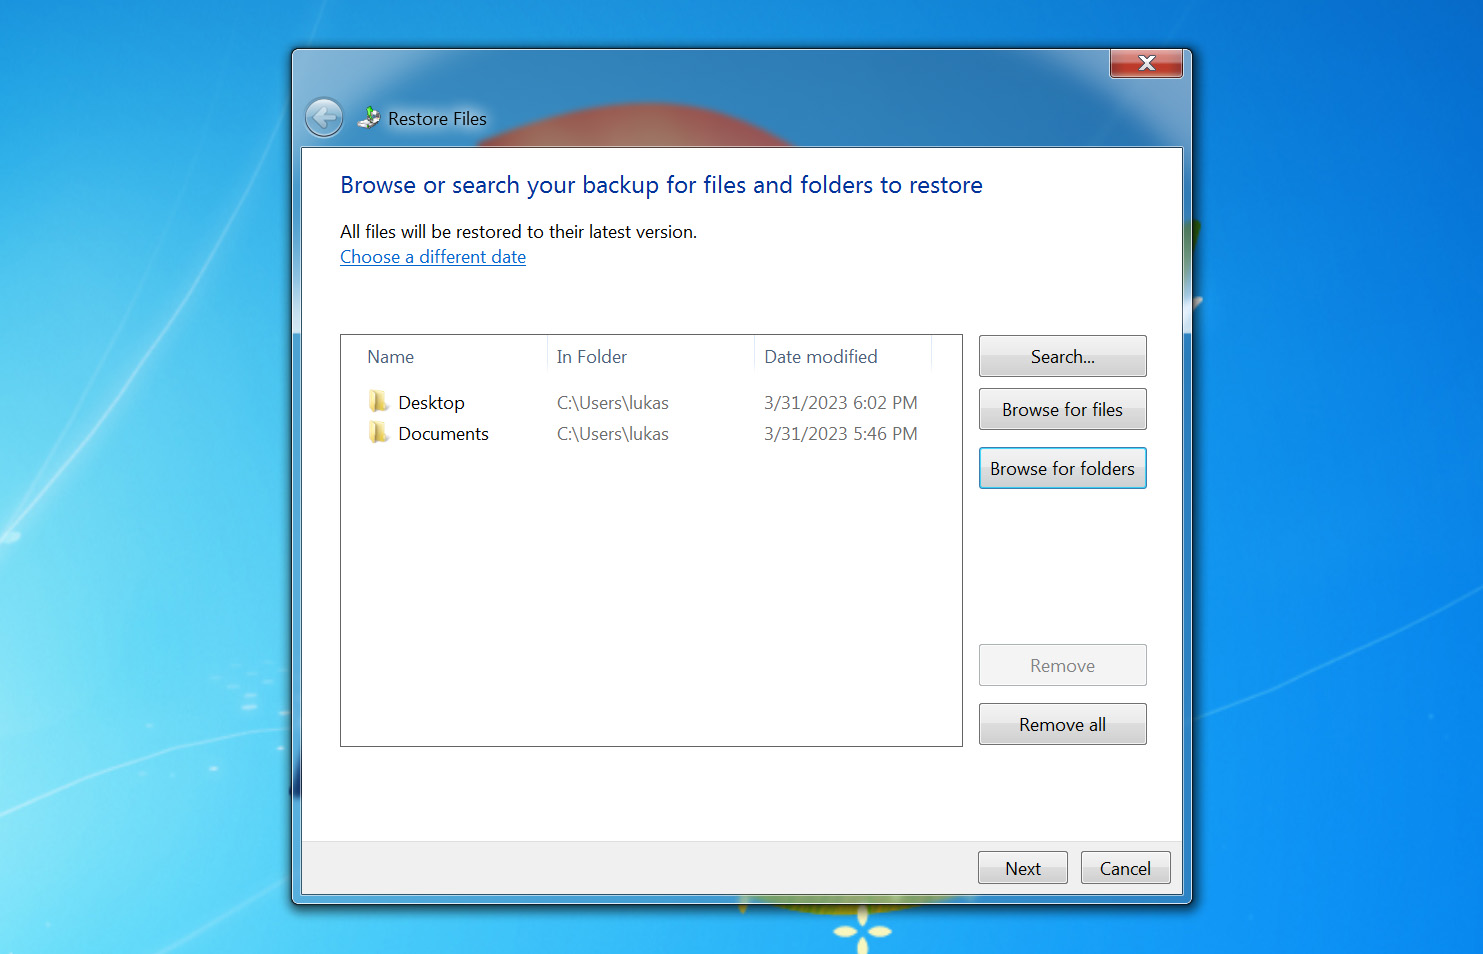
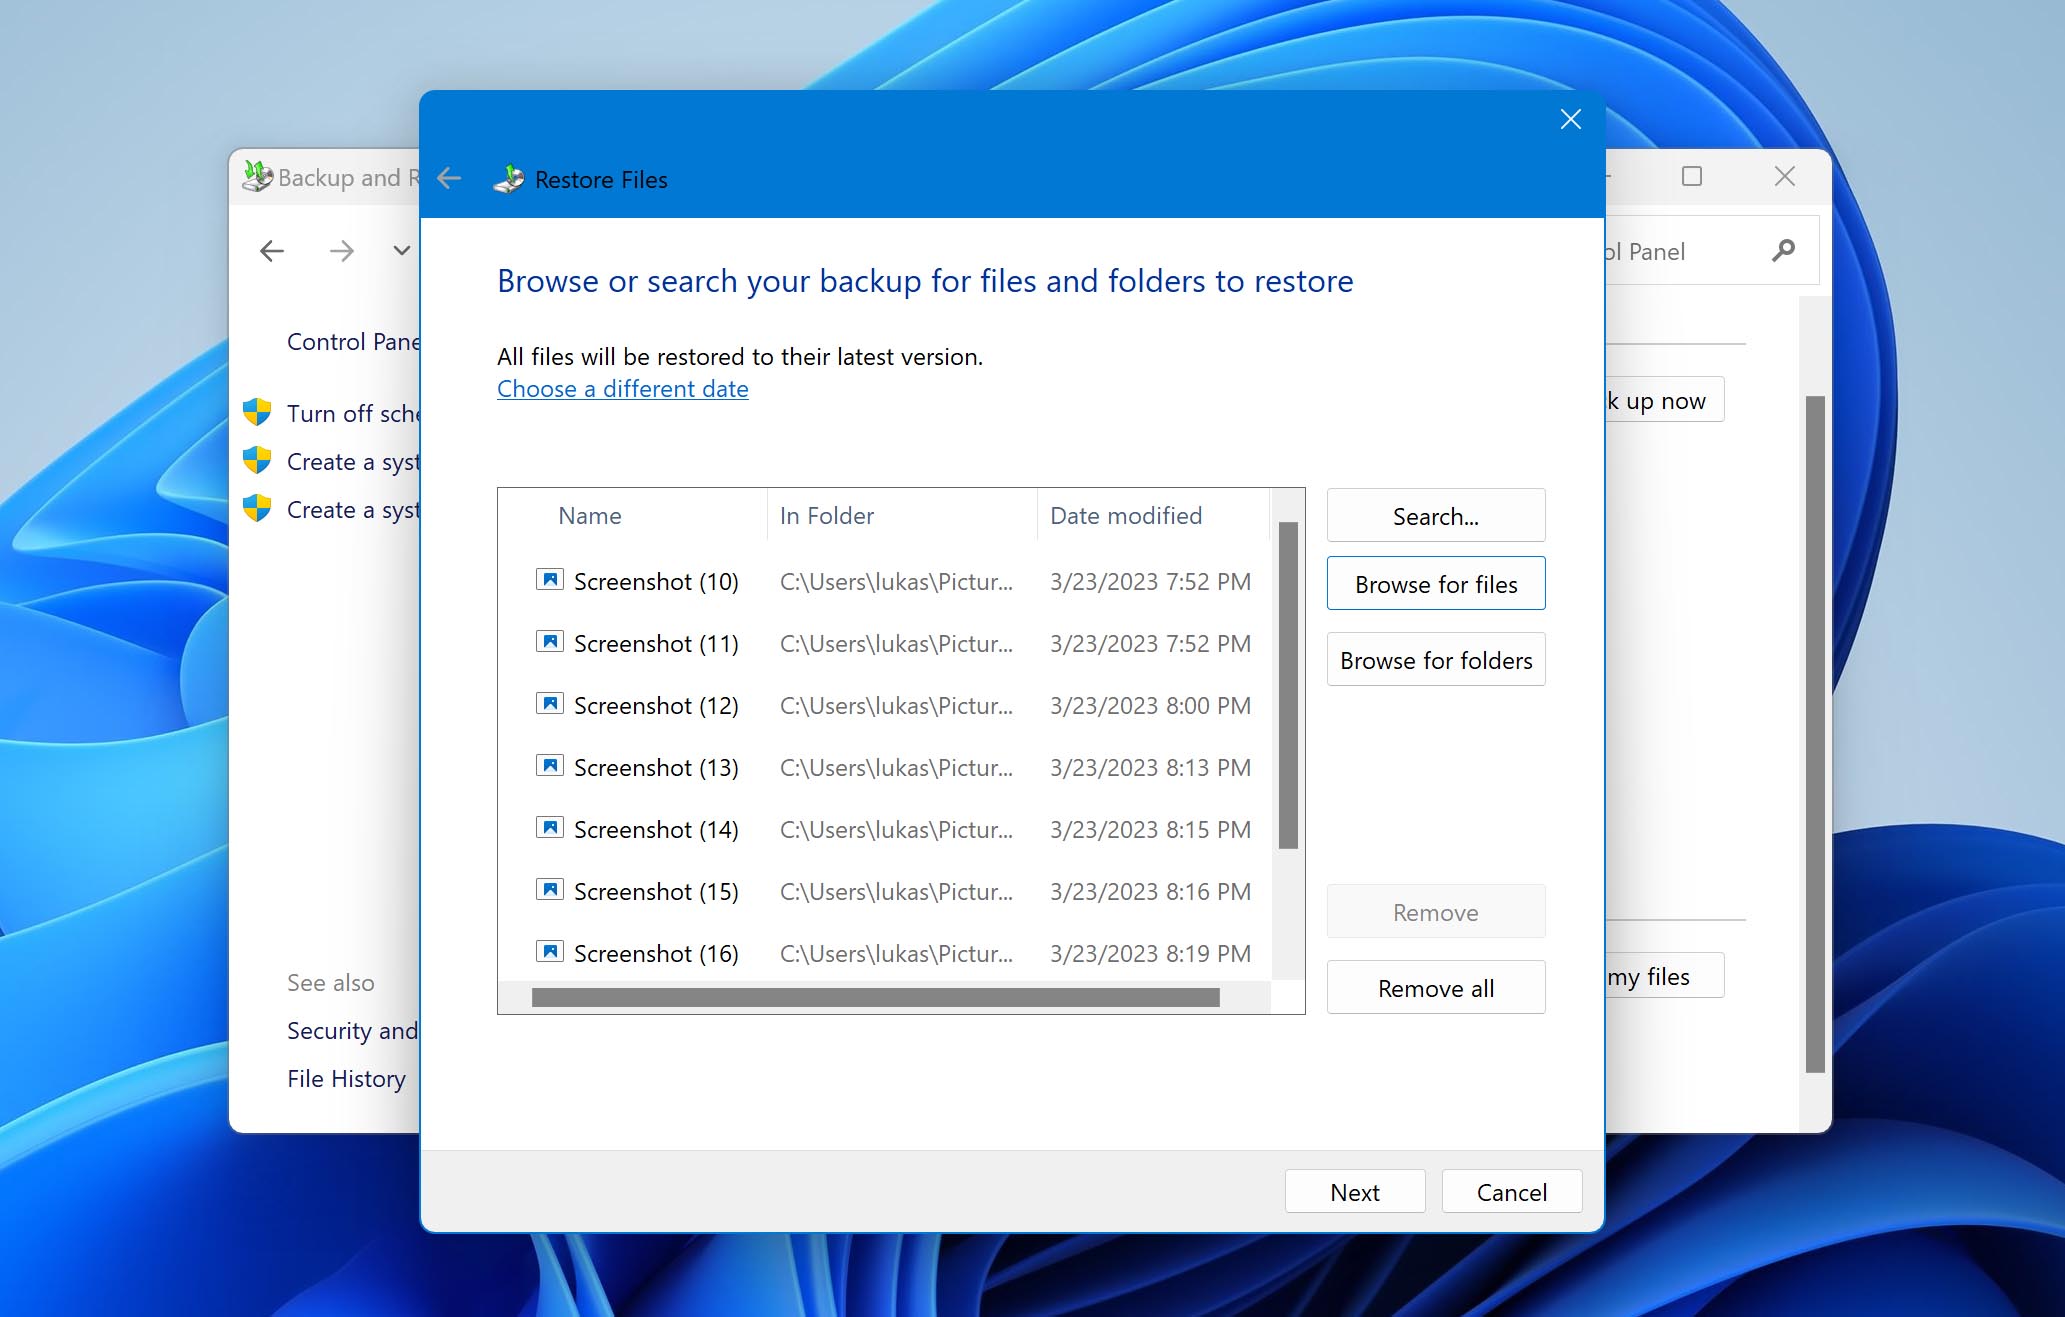
Method 2: Restore Files from Windows Backup and Restore
Windows 7 introduced a backup feature that allowed its users to back up selected libraries, folders, and system data with a few simple clicks. Called Backup and Restore, the feature offers two main backup options:
- 💡 Let Windows choose: Windows will back up data files saved in libraries, on the desktop, and in default Windows folders. Windows will also create a system image, which can be used to restore your computer if it stops working. These items will be backed up on a regular schedule.
- 🤔 Let me choose: You can select libraries and folders and whether to include a system image in the backup. The items you choose will be backed up on a regular schedule.
Regardless of which of the two options you choose, you can always recover your data with minimal effort.
For Windows 7 Systems:
- Open Control Panel.
- Select System and Security.
- Choose Backup and Restore.
- Click Restore my files and follow the wizard.
Read also: How Recover Deleted Files on Windows 7
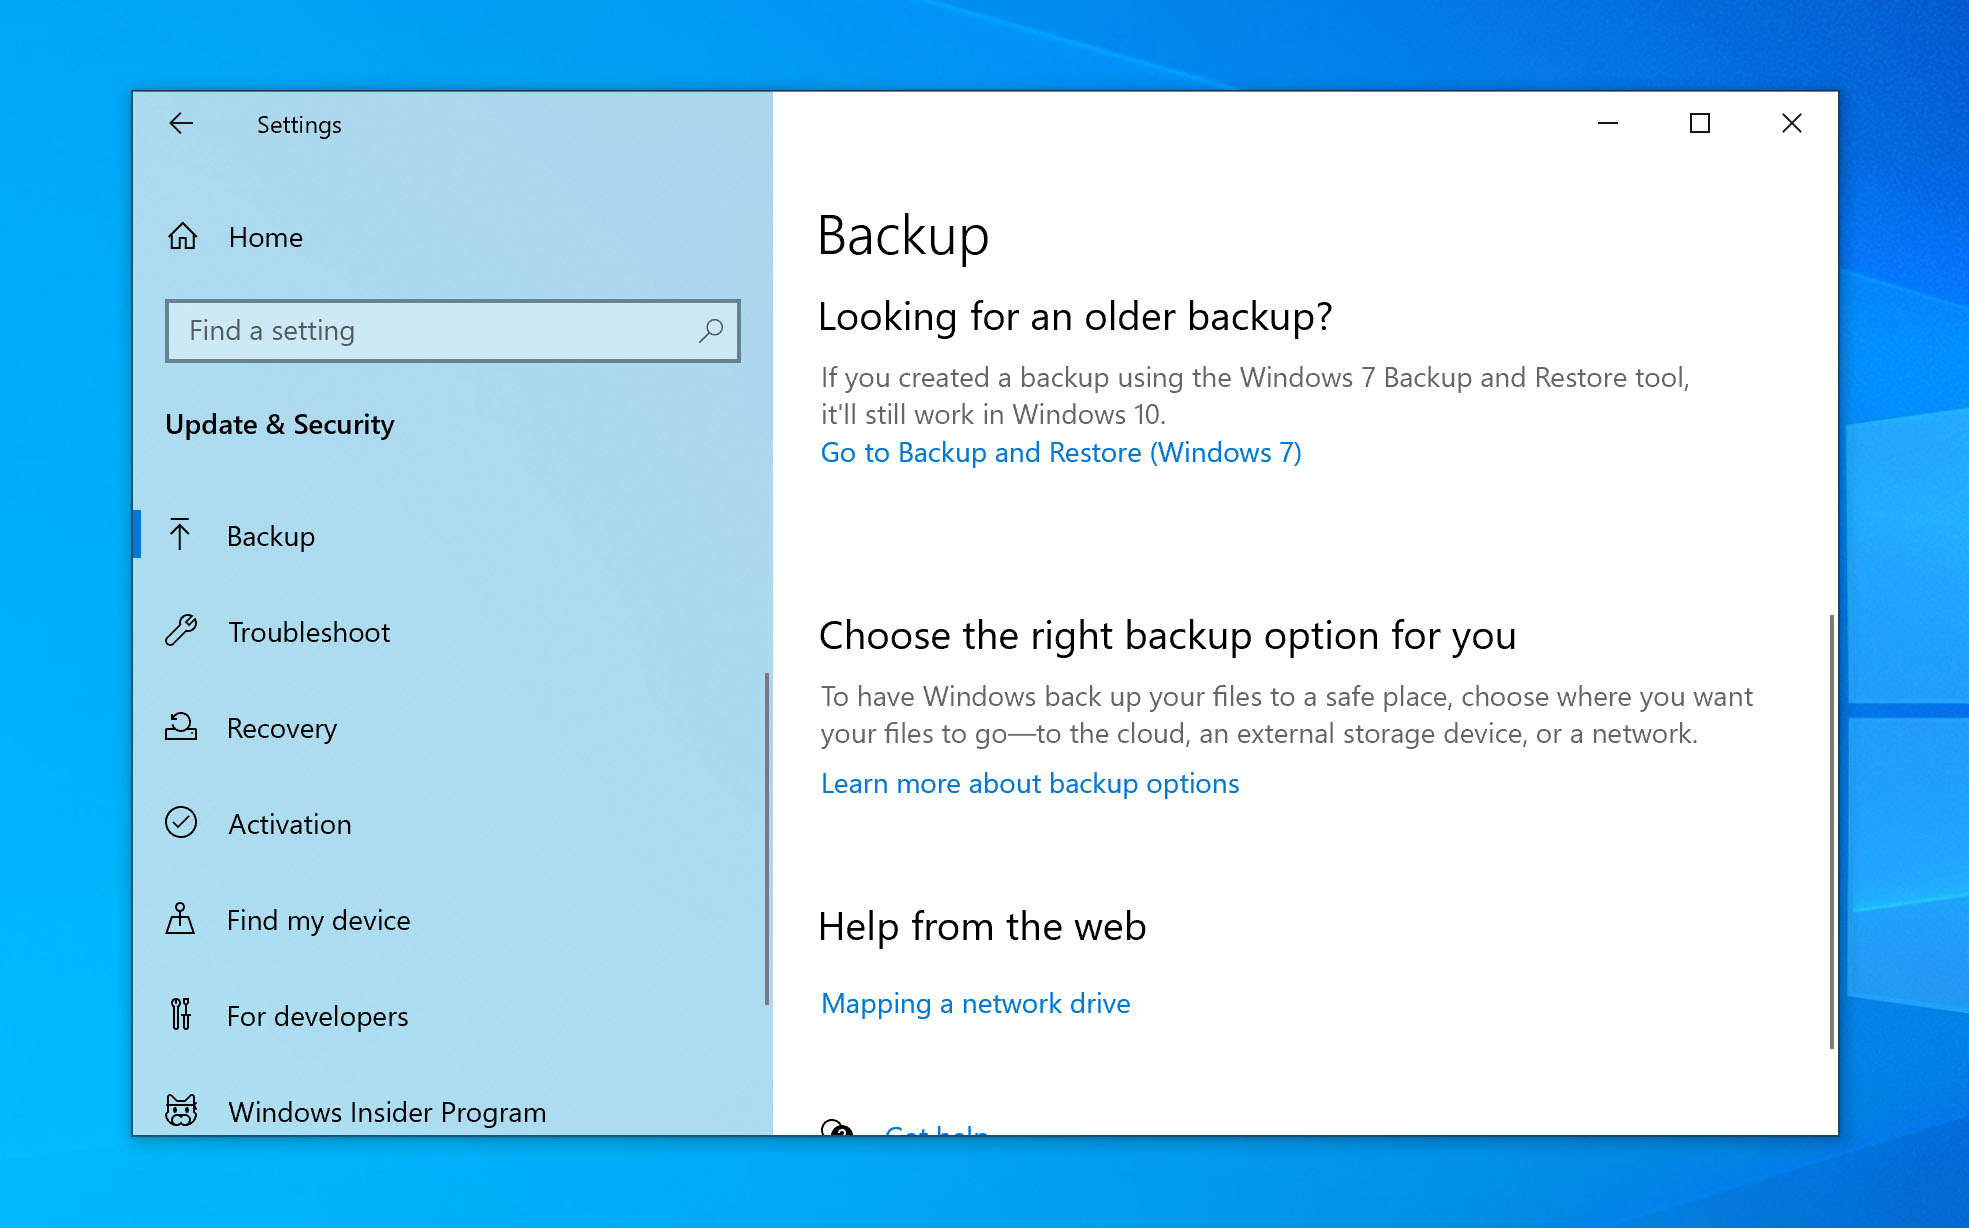
For Windows 10 Users:
- Open Settings.
- Choose Update & Security.
- Select the Backup.
- Click the Go to Backup and Restore (Windows 7) options.
- Select a backup to restore from and follow the instructions.
Read also: How to Recover Deleted Files on Windows 10
For Windows 11 Users:
- Connect the external storage device that contains your backup files.
- Type Control Panel in the search box on the taskbar.
- Select Control Panel from the list of results.
- Select Backup and Restore (Windows 7).
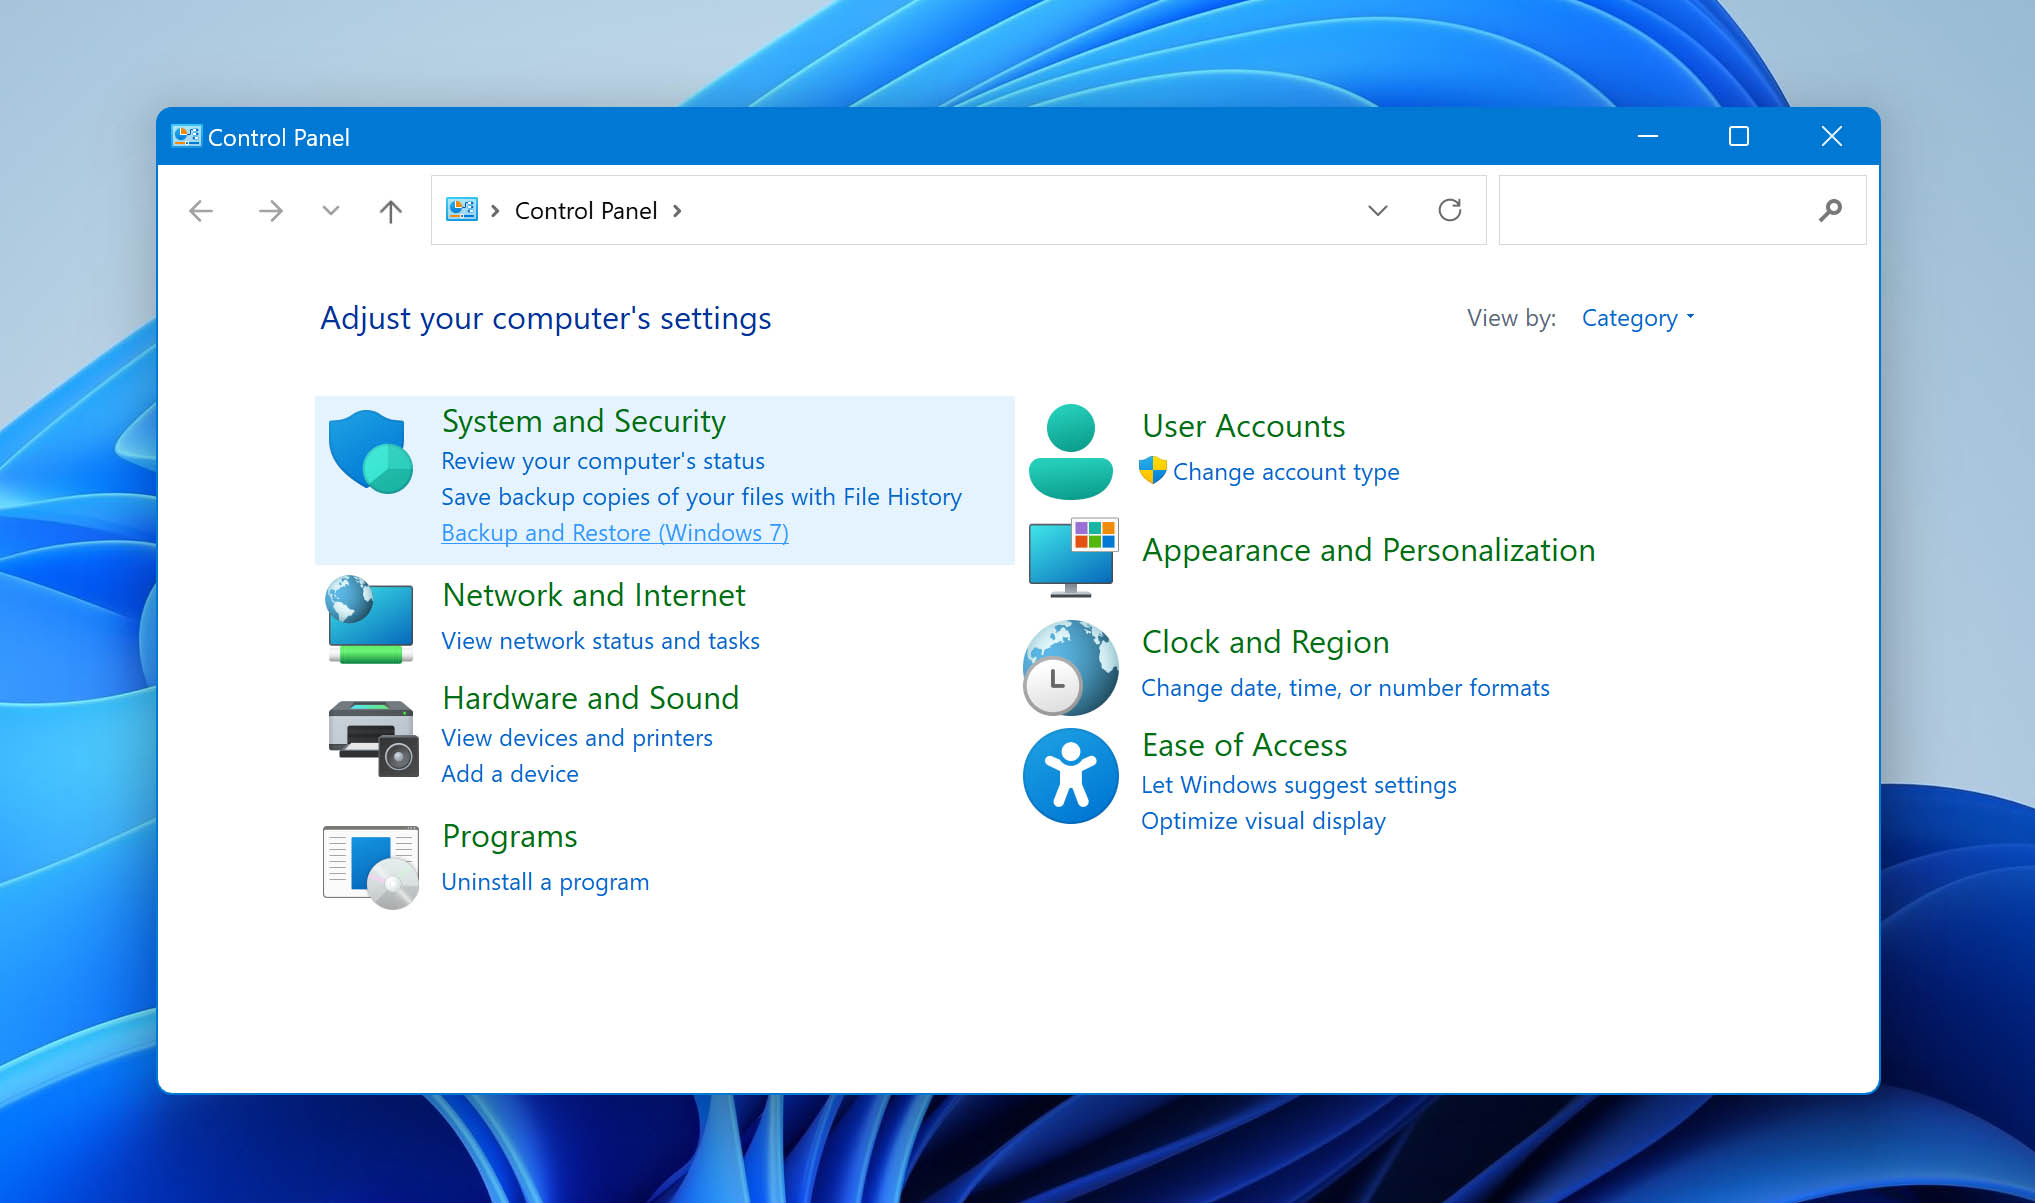
- Choose the backup you want to restore files from.
- Select the location of your external storage device.
- Follow the instructions provided to complete the restoration of your files.
Read also: How to Recover Deleted Files on Windows 11
Best Practices to Prevent Loss of Important Data
It’s always a good idea to take extra steps in order to prevent the loss of important data. Even though it’s usually possible to recover deleted files from the Recycle Bin or using a data recovery software tool like Disk Drill, why risk permanent data loss when you can easily prevent it by following the tips below?
💽 Back Up Your Data | There’s nothing more important when it comes to preventing the loss of important data than regular backups. If you don’t want to purchase a dedicated backup storage device (external hard drive is a great choice) or backup & recovery software tool, you can back up your data to the cloud using Dropbox, Google Drive, Microsoft OneDrive, or any other cloud storage solution with a free plan. |
⚠️ Maintain Your Computer | Hard drives and other storage devices are far more likely to fail if they’re constantly overheating or are exposed to excessive vibrations, high humidity, and dust. If you make sure that your computer is always properly maintained, you can avoid data loss caused by sudden and irreparable hardware failure. |
🔌 Use a UPS | An uninterruptible power supply, or UPS for short, is a backup power supply that provides emergency power during a temporary power outage. Most budget consumer-grade uninterruptible power supplies can keep your computer running for just a few minutes, but even that’s long enough for you to save your work and close all running applications to prevent file corruption. |
🚀 Avoid Overclocking | Overclocking is a great way how to gain extra performance without spending any money on new hardware components, but it can easily compromise the stability of your system. If you rely on your computer for work, we recommend you stay away from overclocking. |
🛡️ Don’t Disable Your Antivirus | Some people disable their antivirus software because they want their computer to perform better, while others don’t believe that antivirus software solutions are useful in the first place. The fact remains that there’s a lot of dangerous malware that can cause you to lose access to important data if you make a single mistake and allow it to enter your system. Unless you’re willing to take the risk, keep your antivirus enabled. |
✅ Buy Reliable Hardware Components | You wouldn’t cycle around the world on a $100 Walmart bike for the same reason you shouldn’t rely on cheap hardware components when it comes to doing important work. While all SSDs have a limited life span, there’s a huge difference between premium and budget brands. A typical TBW (terabytes written) figure for a 500 GB low-end SSD is around 150 TBW, but it jumps up to 300 TBW for high-end SSDs, such as those manufactured by Samsung or Crucial. |
✂ Check TRIM status | Most new SSDs enable the TRIM command by default, which means that deleted data get permanently wiped clean soon after their deletion. To prevent this from happening, you can manually disable the TRIM command at the expense of some performance. |
Frequently Asked Questions
Yes. Data deleted from the Recycle Bin is only marked as available to be occupied by incoming data. You can use data recovery apps to try to get your files back, as long as they haven’t been overwritten yet. Remember to scan the drive where your deleted files were as soon as you can and avoid using the drive to avoid further data loss.
They don’t go anywhere! Windows simply marks the storage space they occupy as free, allowing other files to be stored on it. Until the original files are overwritten, you can recover them with any capable data recovery software tool.
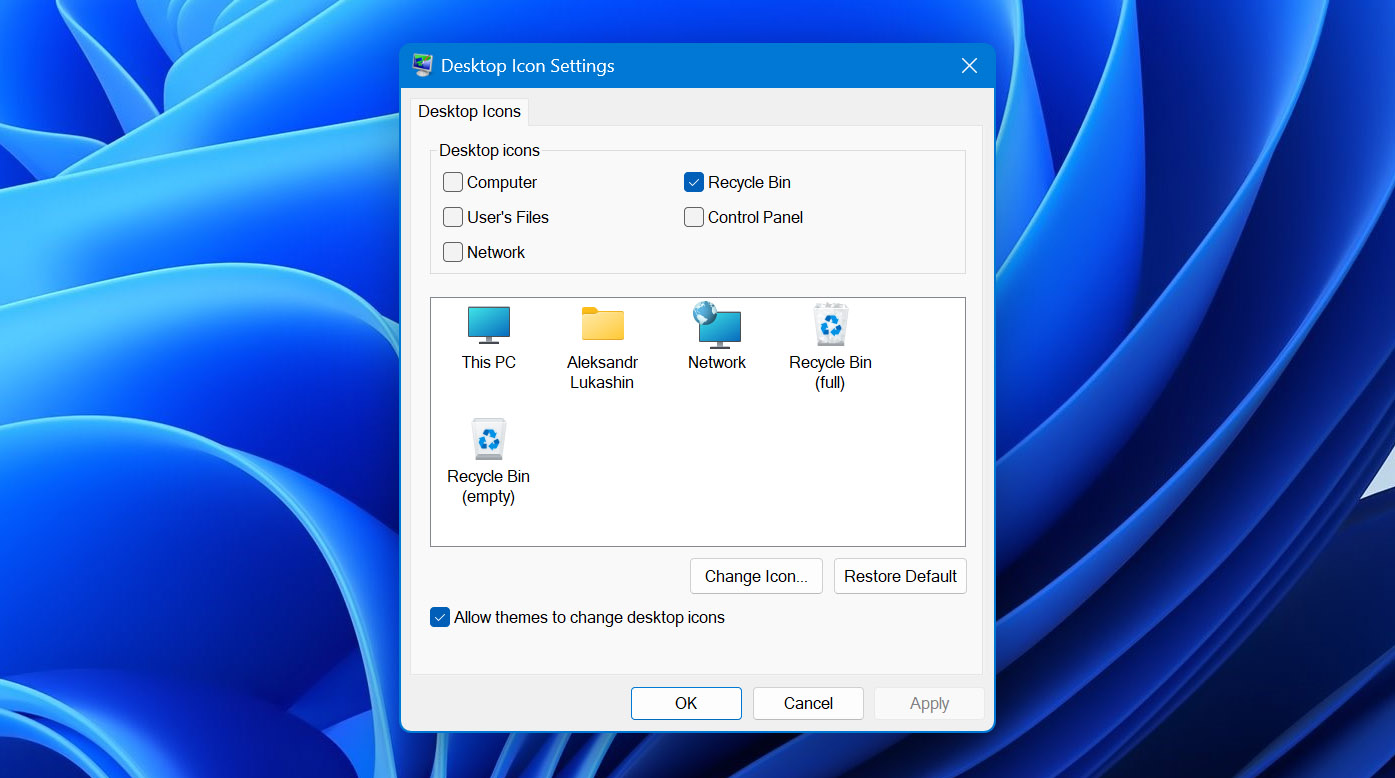
If you cannot locate the Recycle Bin icon, you can try these methods to make it visible again.
Method 1 – Verify the icon settings are set to display the Recycle Bin.
- Click the Start button and then Settings or select Personalize after right-clicking on the desktop.
- Choose Personalization > Themes > Desktop Icons settings.
- Check the box next to the Recycle Bin selection and click.
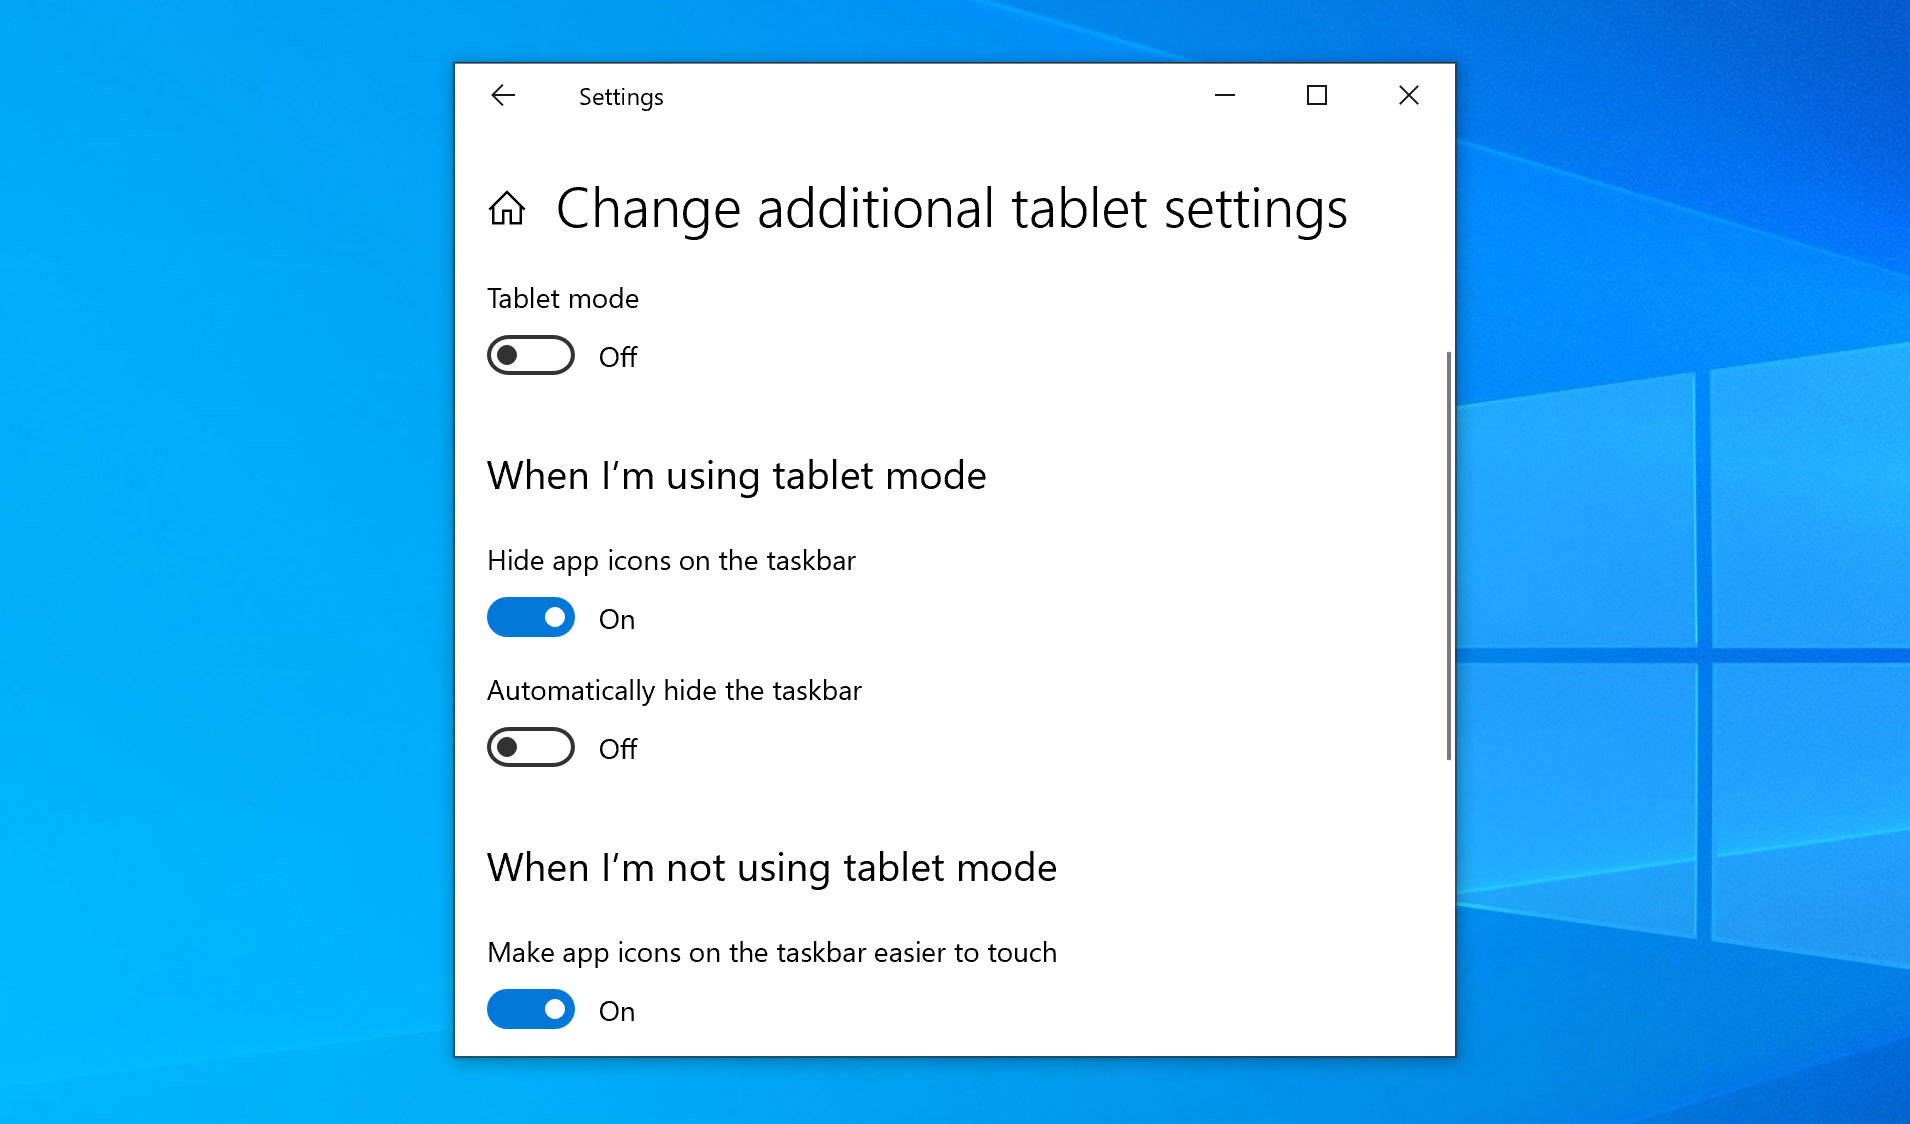
Method 2 – Turn off Windows 10 Tablet Mode.
- Open Start > Settings > System > Tablet > Change additional tablet settings.
- Toggle off the options that Hide app icons on the taskbar and Automatically hide the taskbar in tablet mode.
Method 3 – create a Recycle Bin shortcut
- Go to File Explorer and select the C: disk.
- Click on the View tab and then select Settings.
- Choose change folder and search settings.
- Make sure that the hide protected operating system files checkbox is not selected. Uncheck it if it is.
- Ensure that show hidden files, folders and drives is selected.
- Go back to File Explorer and delete the folder named $RECYCLE.BIN.
- A new Recycle Bin will appear and you should be presented with an icon on your desktop.
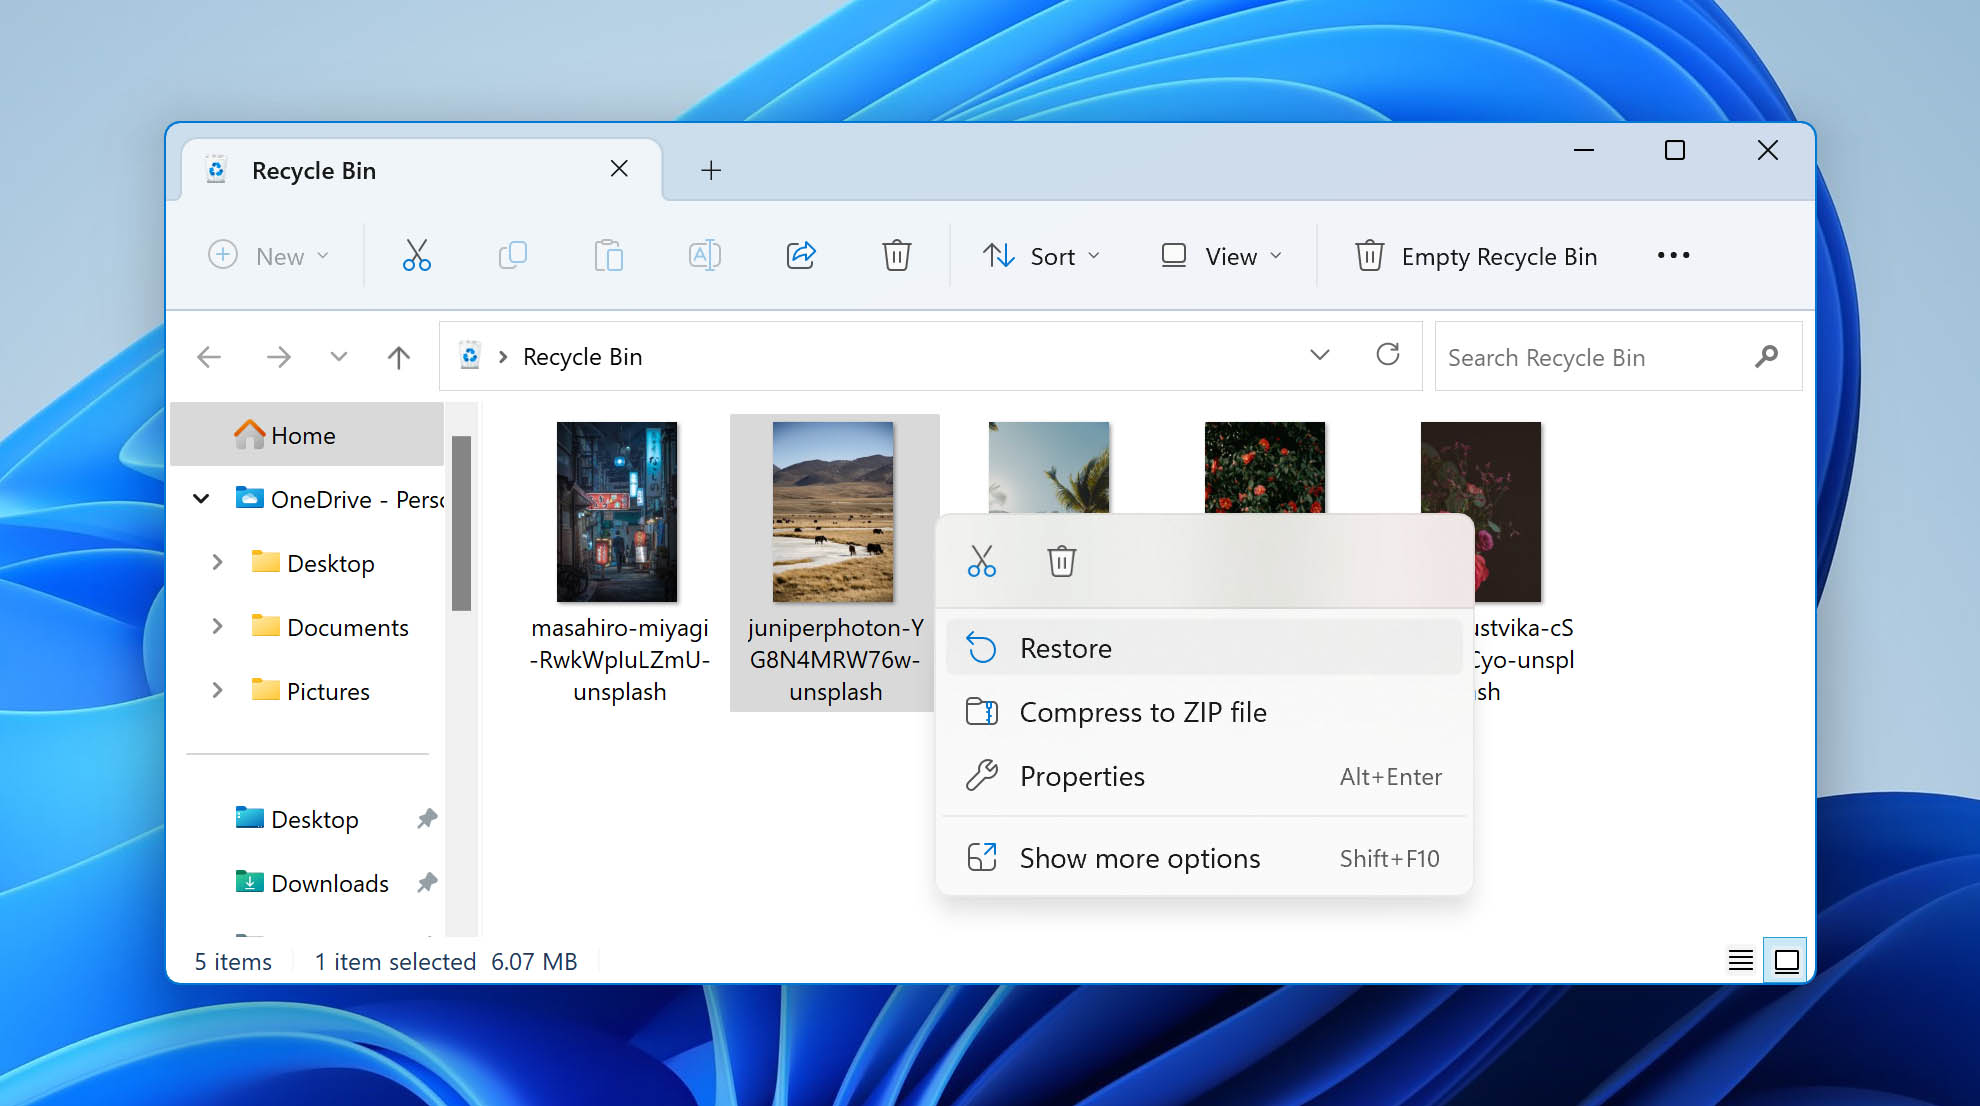
To use the Windows 10 Recycle Bin to recover files, use these steps:
- Open the Recycle Bin by double-clicking on its icon.
- Locate the items that you want to recover.
- Check the box next to the files or folders you want to retrieve.
- Right-click and select Restore to recover the items to their original locations.
You can also drag files out of the Recycle Bin to an alternative location. Read more on recovering deleted files on Windows 10 here.
The Trash is the macOS counterpart of the Windows Recycle Bin. Files that have been deleted from the Trash can typically be recovered only using third-party data recovery software applications, and this is how the process usually works:
- Download, install, and launch the data recovery software on a different disk or partition than the one that contains the Trash.
- Select the disk where the Trash is located (typically your Mac’s main drive).
- Initiate a scan of the disk for lost data.
- Preview the files that can be recovered (if the app you chose allows previewing) and make your selections.
- Select a new location on a different disk (other than the one with the Trash) to save the recovered data.
Try to recover permanently deleted files from the Recycle Bin with these methods:
- Check if the Recycle Bin is already emptied
- Use Previous Version from File History
- Use Windows Backup and Restore
- Check cloud storage like OneDrive
- Use data recovery software
When you empty the Recycle Bin in Windows 7, you permanently sever all logical links to your files. However, the actual data remains on your hard drive until it’s overwritten. You can restore access to it using data recovery software. Here’s how to recover files from an emptied Recycle Bin on Windows 7 using such software:
- Download and install the data recovery software of your choice for Windows 7.
- Launch the software and select the disk containing the Recycle Bin.
- Initiate a scan for deleted files.
- Select the files you want to recover (if your software allows individual file selection instead of recovering all files in bulk) and restore them.
The maximum size of the Recycle Bin is automatically configured based on the size of your storage device. When you attempt to delete a file that exceeds the maximum size of the Recycle Bin, you will see the “This folder is too big to recycle” message and be presented with the option to permanently delete it. If you select “Yes”, you won’t be able to recover the file from the Recycle Bin. However, you can still recover all permanently deleted files that were too large for the Recycle Bin using a data recovery software tool like the one described in this article.
This article was written by Robert Agar, a Staff Writer at Handy Recovery. It was recently updated by Emma Collins. It was also verified for technical accuracy by Andrey Vasilyev, our editorial advisor.
Curious about our content creation process? Take a look at our Editor Guidelines.