Disk Structure is Corrupted and Unreadable – if you’re getting this error, it means that file system corruption has made your drive inaccessible. Not only is your drive now unusable, but you’ve also lost access to the data stored within it.
The right way to proceed is to: (1) secure your data, then (2) fix the drive – in that order.
We prepared a full beginner-friendly guide to walk you through this process from start to finish. Learn how to use the right tools to regain access to your drive and data even without much tech tech knowledge. Read on!
This error appeared in Windows 7 as Error 0x80070571: The disk structure is corrupted and unreadable. It continued to be a problem in Windows 10 and has persisted in Windows 11. It can occur on almost any storage device, including HDDs, SSDs, and more.
Common Reasons Behind the ‘Disk Structure Is Corrupted and Unreadable’ Error
The first step to fix the “Disk Structure is Corrupted and Unreadable” error is to diagnose its root cause. While the error universally means that a disk is inaccessible, there are varying reasons “why” it’s inaccessible.
Figuring out why and how your hard disk became corrupted and unreadable can help you determine your chances of successfully recovering your data, and ascertain whether or not it’s safe to proceed with repair and recovery yourself.
- Damaged MFT on NTFS – The MFT (Master File Table) contains the information needed for Windows to locate files and folders on an NTFS partition. Corruption of the MFT can cause the disk error. Fortunately, special tools (called data recovery software) can still access the underlying data clusters to restore files without relying on the MFT.
- Damaged boot sector – Windows relies on the information in the boot sector to boot the disk properly and interpret the file system. Corruption of the boot sector can prevent Windows from accessing the disk, resulting in the error. If corruption is limited to the boot sector, chances of data recovery are usually high.
- Damaged file system – The file system stores and communicates loads of information about the disk, partitions, and drive contents. If it gets corrupted, the drive becomes unreadable. However, the data itself often remains intact and recoverable.
- Physical damage – Physical damage to a drive manifests in many different ways, including disk errors. Further DIY repair and recovery attempts are discouraged. For the best chance of restoring your data, send your drive to a professional data recovery center instead.
How to Recover Data from a Drive Giving the ‘Disk Structure Is Corrupted and Unreadable’ Error
Before attempting to repair your drive, we strongly recommend recovering your data first. Most fixes naturally lead to data loss due to overwriting, even if they allow you to regain access to the disk. Fortunately, a tool called data recovery software can access and restore data from your drive even if you can’t open it in File Explorer.
For data recovery software to work, the disk has to show up in Disk Management and shouldn’t appear as “No Media.”
There are literally dozens of data recovery apps you can choose from online. But for this article, we’ll be demonstrating the use of two recovery tools that we chose due to their backup feature – one of which topped our recently published list of the best data recovery apps.
The ability to create and scan image backups is incredibly useful for restoring corrupted and unreadable drives. We’ll demonstrate this feature with both tools in the following section. However, we only recommend creating an image backup if you’ve noticed signs of physical wear or damage on your drive (e.g. clicking, grinding, beeping, and other unusual sounds). In case it was corrupted due to software errors or a power surge, creating a backup isn’t mandatory.
Option A: Disk Drill
The first recovery software we’re featuring is a tool called Disk Drill. Aside from Byte-to-byte backup (Disk Drill’s image backup feature), we chose this app because it’s easy to pick up for beginners, it supports the most common file systems (NTFS, ExFAT, FAT32), and it has one of the biggest signature databases among its competitors.
In other words, Disk Drill can recognize and recover a lot of different file types from a huge variety of devices.
In the guide below, we’ll demonstrate how to use Disk Drill to create an image backup of your drive, scan the backup, and restore your data. Remember that you can skip backup creation if your drive was corrupted due to logical errors (software issues, improper ejection, etc.)
Disk Drill Basic for Windows only offers 500 MB of free data recovery. However, you can scan and preview your data as much as you want for no charge. It’s totally secure and offers a bunch of data protection tools for free (including byte-to-byte backup), which we explore further in our Disk Drill review.
- Download and install Disk Drill. Then, open the app.
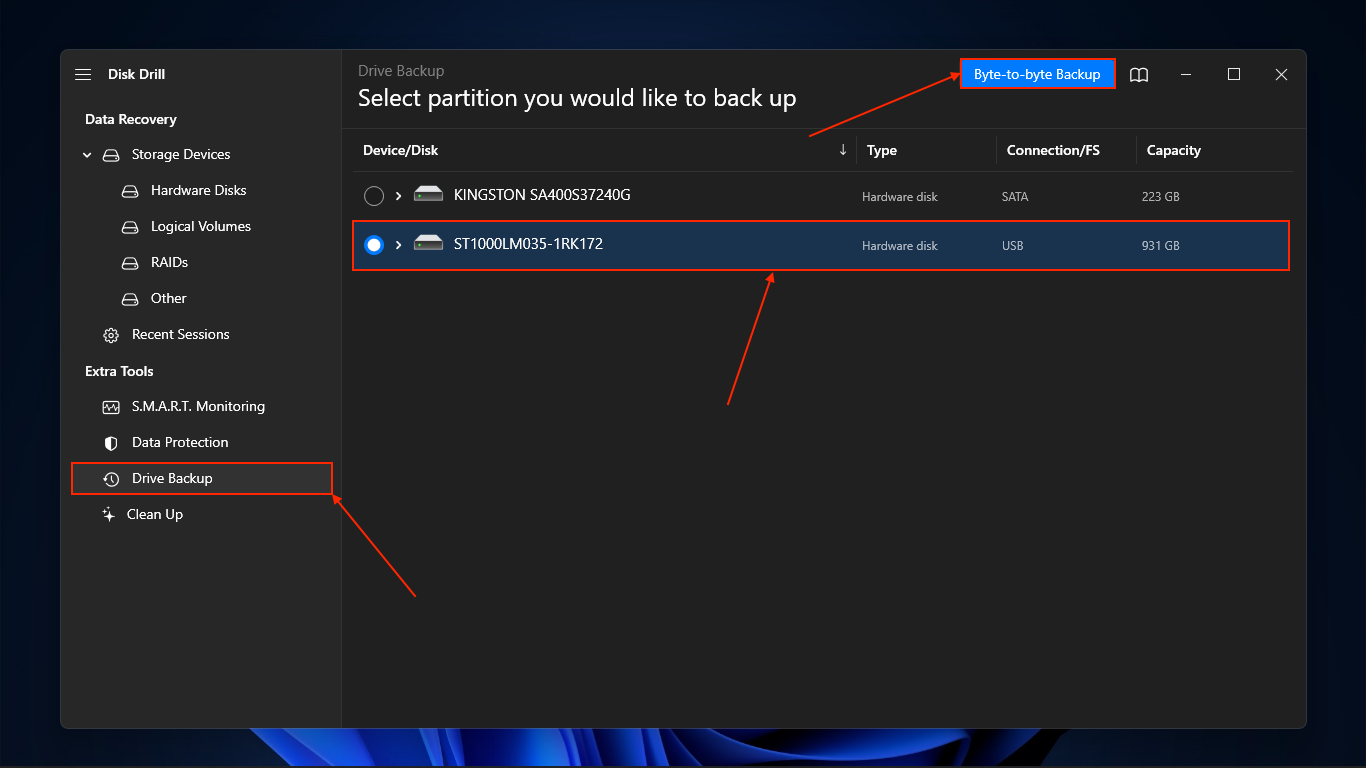
- If you won’t create a backup, skip to Step 7. If you’ve decided to protect your data and make a backup of your disk, click Drive Backup in the left sidebar. Then, select your drive and click Byte-to-byte Backup.
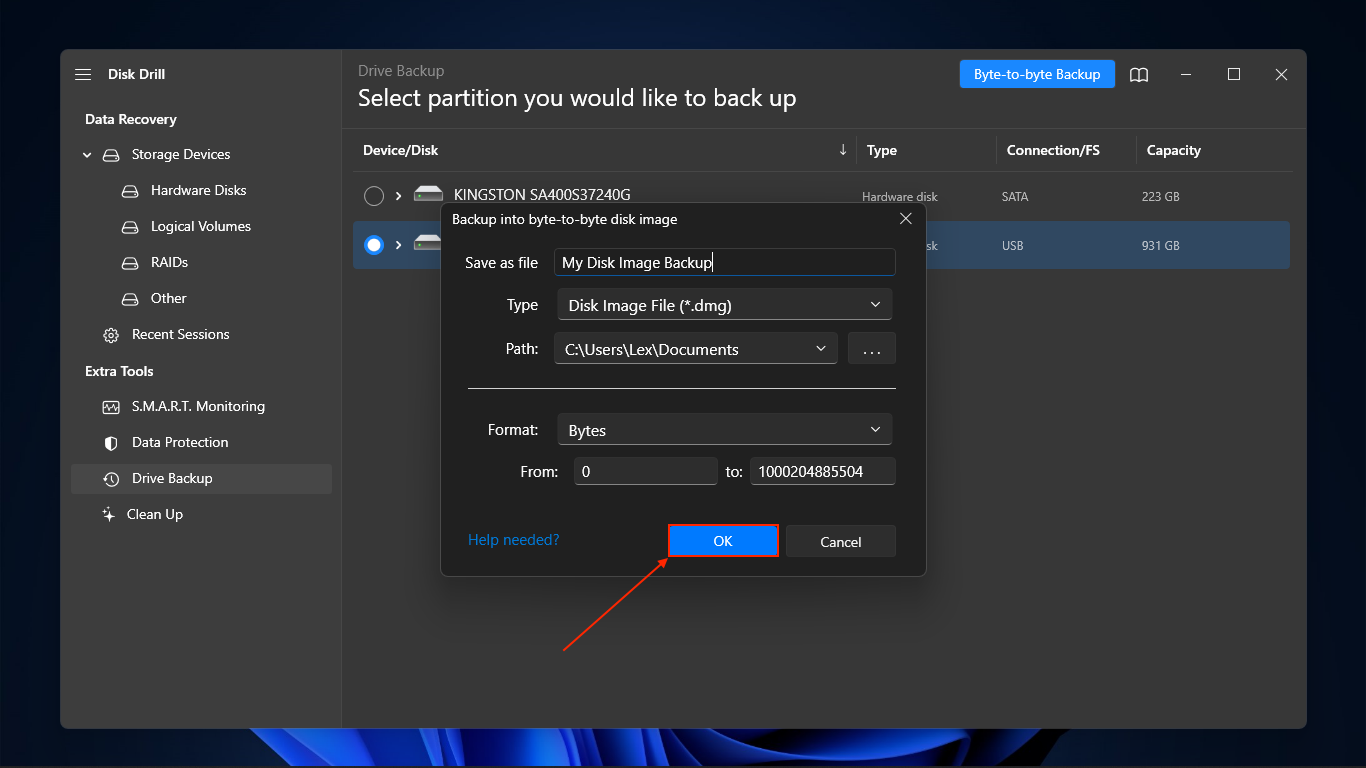
- Select a file name and save location for the image backup you want to create. Then, click OK.
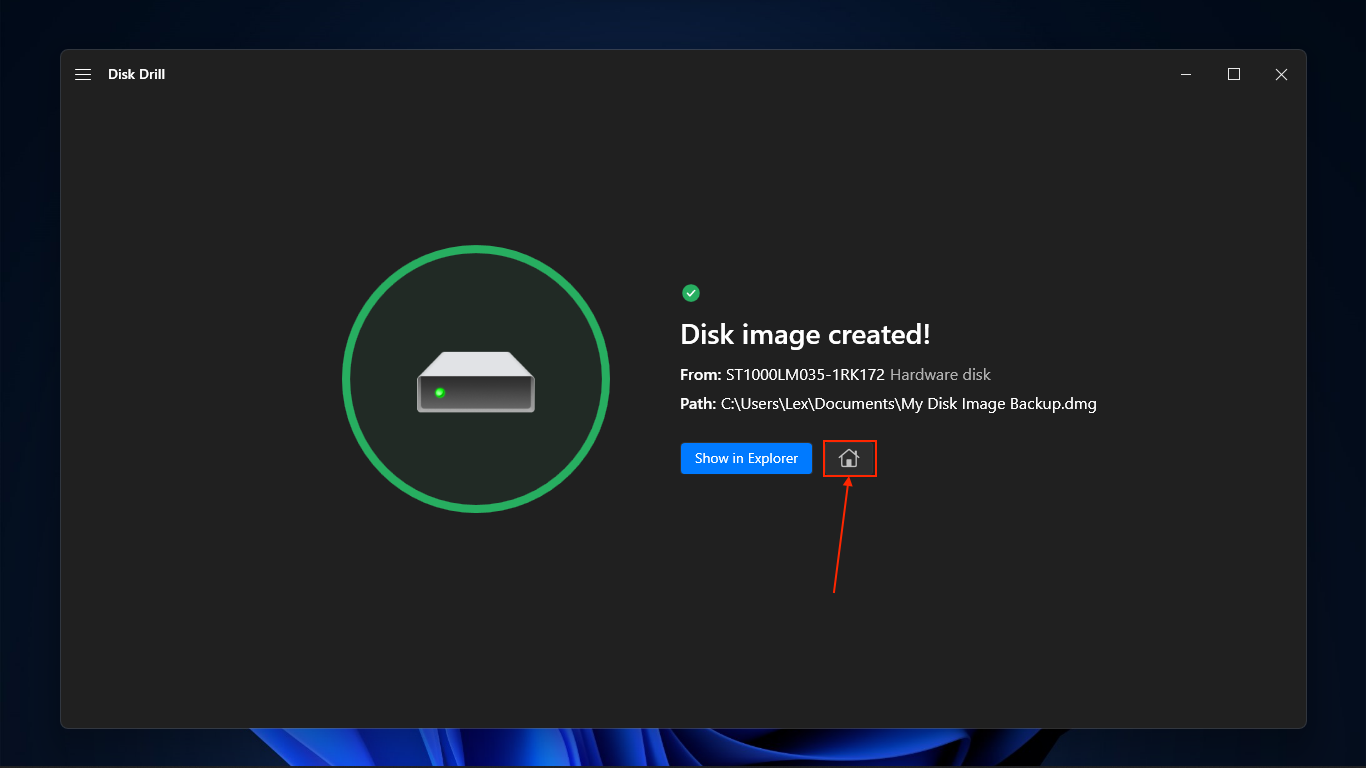
- Once the backup has been created, return to Disk Drill’s main menu by clicking the home button. At this point, you can safely eject and set aside your drive.
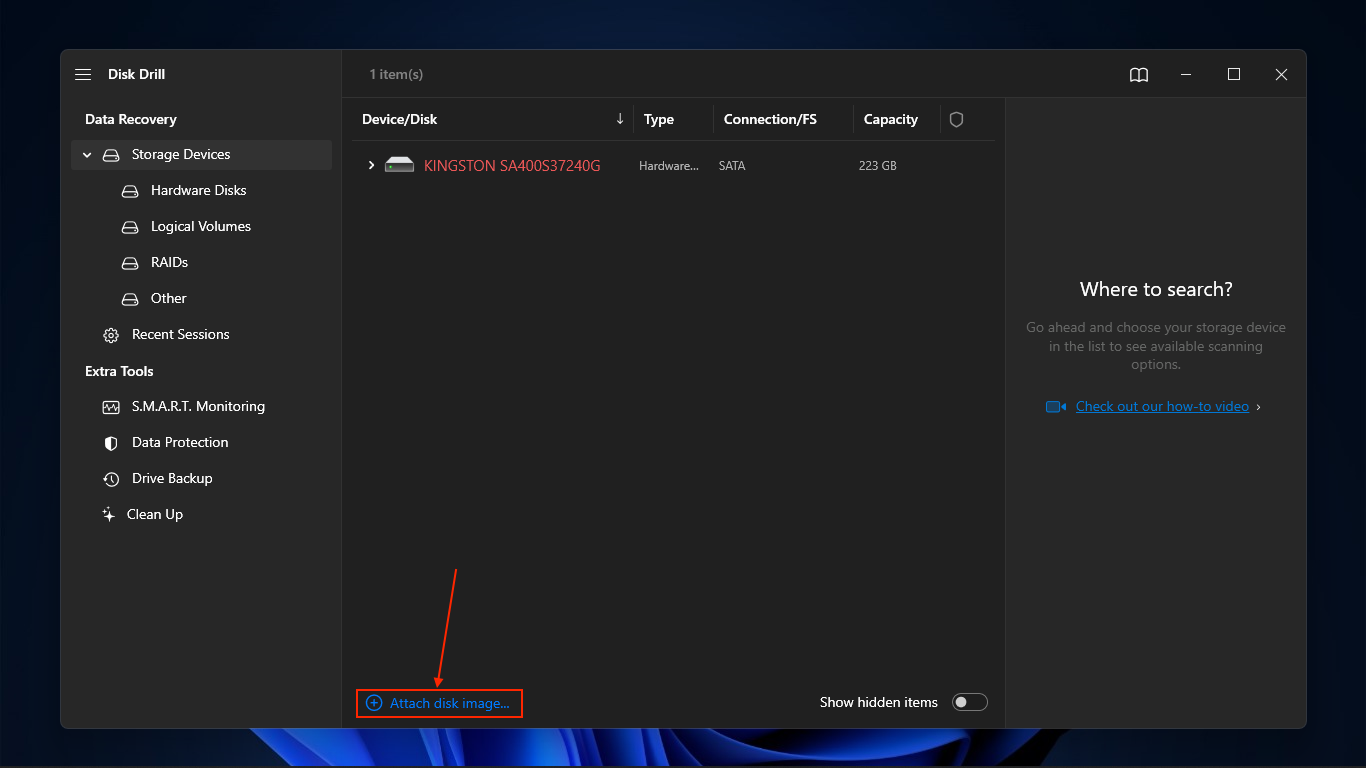
- In the Storage Devices menu, click Attach disk image… at the bottom of the screen.
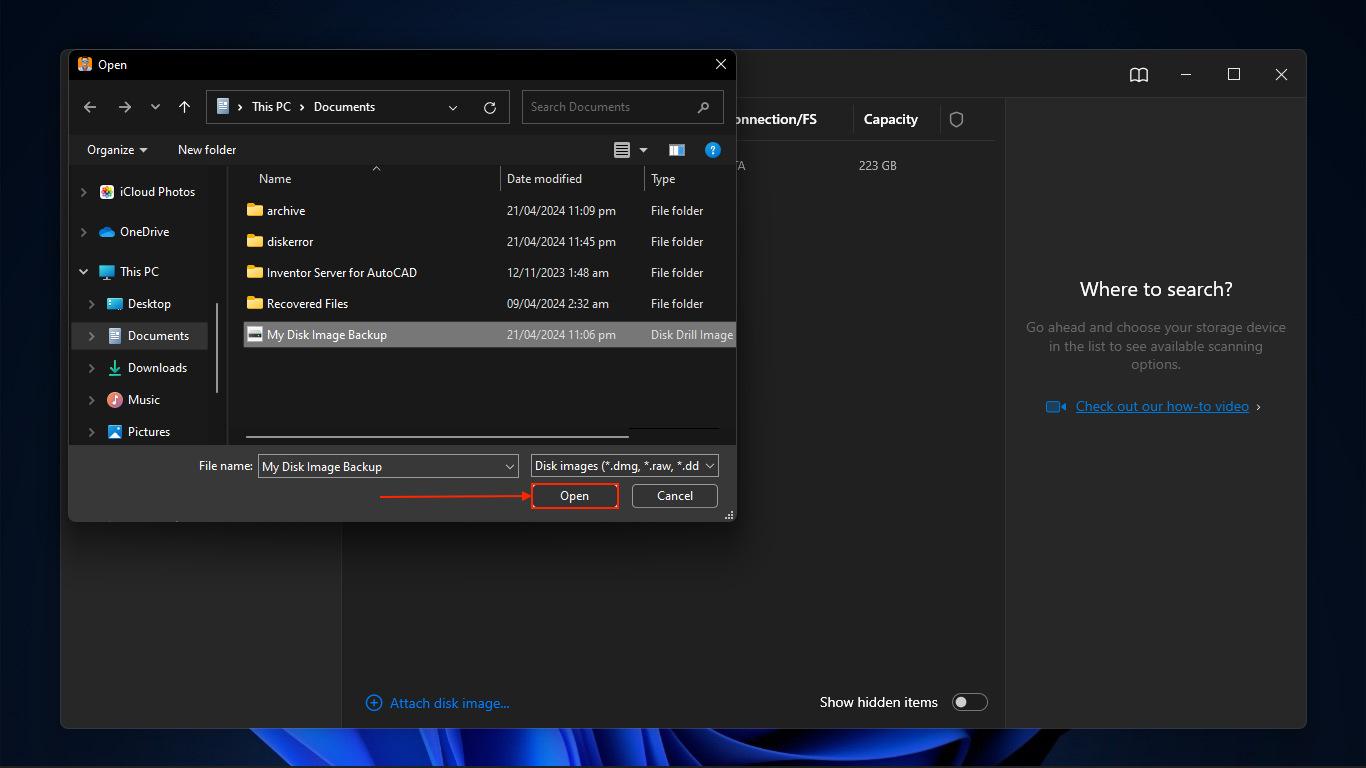
- Open the backup you created in steps 2-3.
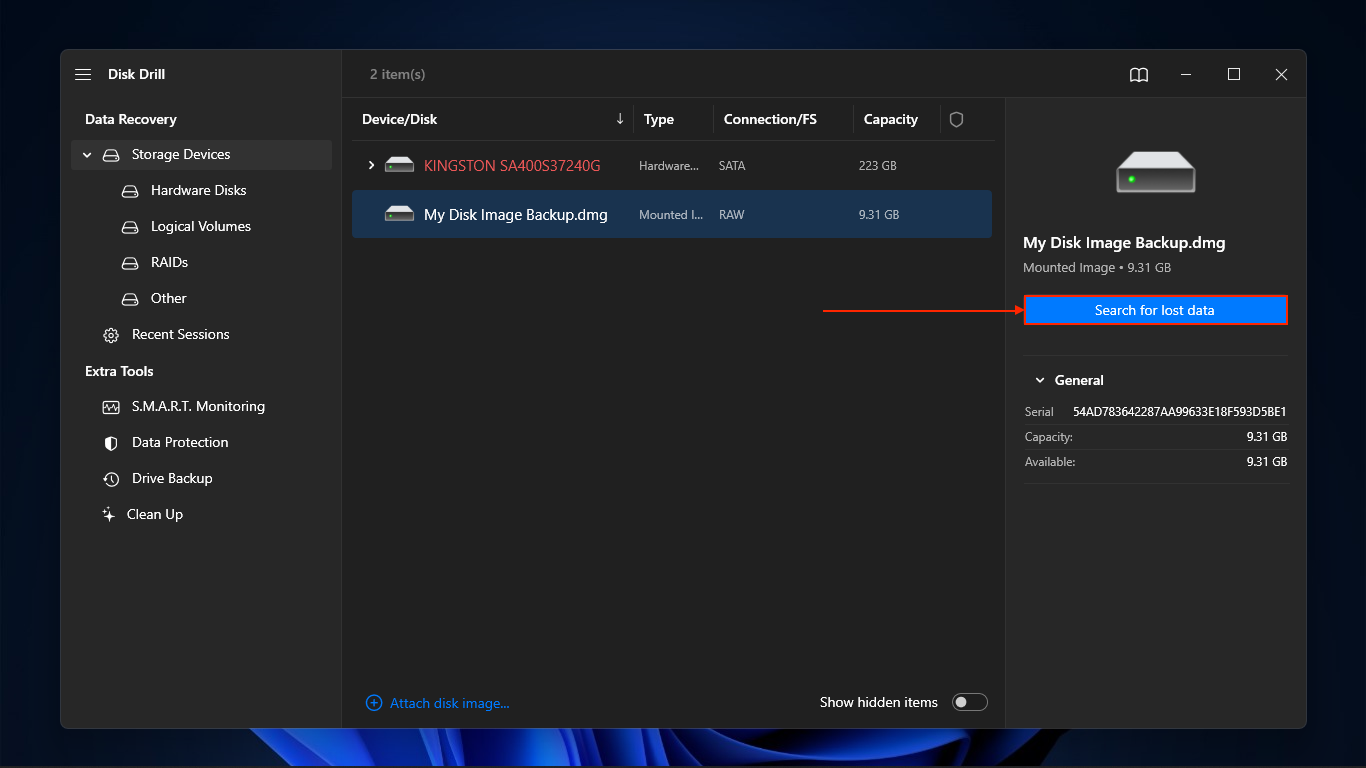
- From the list of drives, select the backup you just attached and click Search for lost data. If you didn’t create a backup, select your drive instead.
- Once Disk Drill is done scanning the backup, click Review found items.
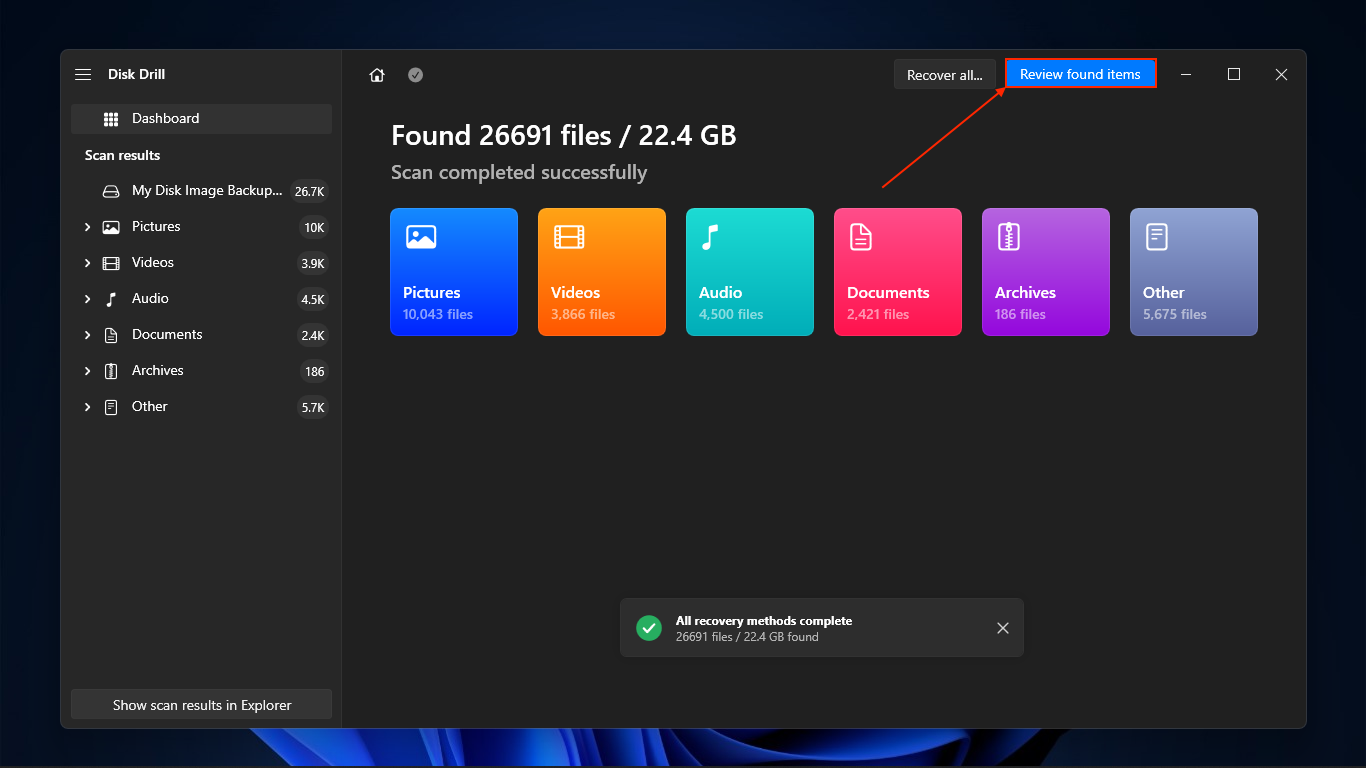
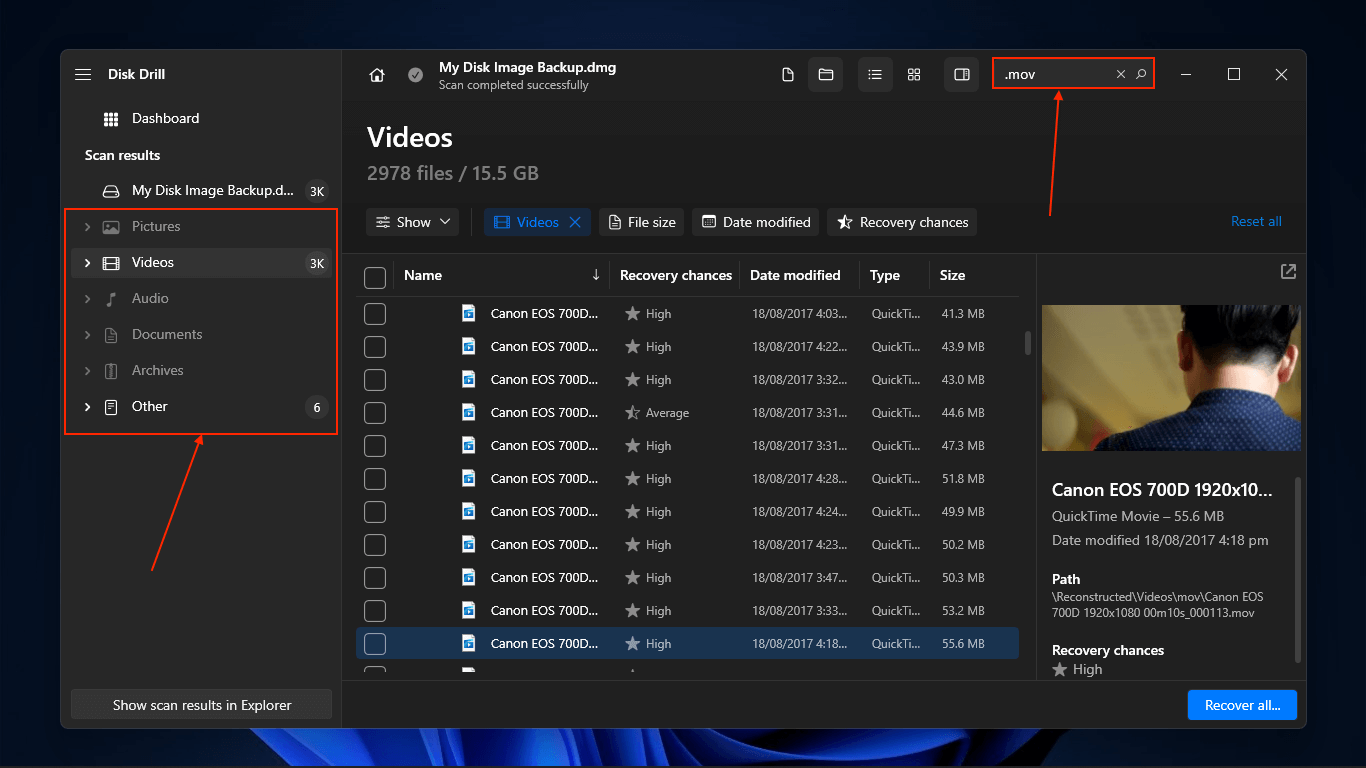
- If the error did not result in direct data loss (e.g. file deletion), you should find your files in the Existing tab. Otherwise, feel free to browse the Deleted or lost and Reconstructed tabs. Use the search bar and the filters in the sidebar to quickly find specific files. Clicking a file will automatically display its preview in the right pane.
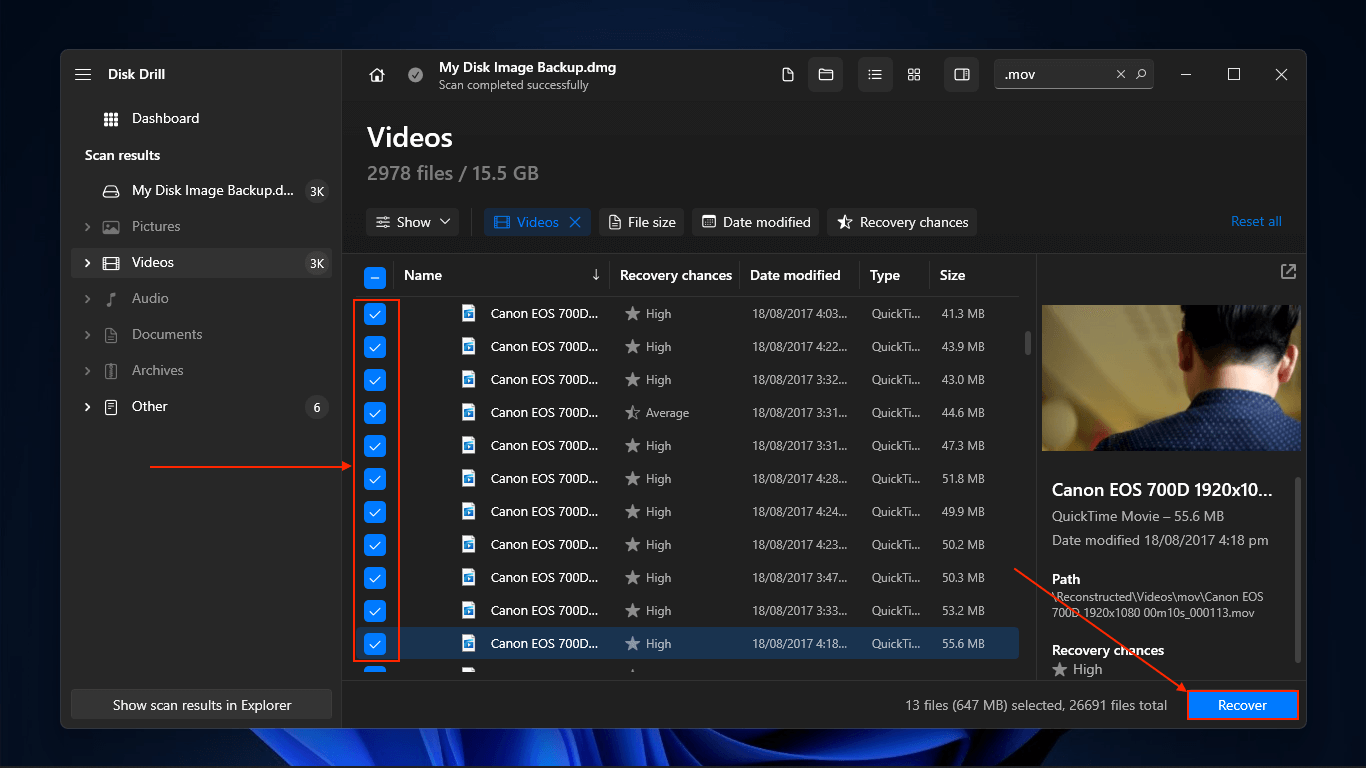
- Select the files and folders you want to restore by marking the checkboxes beside them. Then, click Recover.
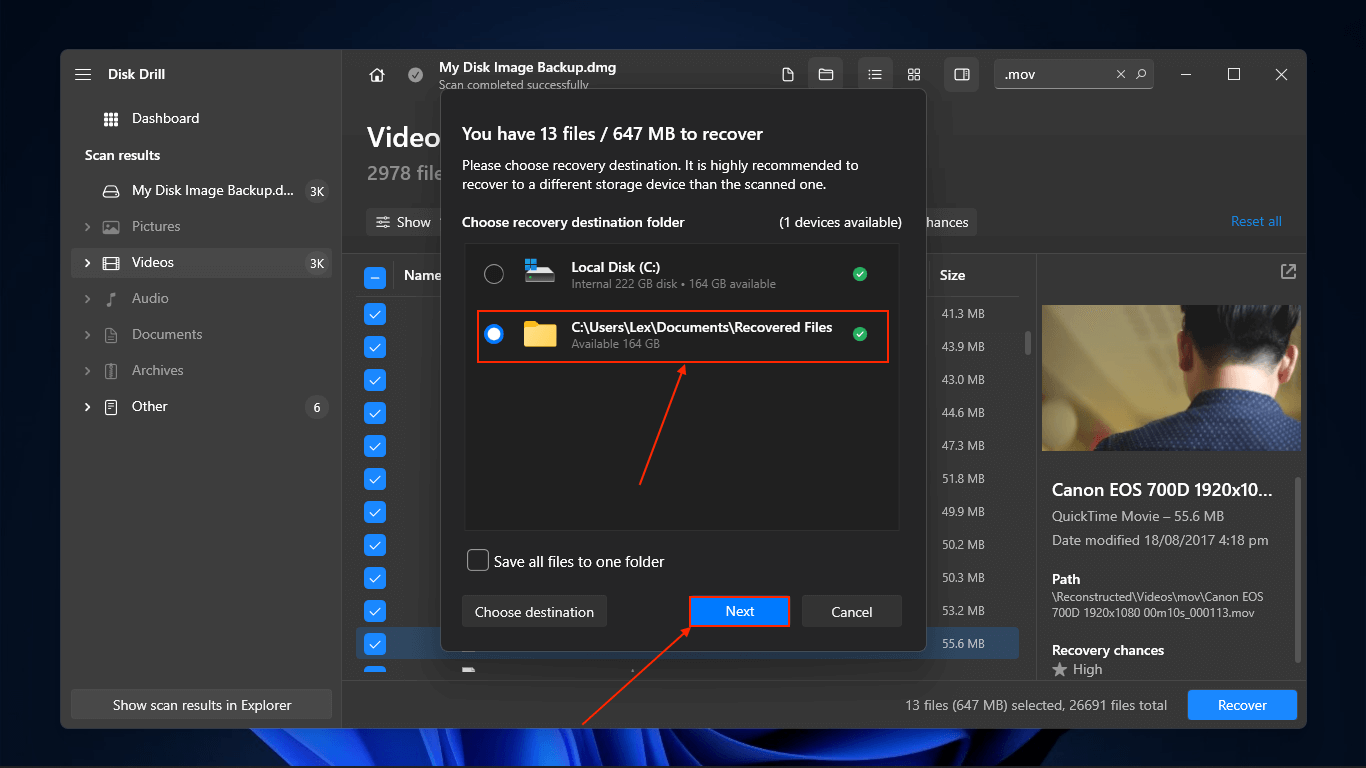
- Choose a location on your PC where Disk Drill will save the recovered files. Then, click Next to proceed with recovery.
Option B: UFS Explorer
UFS Explorer is a well-respected data recovery tool that has been used by technicians for a long time. We chose it for this article because of its consistent performance and useful features for restoring faulty drives (e.g. can address bad sectors).
More importantly, its robust disk imaging tool is exactly what we need for this task. In fact, UFS Explorer has a massive armoire of advanced tools that increase its value the more you learn how to use it.
However, it’s much less user-friendly compared to Disk Drill (and compared to other modern data recovery software in general). But as long as you follow our guide closely, you should be fine.
To learn more about UFS Explorer before installing it on your PC, read our in-depth UFS Explorer review.
- Download and install UFS Explorer on your PC.
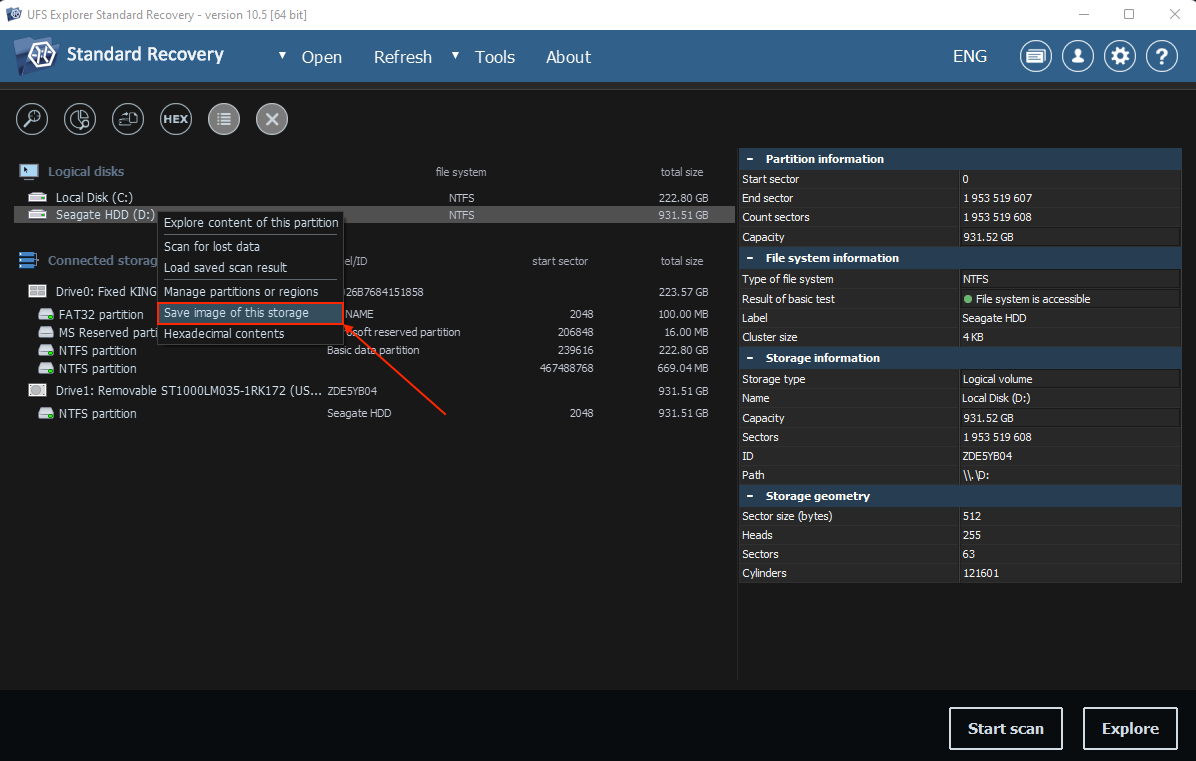
- Open UFS Explorer. If you will not use the image backup feature, skip to Step 6. If you want extra protection for your data and want to back up your disk, right-click your drive > Save image of this storage.
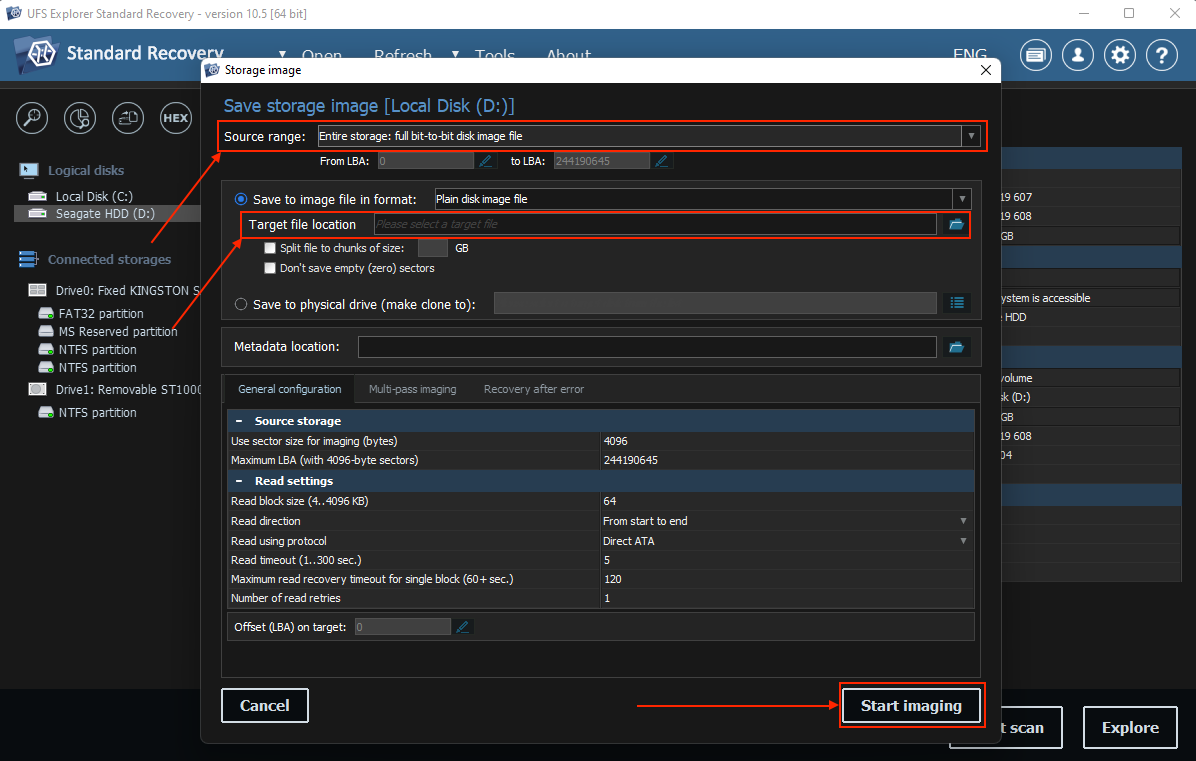
- For the Source range parameter, select Entire storage: full bit-to-bit disk image file. Then, choose a destination for the recovered files, which is indicated by the Target file location parameter. Leave the rest of the parameters to their default settings and click Start imaging.
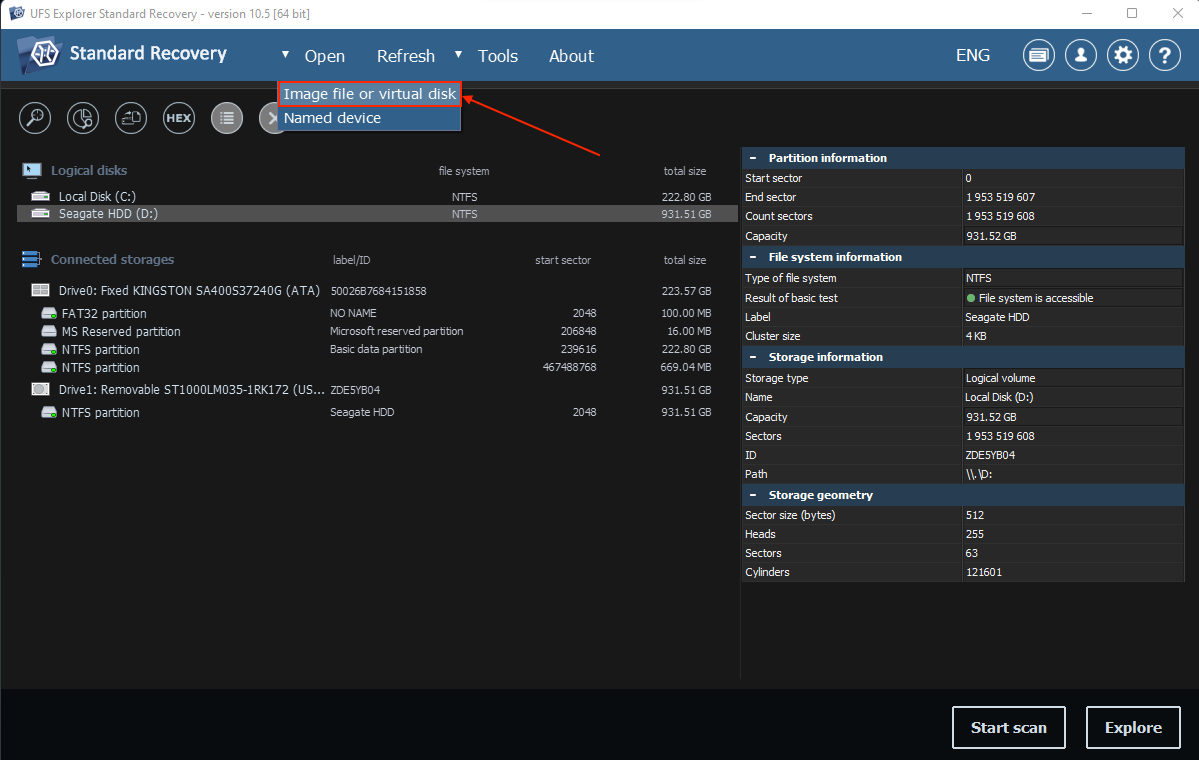
- Once the image has been created, return to UFS Explorer’s main menu. At the top of the window, click Open > Image file or virtual disk.
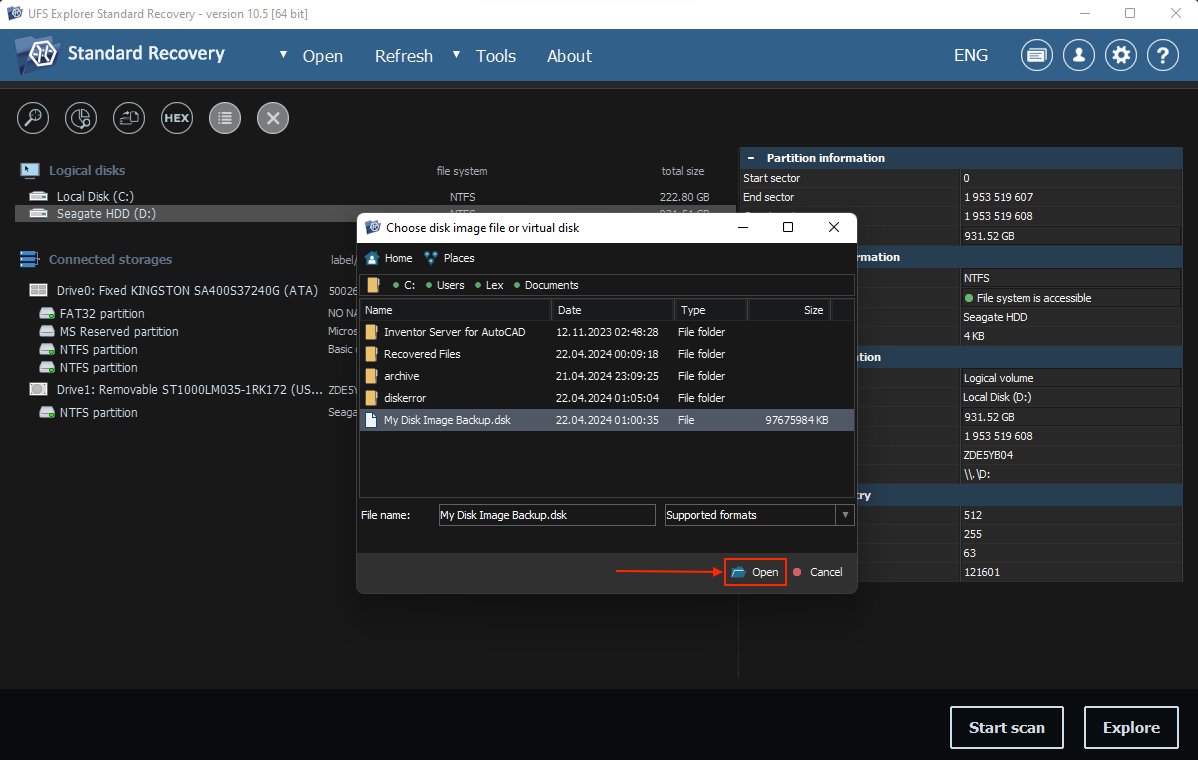
- Select the backup you saved in step 4 and click Open.
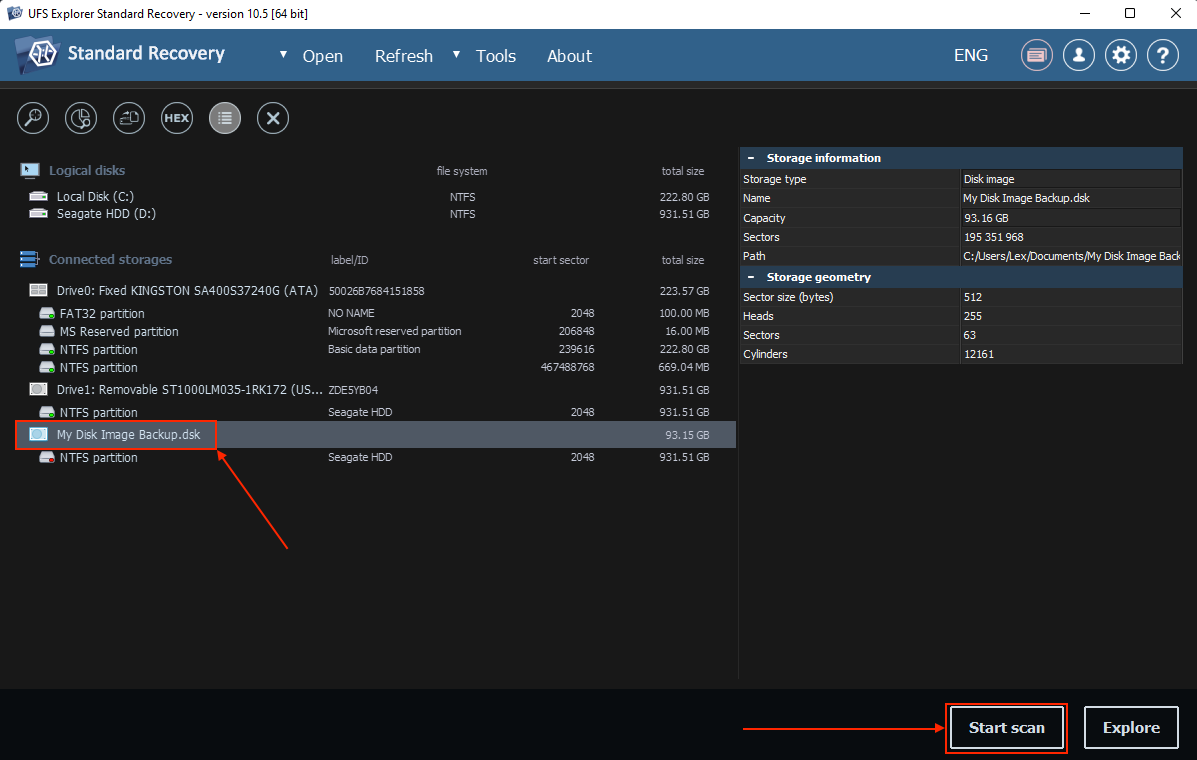
- Right-click the image file you attached in step 6 and click Start Scan. If you didn’t create an image backup, select your drive instead.
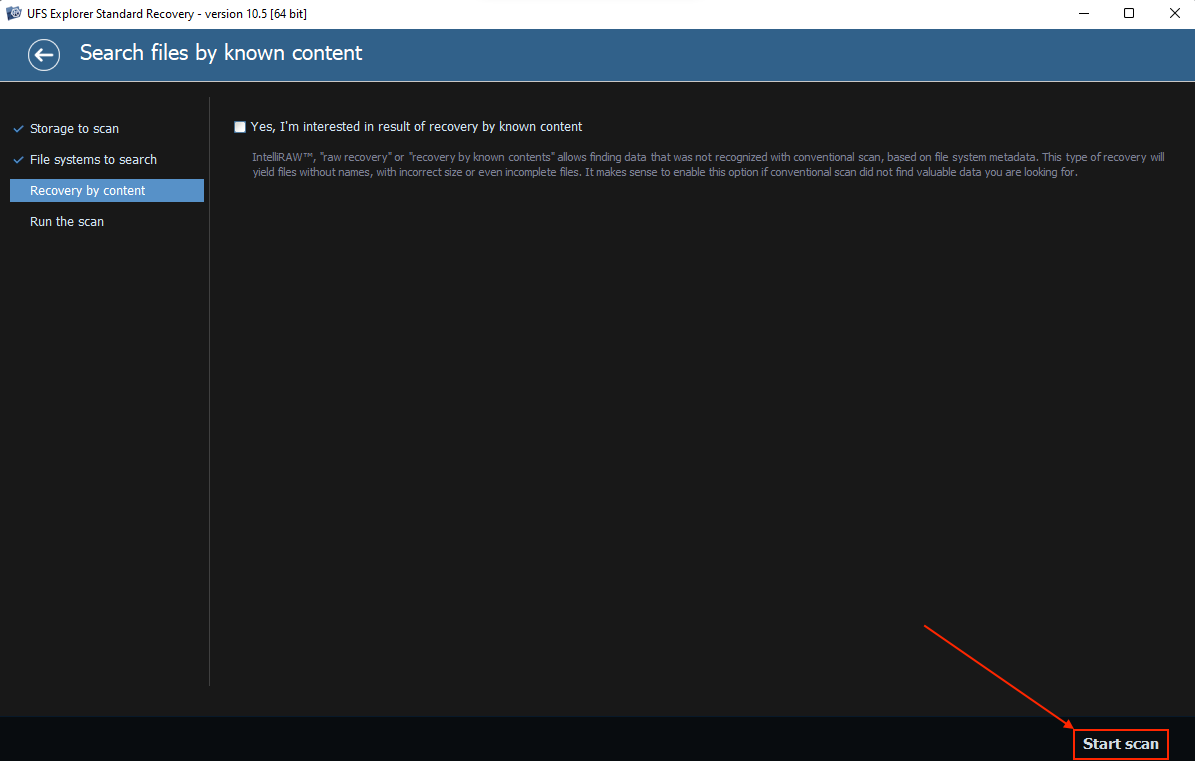
- UFS Explorer will prompt you to set scan parameters. You can leave all settings to their defaults and keep clicking Next until the Start scan button appears. Click it.
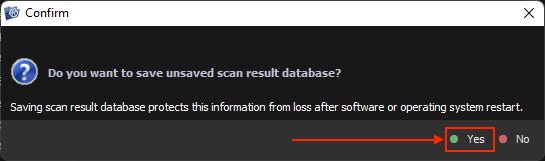
- Click Yes when prompted to save the current scan result database.
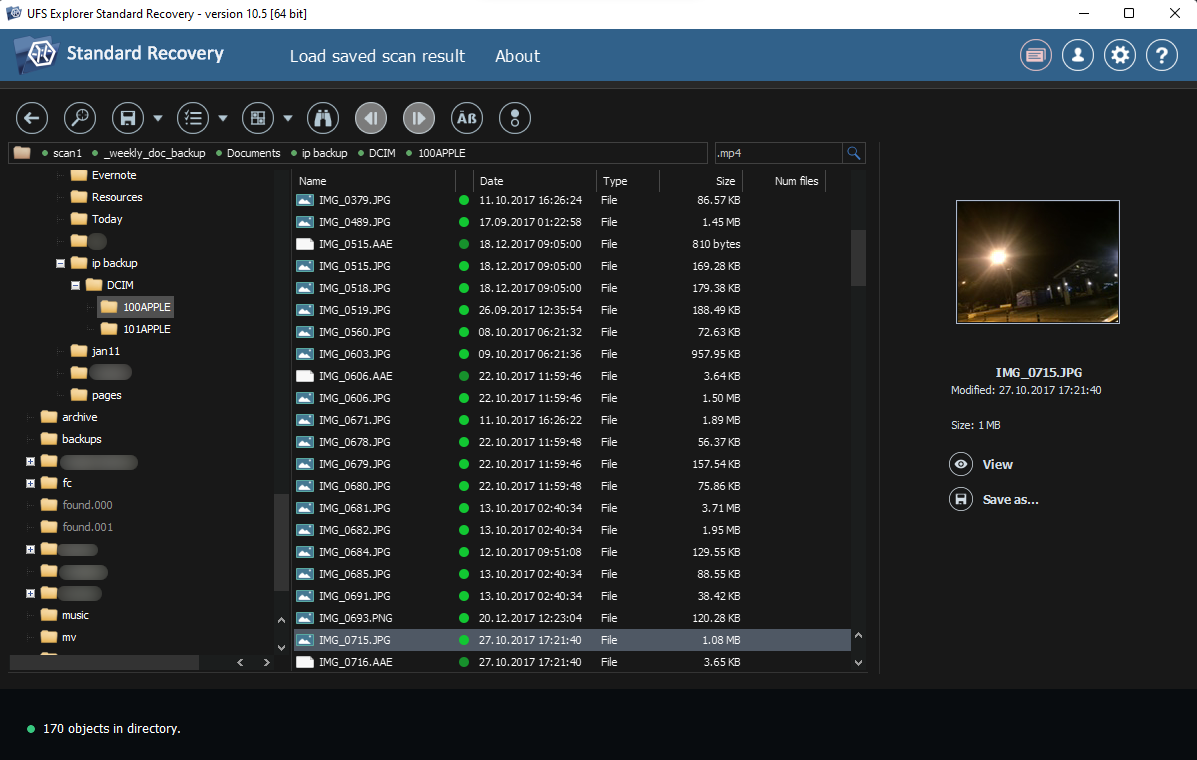
- You can navigate the folders of your found files using the tree menu in the left sidebar, and the search bar can help locate files by name. Unfortunately, there are no sorting tools or alternative views (e.g. by type). Clicking a file once will display its preview in the right sidebar.
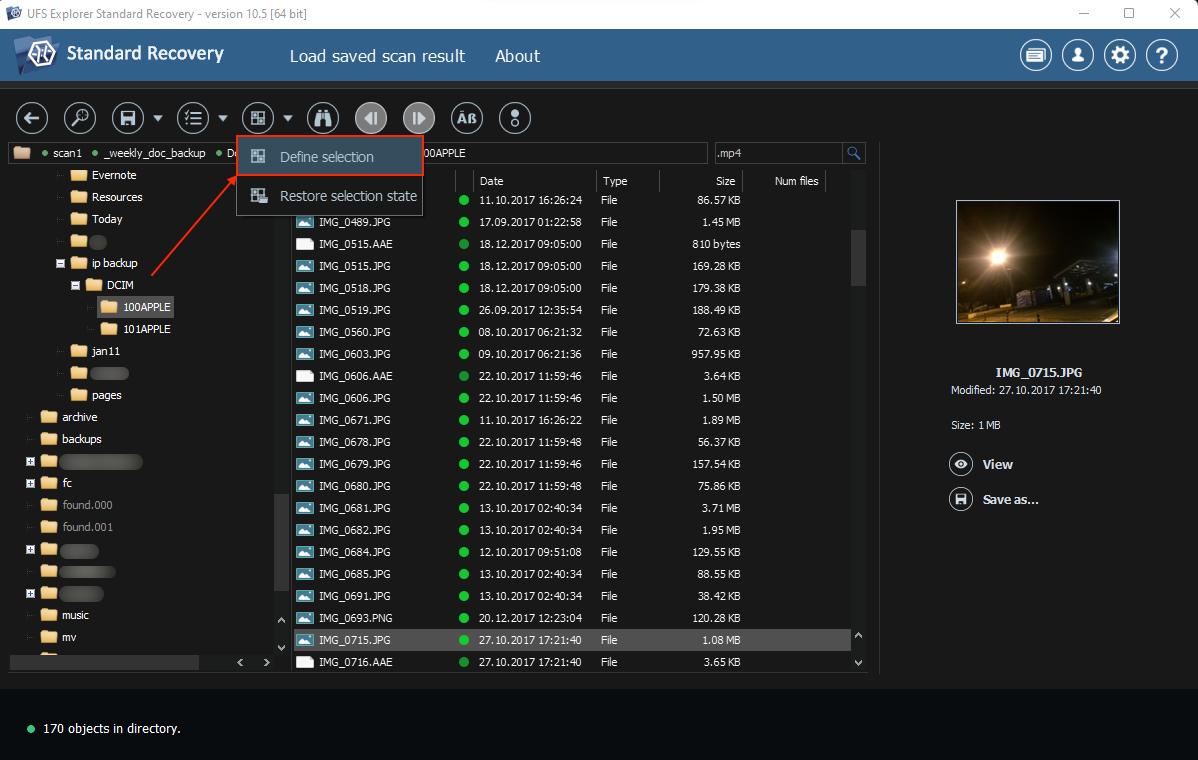
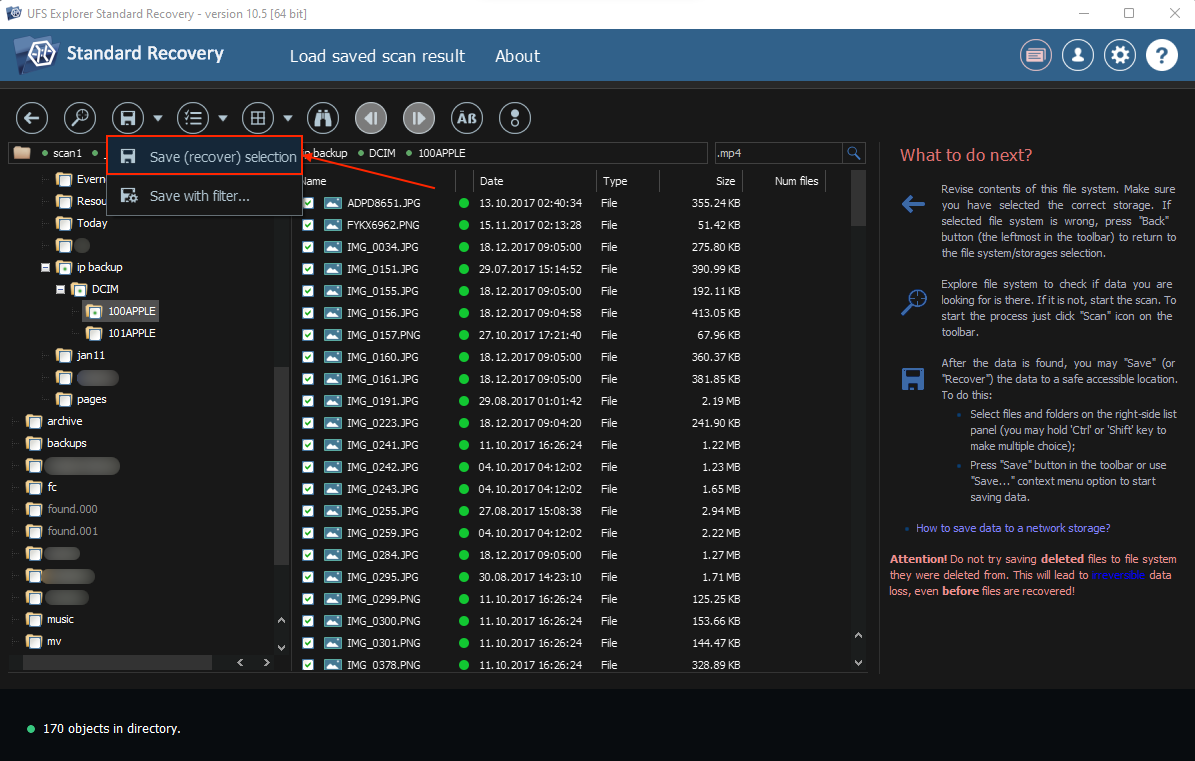
- To make your selection, click the Define selection button in the menu bar (to the left of the binoculars icon) and mark the boxes beside the files and folders you want to restore.
- Click the arrow beside the floppy disk icon and click Save (recover) selection button.
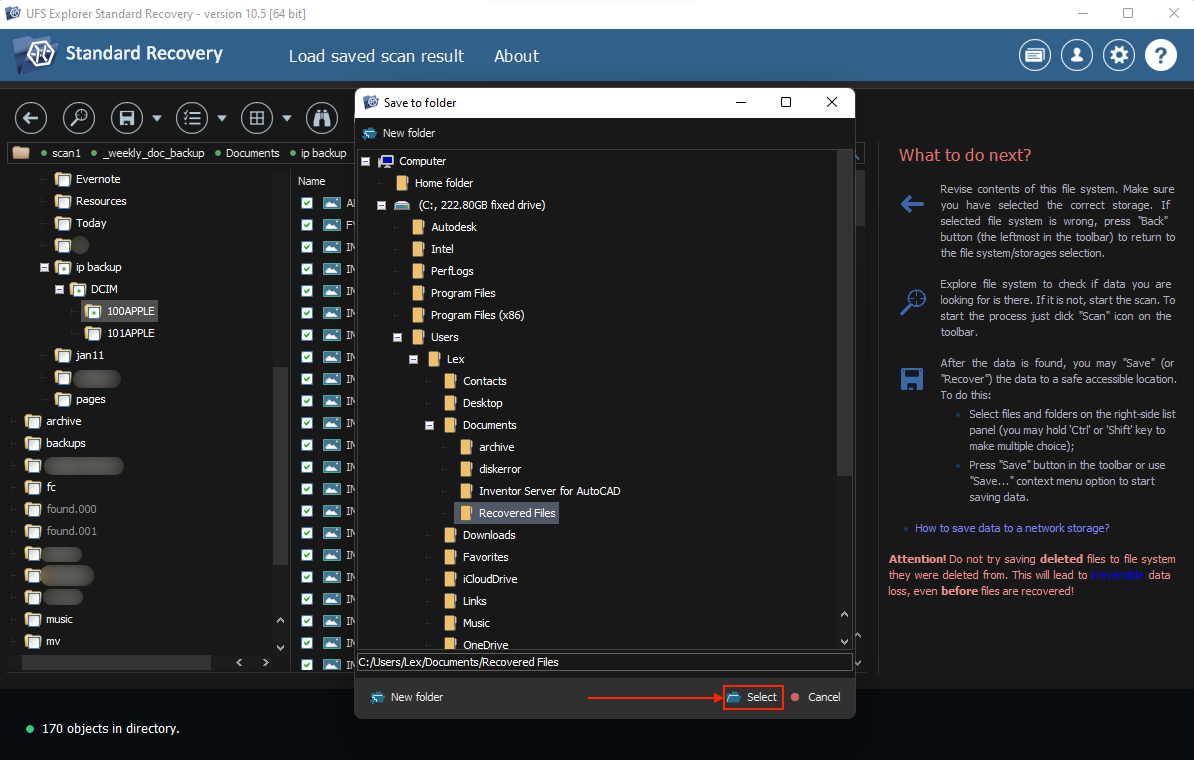
- Use the tree navigator to choose a location where you want UFS Explorer to save the recovered files. Then, click Select to start the recovery process.
What Methods Might Work to Fix a Device with the ‘Disk Structure Is Corrupted and Unreadable’ Error
In this section, we’ll demonstrate 3 proven methods to address the Disk Structure Is Corrupted and Unreadable error. We’ll be using third-party and native Windows tools to attempt to repair the file system errors causing your drive to become inaccessible.
Note that all repair methods have the potential to cause data loss, so we recommend that you go over the recovery section before proceeding if you haven’t already.
If you suspect that physical damage was the cause of this error. Don’t attempt to fix your drive because you’ll likely make it worse. Send it to a professional data recovery center instead.
Method 1: Try CHKDSK
The CHKDSK command is a Windows system utility you can access through Command Prompt that can scan your drives for file system errors and attempt to repair them automatically. It can even scan for bad sectors, which should only help clear your drive of errors.
We’ll demonstrate how to use CHKDSK by running a simple command in Command Prompt (if you’ve never used Command Prompt before, don’t worry – it’s just one line).
CHKDSK will very likely cause data loss on your drive as it aggressively tries to correct file system inconsistencies, conservatively evaluate data recoverability, and move data around the disk in a general attempt to fix things. While you can technically recover files deleted by CHKDSK, there’s a good chance you’ll lose some data permanently.
- Open Command Prompt as administrator.
- Type the following command and press Enter: chkdsk D: /r
- Replace D with the drive letter assigned to the disk you want to repair.
Method 2: Use TestDisk
TestDisk is a well-known and highly respected open-source partition recovery tool. It has multiple features that can help you restore access to your data by repairing the disk errors that made your drive unreadable.
Specifically, it has a feature that can repair a corrupted boot sector, which we know is one of the common reasons for the Disk Structure Is Corrupted and Unreadable error.
TestDisk looks a bit intimidating at first, but you don’t have to know any actual commands to use it. Follow the steps below closely.
TestDisk has loads of awesome features and capabilities underneath its spartan design, which we covered in more detail in our TestDisk review. We recommend giving it a read for additional demonstrations of its usage, frequently asked questions, and user feedback.
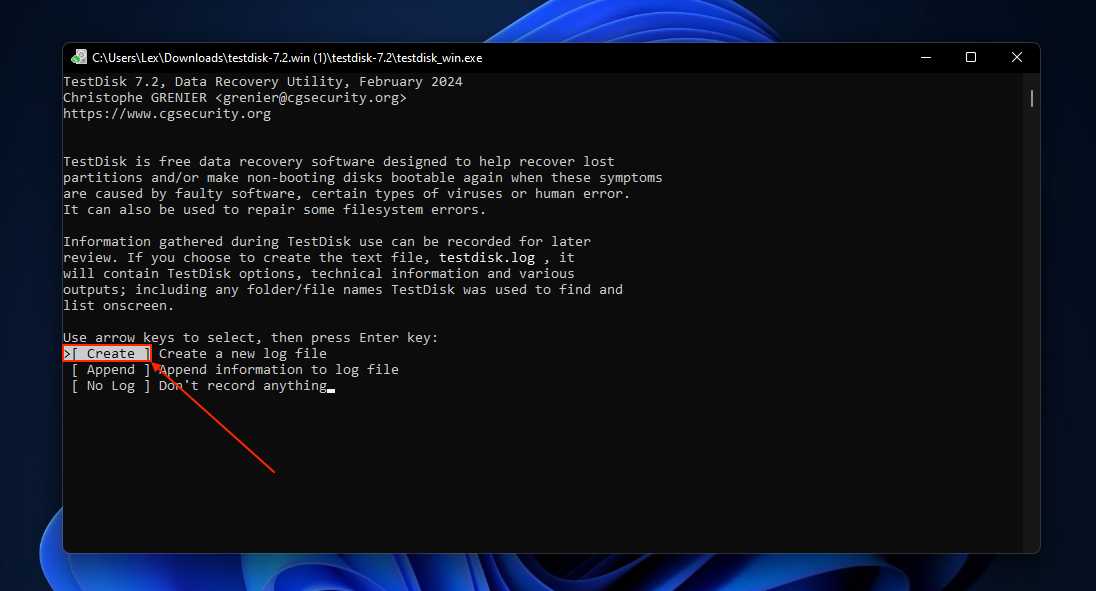
- Download and open TestDisk.
- With your arrow keys, select Create. Then, press Enter.
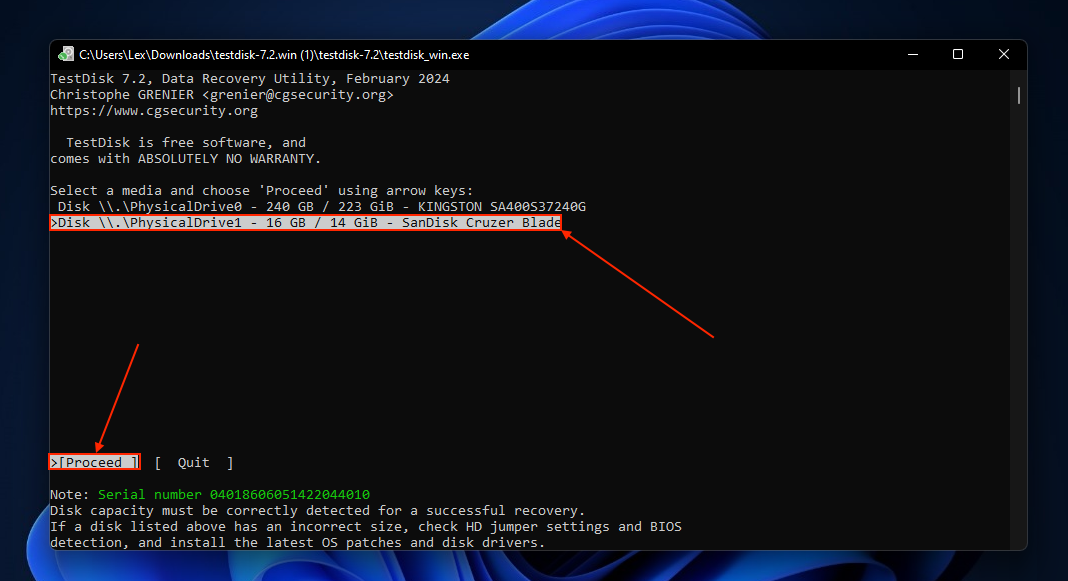
- Use your arrow keys to select your drive and press Enter.
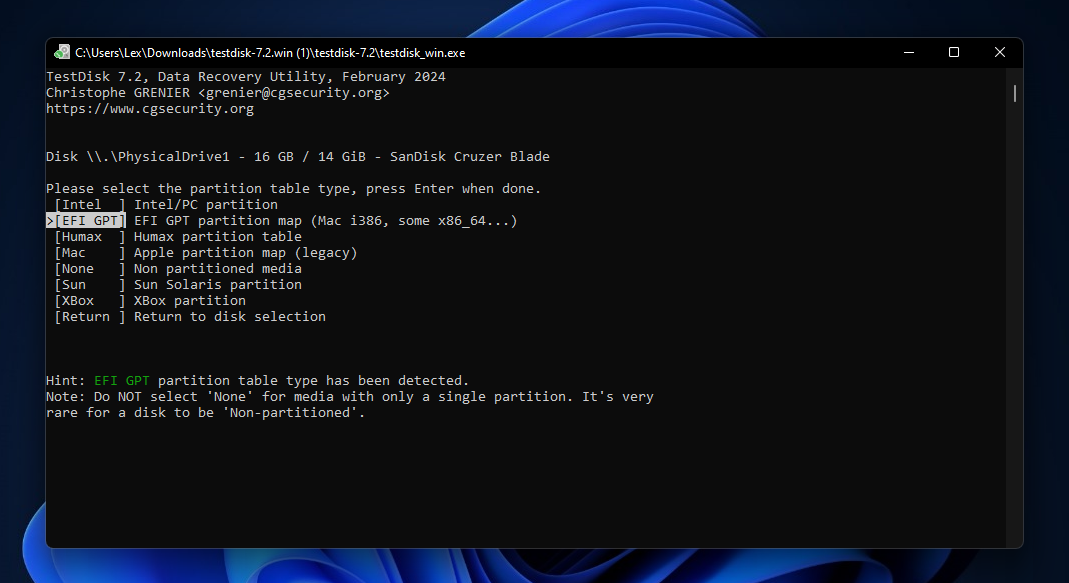
- Allow TestDisk to choose the partition table type and press Enter.
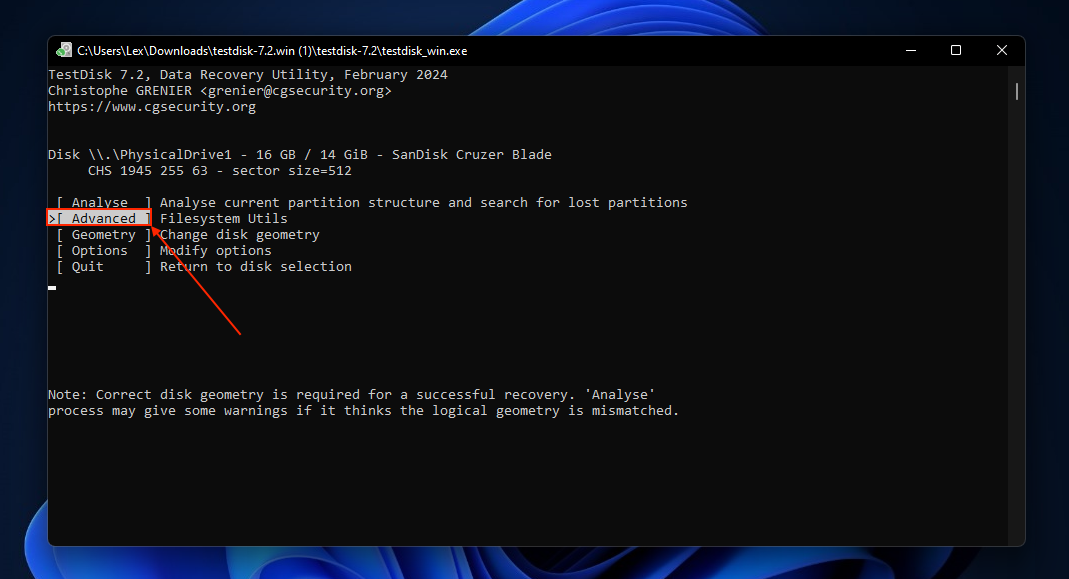
- Select Advanced and press Enter.
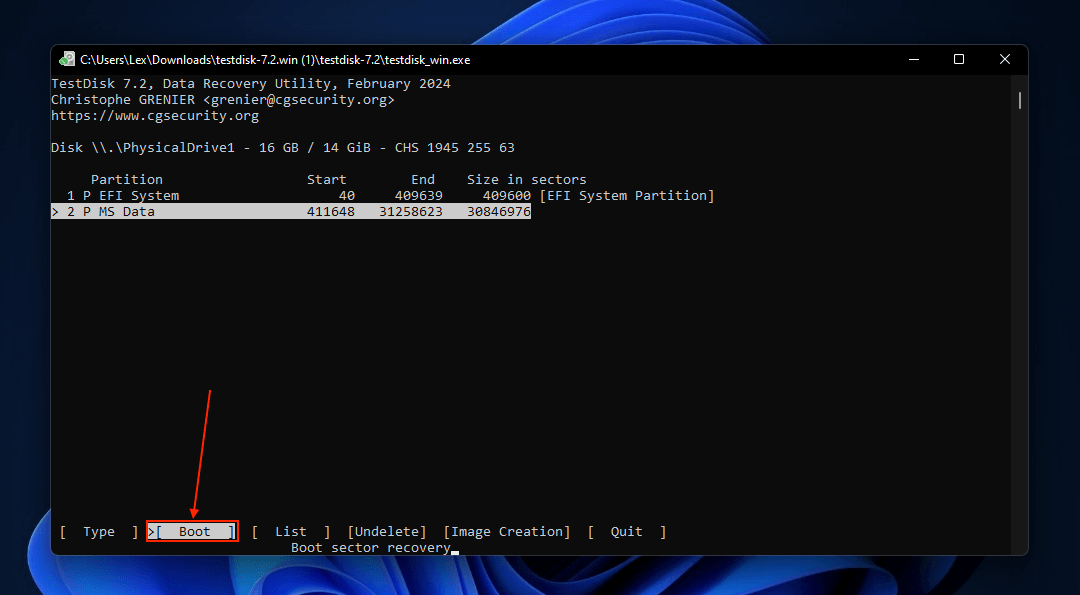
- Choose the partition you want to repair, then select Boot and press Enter.
- If your boot sector appears OK, quit TestDisk. If Boot sector: Bad appears, select choose BackupBS and press Enter.
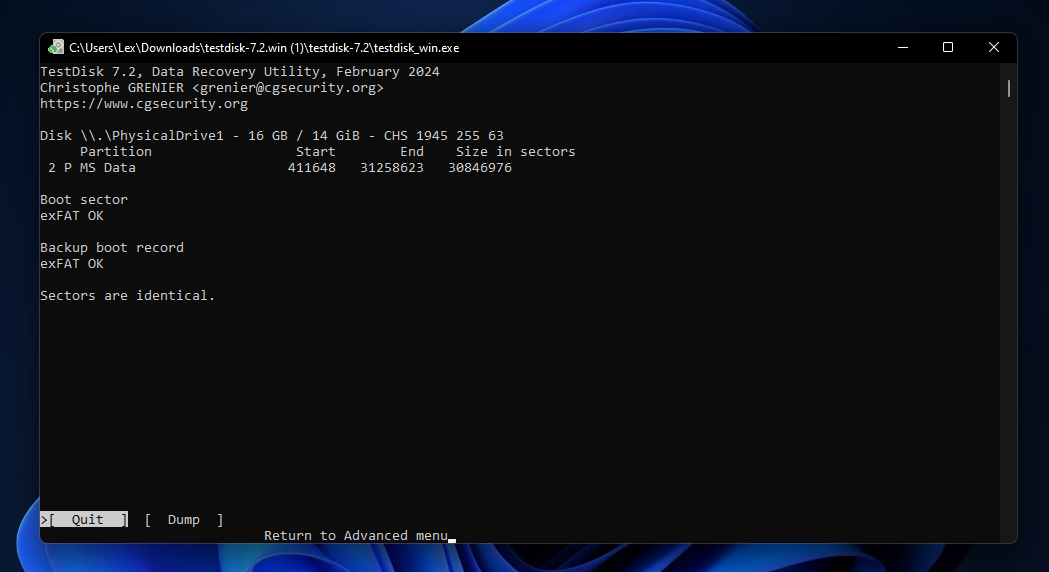
- Confirm the operation, quit TestDisk, and restart your computer.
Method 3: Reformat the Drive
Formatting is one of the most effective repair methods for almost any form of logical damage because it wipes everything, including the file system (taking down any corruption and conflicts along with it).
Even if you can’t right-click your drive in File Explorer, you can perform the format operation in Disk Management as long as the drive shows up.
You can technically format your hard drive without losing data, but we recommend restoring and saving your files somewhere safe beforehand to maximize your recovery rate.
- Open Disk Management.
- Right-click your drive and click Format.
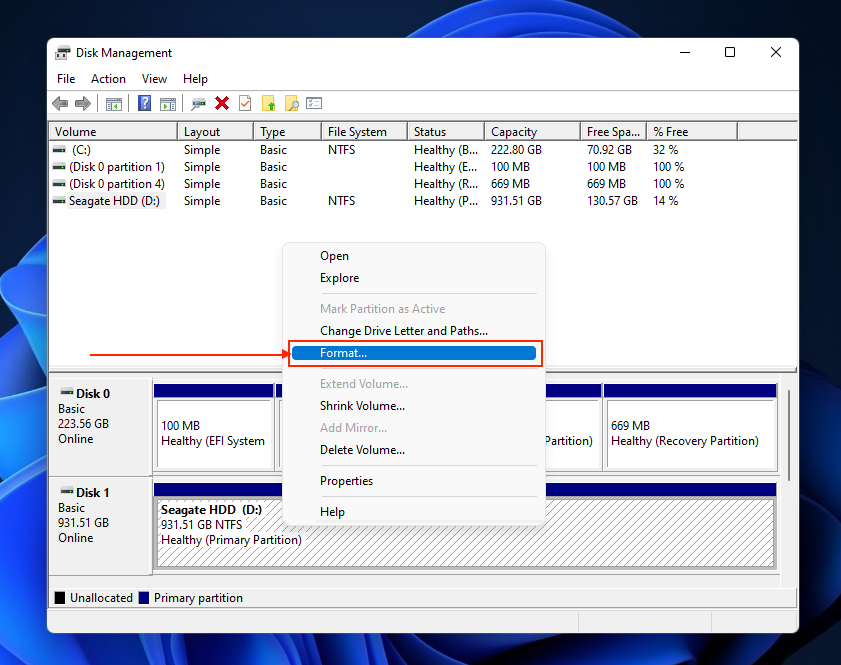
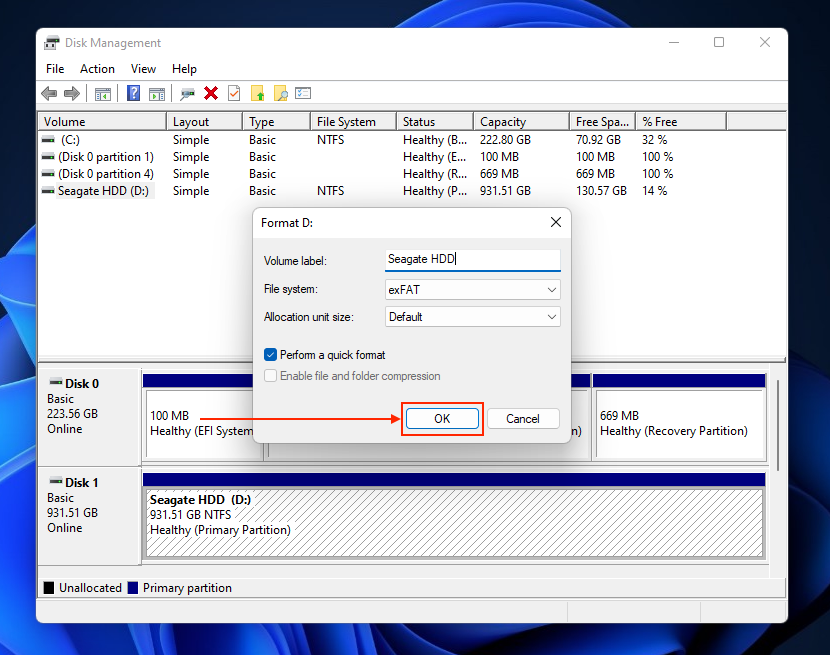
- Choose your drive’s volume label and file system, and leave the rest of the parameters to their default settings. Then, click OK to format the drive.
Which Methods Are Unlikely to Fix the ‘Disk Structure Is Corrupted and Unreadable’ Error?
In this section, we’ll briefly discuss common “Disk Structure is Corrupted and Unreadable fixes” recommended online that don’t actually work or may not yield the desired results. Not only will this help you avoid wasting time on ineffective methods, but it will also help you set realistic expectations as to what you can achieve in terms of repairing your drive.
- Updating drivers – While updating your drivers can fix certain problems with storage devices (e.g. compatibility issues), it won’t help with this specific disk error at all. The error we’re addressing is rooted in the file system or a damaged sector within the disk itself.
- CHKDSK – We recommended CHKDSK as a fix in this article because it can resolve certain file system issues that lead to the disk error we’re addressing, but it’s not always guaranteed to work. If the damage is too severe, CHKDSK might not detect anything or won’t even start at all.
Conclusion
Disk Structure is Corrupted and Unreadable sounds like an intimidating error and it immediately renders your data inaccessible. Fortunately, like many common storage issues, it can be safely resolved by users at any level.
However, the order of the tasks matters. Recover your data first, fix your drive second. The data on your malfunctioning drive is still likely intact – but all repair methods have the potential to cause data loss (especially formatting).
Finally, we recommend that you no longer use this drive for highly important data. Storage devices that have already failed once are more likely to fail again.
This article was written by Alejandro Santos, a Staff Writer at Handy Recovery Advisor. It was also verified for technical accuracy by Andrey Vasilyev, our editorial advisor.
Curious about our content creation process? Take a look at our Editor Guidelines.