If you notice slow speeds, data loss, and random error messages on your USB drive, it may be on its last legs. But, how do you confirm whether the flash drive is failing? Well, by performing a USB health check. The sections below explain how to check the health of your flash drive effectively, and how to recover data from it in case it has become inaccessible.
When to Check USB Drive Health
Periodically checking your USB drive’s health improves its longevity, and that’s why we recommend performing a health check every 3–6 months on USB drives that are used almost daily. This will give you enough time to back up your files and preemptively deal with any problems that arise in the future. For drives used sporadically, an annual USB health check will suffice. But, these pointers only apply to drives that are working perfectly, and displaying no unusual symptoms.
It’s difficult to predict when a USB drive will fail. Some pen drives give up without warning, but most display at least one of these symptoms:
- 🐌 Slow Performance: Slow performance, bordering on unresponsive, is one of the first symptoms of a failing USB drive. Observe how long it takes to access, or copy files to and from the USB drive. To accurately compare your pen drive’s performance, connect the USB drive to the same PC, and USB port as you usually do.
- 🔎 Randomly Appearing/Disappearing Files: Files on a logically damaged USB drive behave strangely. They may disappear one moment, then reappear when you reconnect the drive. This could indicate bad blocks, and file system damage on the flash drive.
- ❌ Data Loss and Corrupted Files: Another common symptom of logical damage on your USB drive, is data loss. If you’ve permanently lost access to some of your files, the pen drive could be failing. The same applies if you notice some files are no longer readable and throw up errors when you attempt to open them, i.e., they’ve been corrupted.
- 😶🌫️ USB Drive Remains Undetected: A pen drive that’s refusing to mount may have already failed. To confirm this, connect the drive to another PC, and see if the drive appears in Windows Disk Management. If it doesn’t, there’s little you can do, except contact an expert.
- 🔐 Flash Drive Became Read-Only: At the end of their lifespan, most USB drives become read-only. You can no longer write any new files to the drive, and you may notice a drop in performance too. If you notice this, try inserting the drive into another computer. If the error persists, it’s likely the USB drive is facing unrecoverable errors. There’s usually no way to fix this.
- ⏏️ Frequent Disconnects and Reconnects: Unhealthy USB drives may randomly disconnect from your PC, and then reconnect within a few seconds. This usually happens when you transfer files, or try to open the drive in Windows Explorer.
If you notice any of the above symptoms, prioritize recovering your data first, and then perform a USB health check.
In some cases, you should avoid DIY data recovery and USB health checks, and contact an expert instead. These include:
- The drive remains undetected on multiple computers, i.e., it refuses to show up in Windows Disk Management.
- There is internal physical damage to the USB drive.
- Windows displays the, “The format did not complete successfully” message when you attempt to format the drive.
How to Recover Data from an Unhealthy USB Flash Drive
Before proceeding to check and fix your USB drive, recover all your data from it. We emphasize data recovery because of two main reasons:
- It’s impossible to know for sure when the USB drive will completely give up, and leave your files unrecoverable.
- Checking a USB drive’s health includes using methods like CHKDSK, which can often cause minor data loss.
On USB drives that are accessible using Windows Explorer, and have no files missing, simply copy your files to another location.
However, on drives that are unhealthy, i.e., you can’t access the stored files using Windows Explorer—you’ll need third-party data recovery tools to recover your data. While you could go with any program of your choice, this list of the best USB recovery tools is a good place to start.
The recommended way to recover data from an unhealthy flash drive is:
- Create a disk image of the USB drive.
- Scan this disk image for recoverable data, instead of directly scanning the USB drive.
A disk image is essentially a soft copy of the entire USB drive. Creating a disk image is important—it ensures you don’t suffer any further data loss, and it also prevents further stress to the drive because of data recovery scans. Pick a program that scans disk images, and ideally, lets you create them as well.
To demonstrate the USB data recovery process, we decided to use Disk Drill, a popular, and capable data recovery program. Its simple UI, advanced data recovery algorithm, and the ability to create as well as scan disk images, make it an excellent choice for most users.
Note: We advise against attempting data recovery from physically damaged USB drives. It’s best to contact a professional data recovery service instead. Additionally, most data recovery programs will not work on USB drives that don’t show up in Windows Disk Management.
Here’s how to recover data from an unhealthy pen drive, using Disk Drill:
Step 1: Create a Disk Image
- Download Disk Drill and install it.
- Connect the USB drive to the PC.
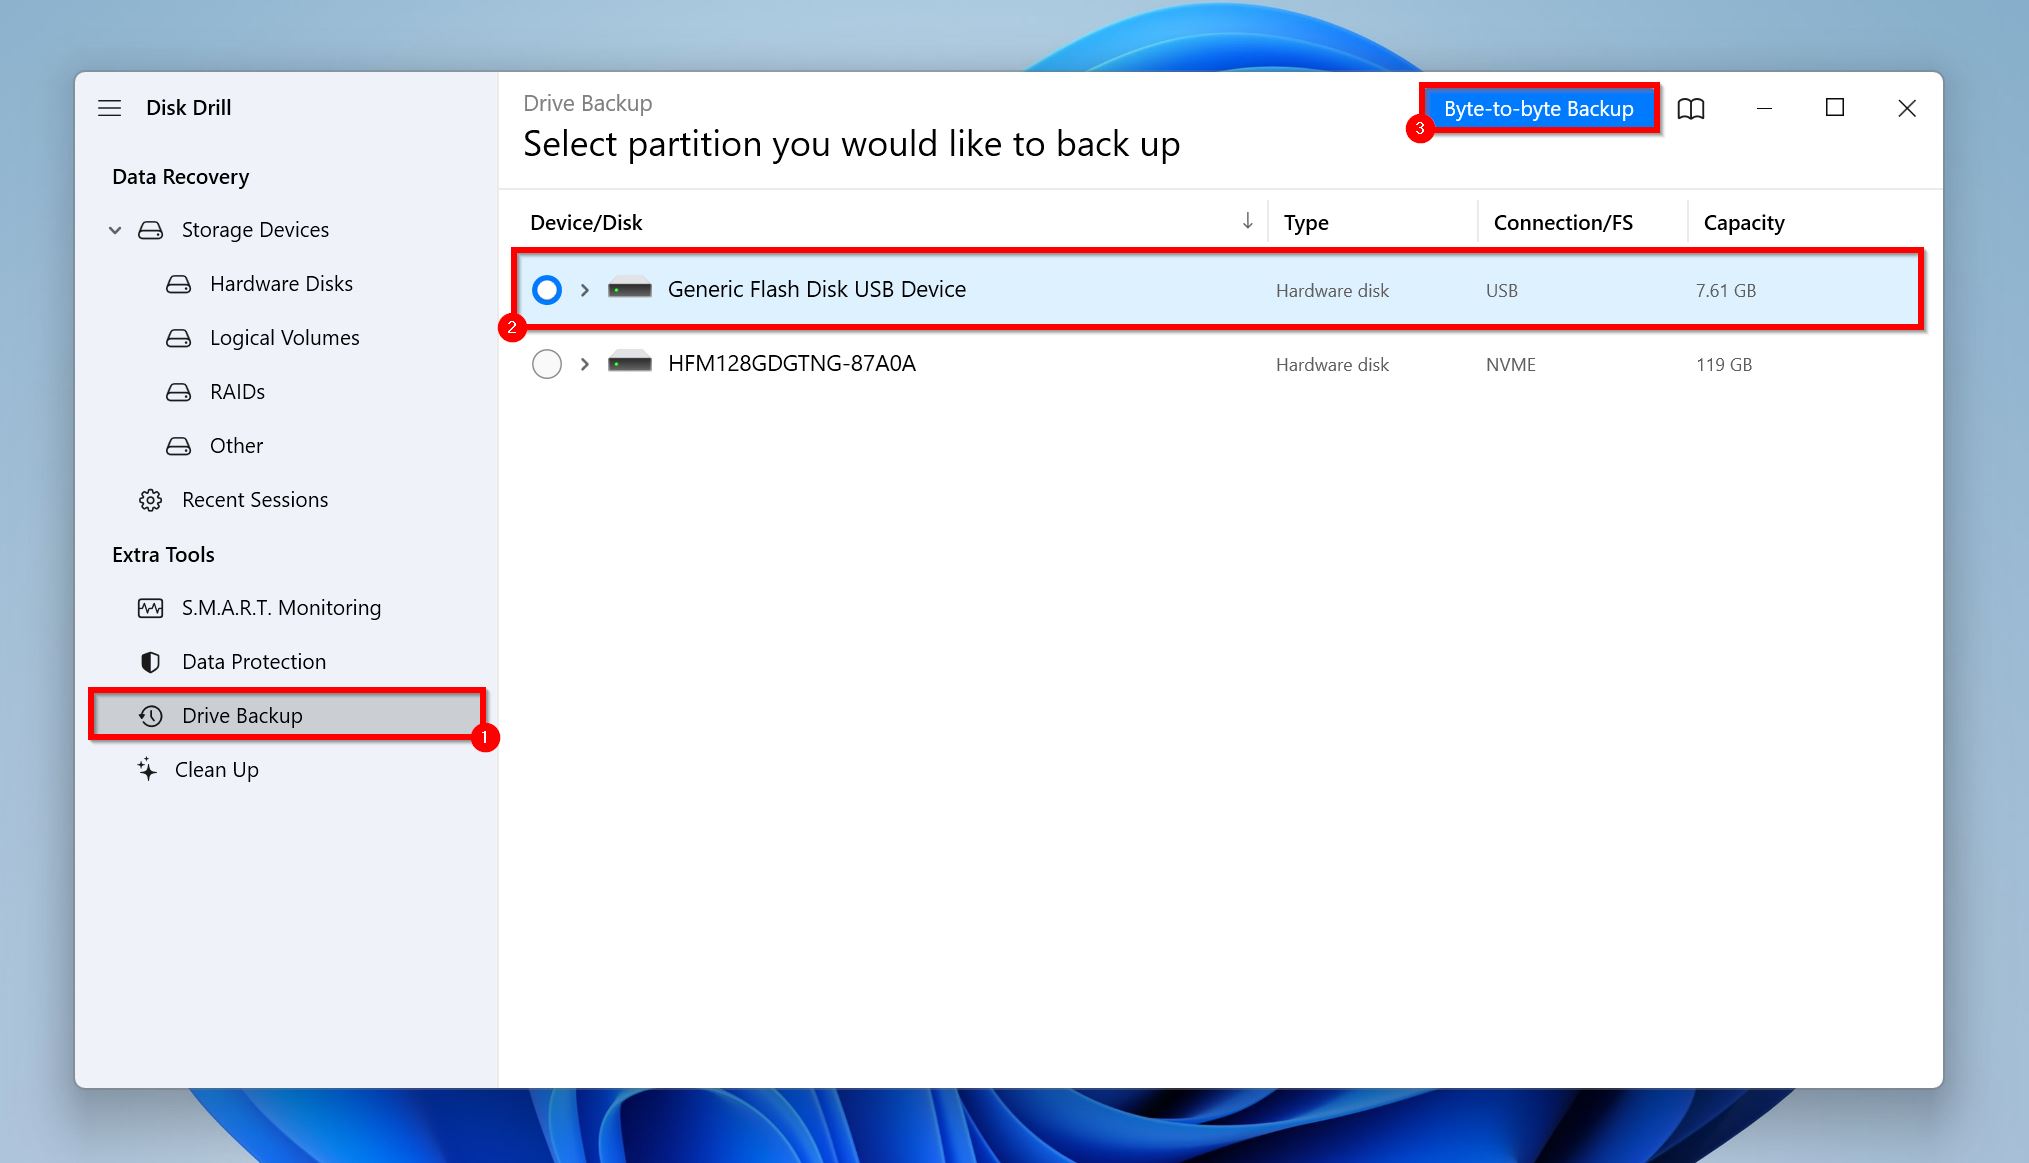
- Open Disk Drill, and click on the Drive Backup option, under Extra Tools.
- Select the USB drive, and click on Byte-to-byte Backup.
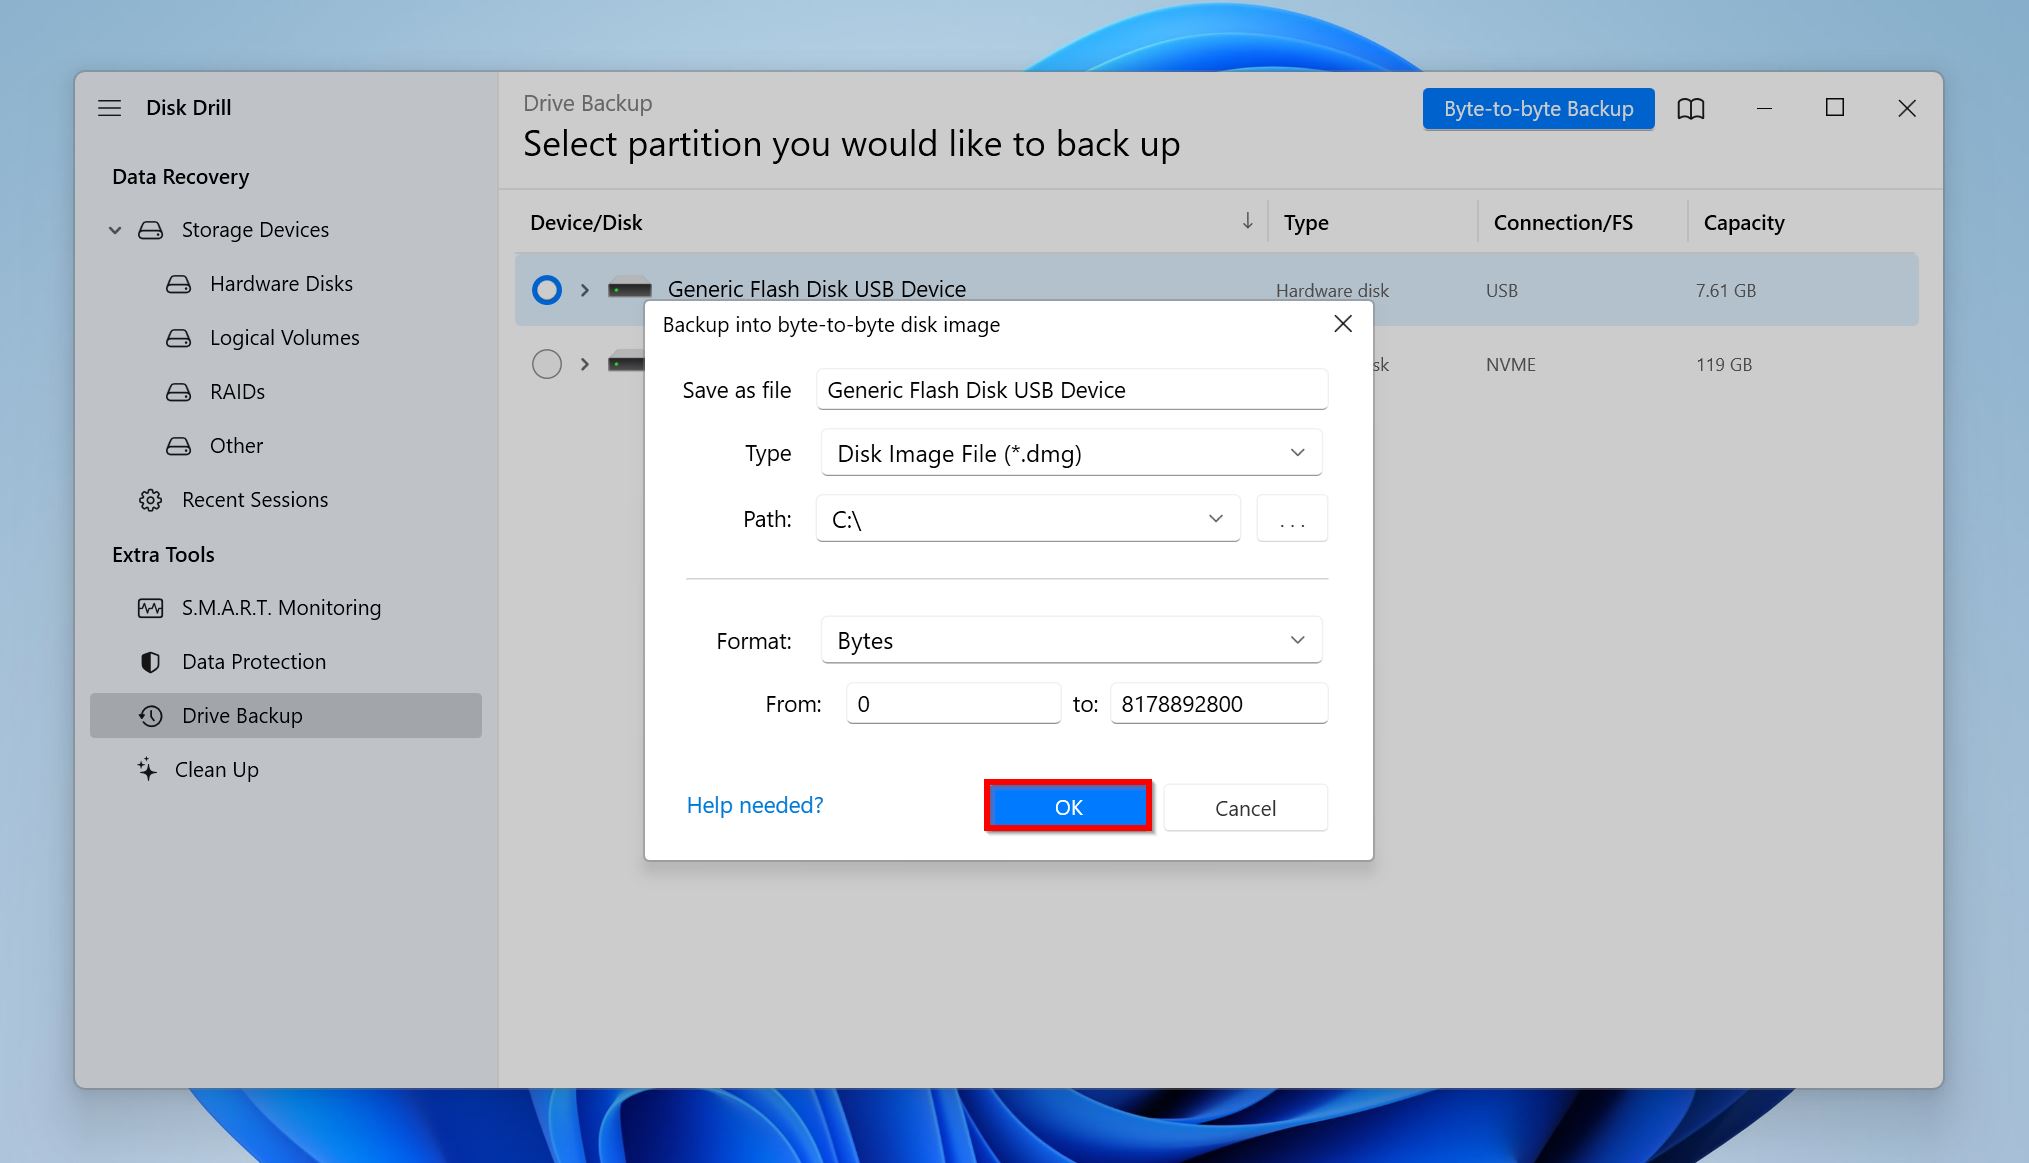
- Choose where you’d like to save the disk image and click OK. The destination should have enough free space—more than or equal to the USB drive’s entire storage capacity).
- Disk Drill will create the disk image. You can safely disconnect the USB drive after Disk Drill creates the disk image.
Note: Disk Drill is, foremost, a data recovery tool. The disk image feature saves the present state of your USB drive—that is, all data that is currently stored on it, and data that can be potentially recovered. This is only useful when there are issues with the drive, preventing access to the stored data. You shouldn’t use it to substitute traditional backup programs that eliminate the hassle of manually copying files from a healthy USB drive. Moreover, Disk Drill only lets you recover 500 MB of data for free.
Additionally, the disk images (DMG backups) created using Disk Drill work best within Disk Drill only, with a few exceptions. There are some other data recovery programs, like R-Studio (commercial software), that can scan DMG files created by Disk Drill.
Step 2: Recover Data from the Disk Image
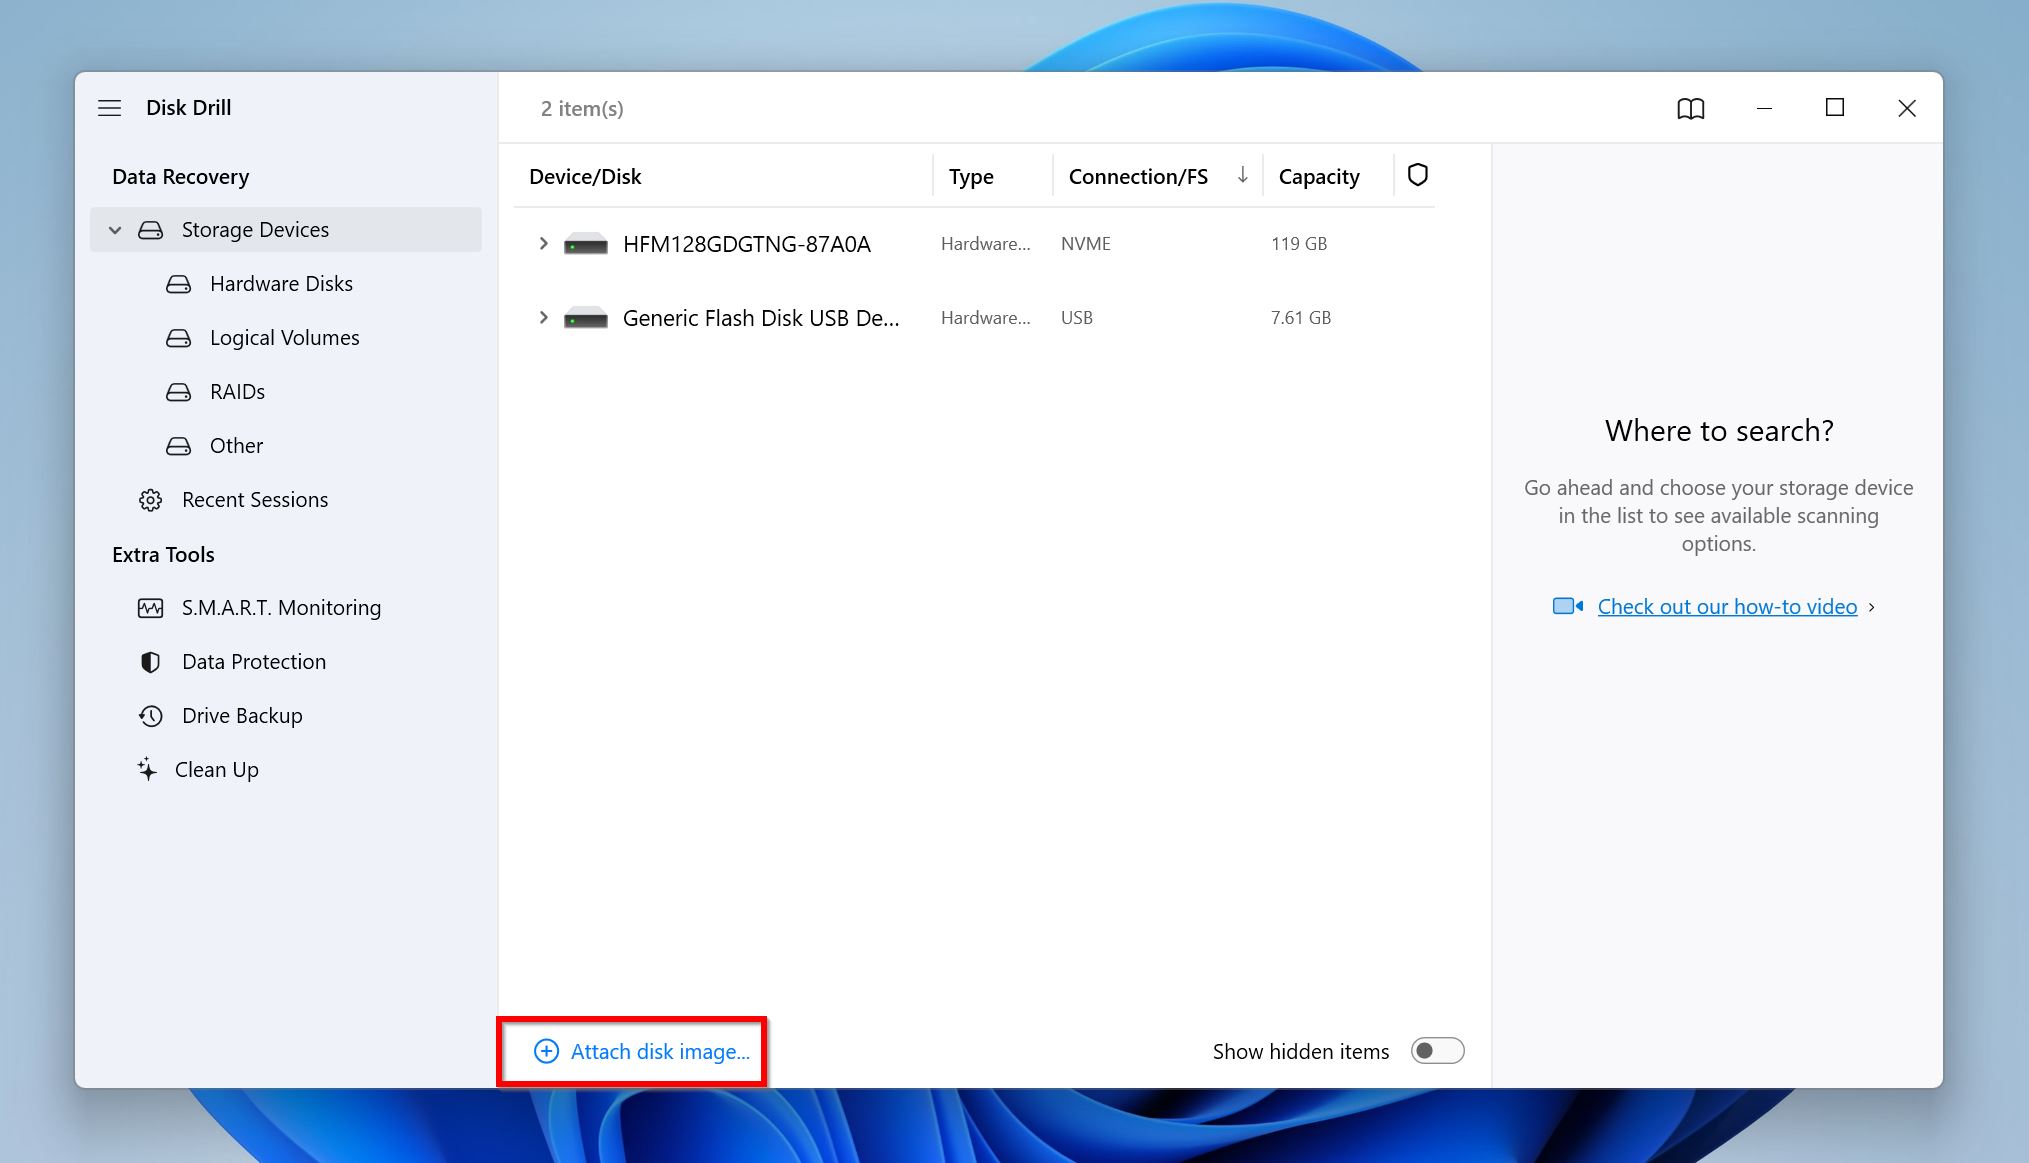
- Open Disk Drill and ensure you’re on the Storage Devices screen.
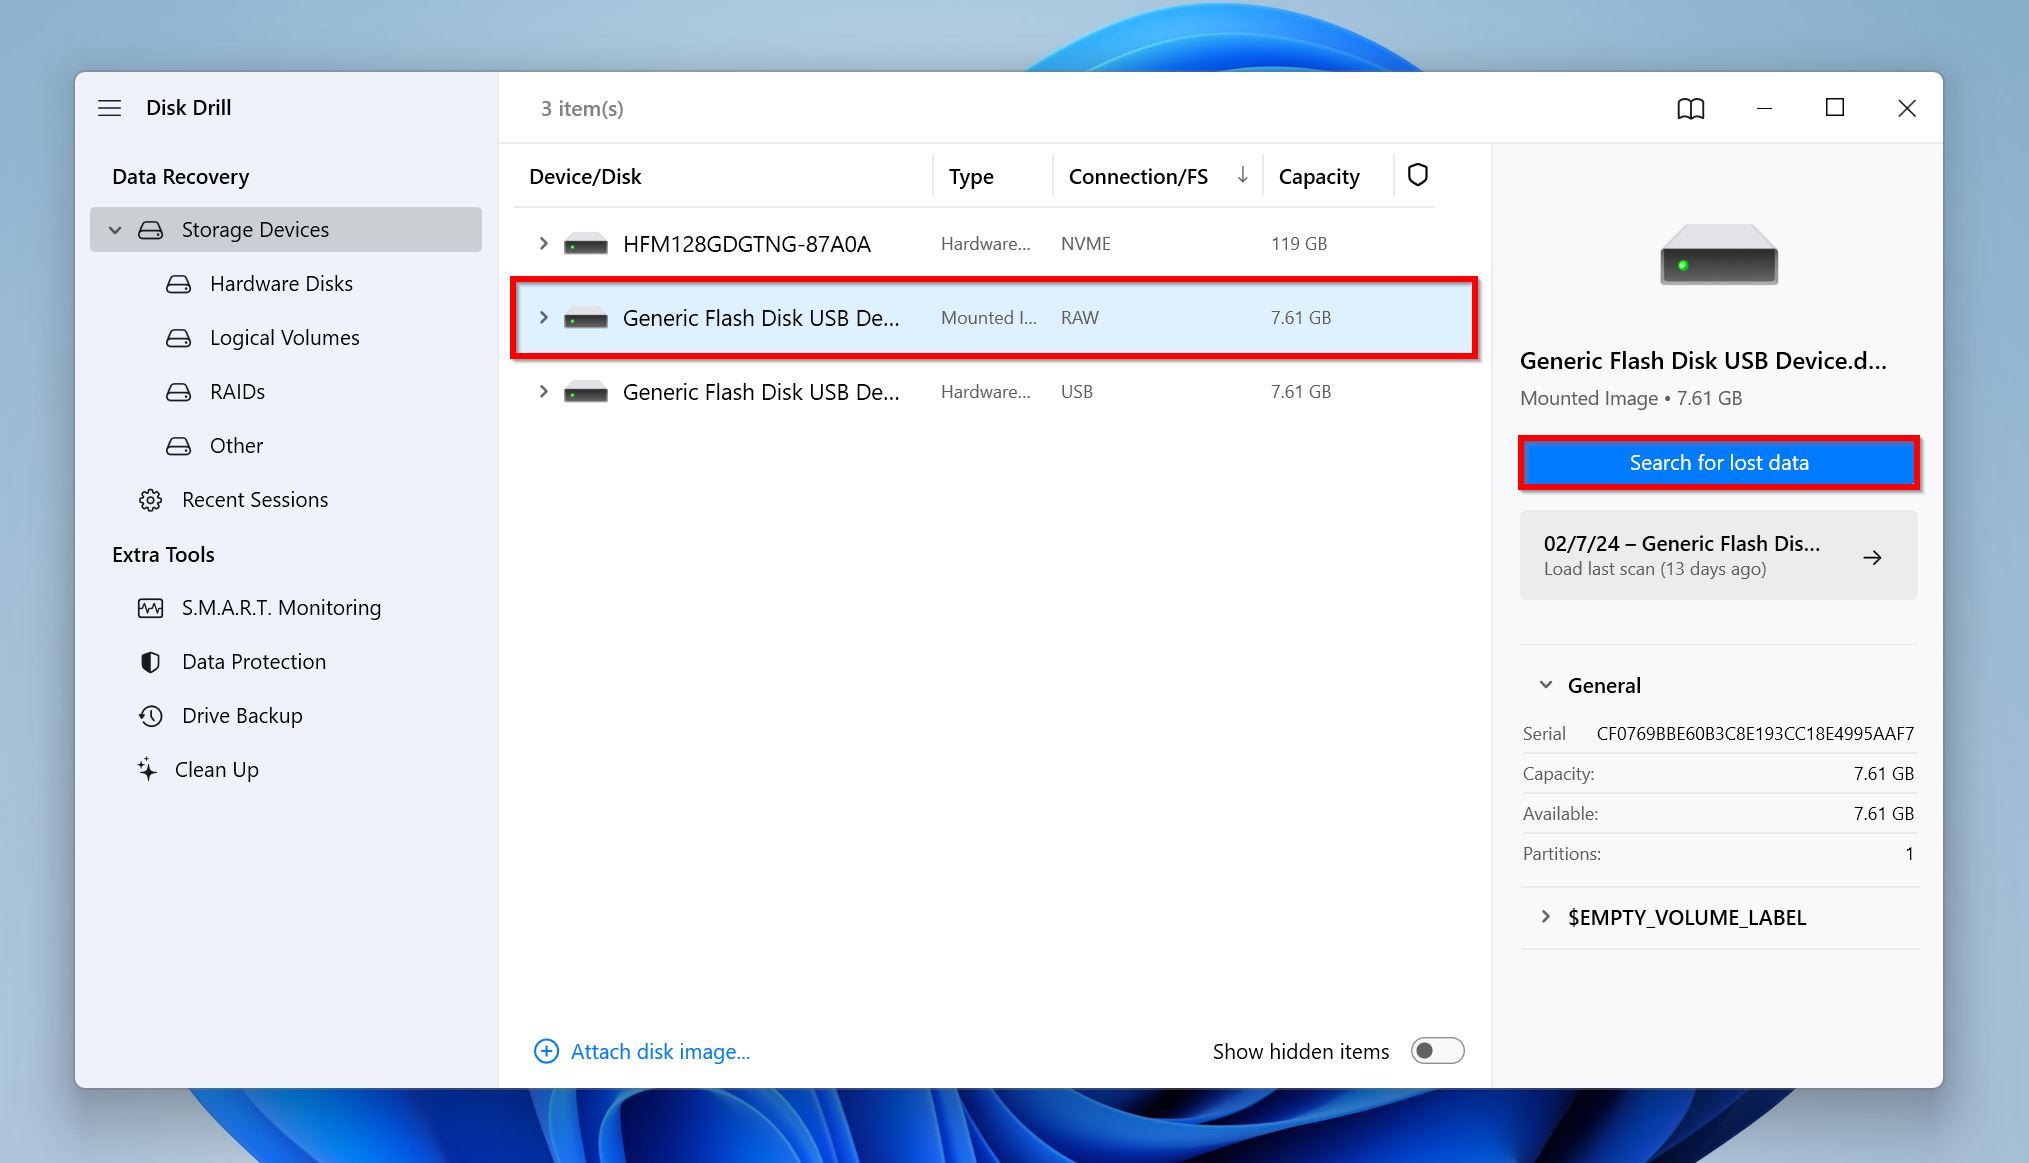
- Click on Attach disk image. Browse for the disk image you created earlier, and double-click it. The disk image will mount to Disk Drill, and show up as a “Mounted Image” in the list of devices.
- Select the disk image and click Search for lost data.
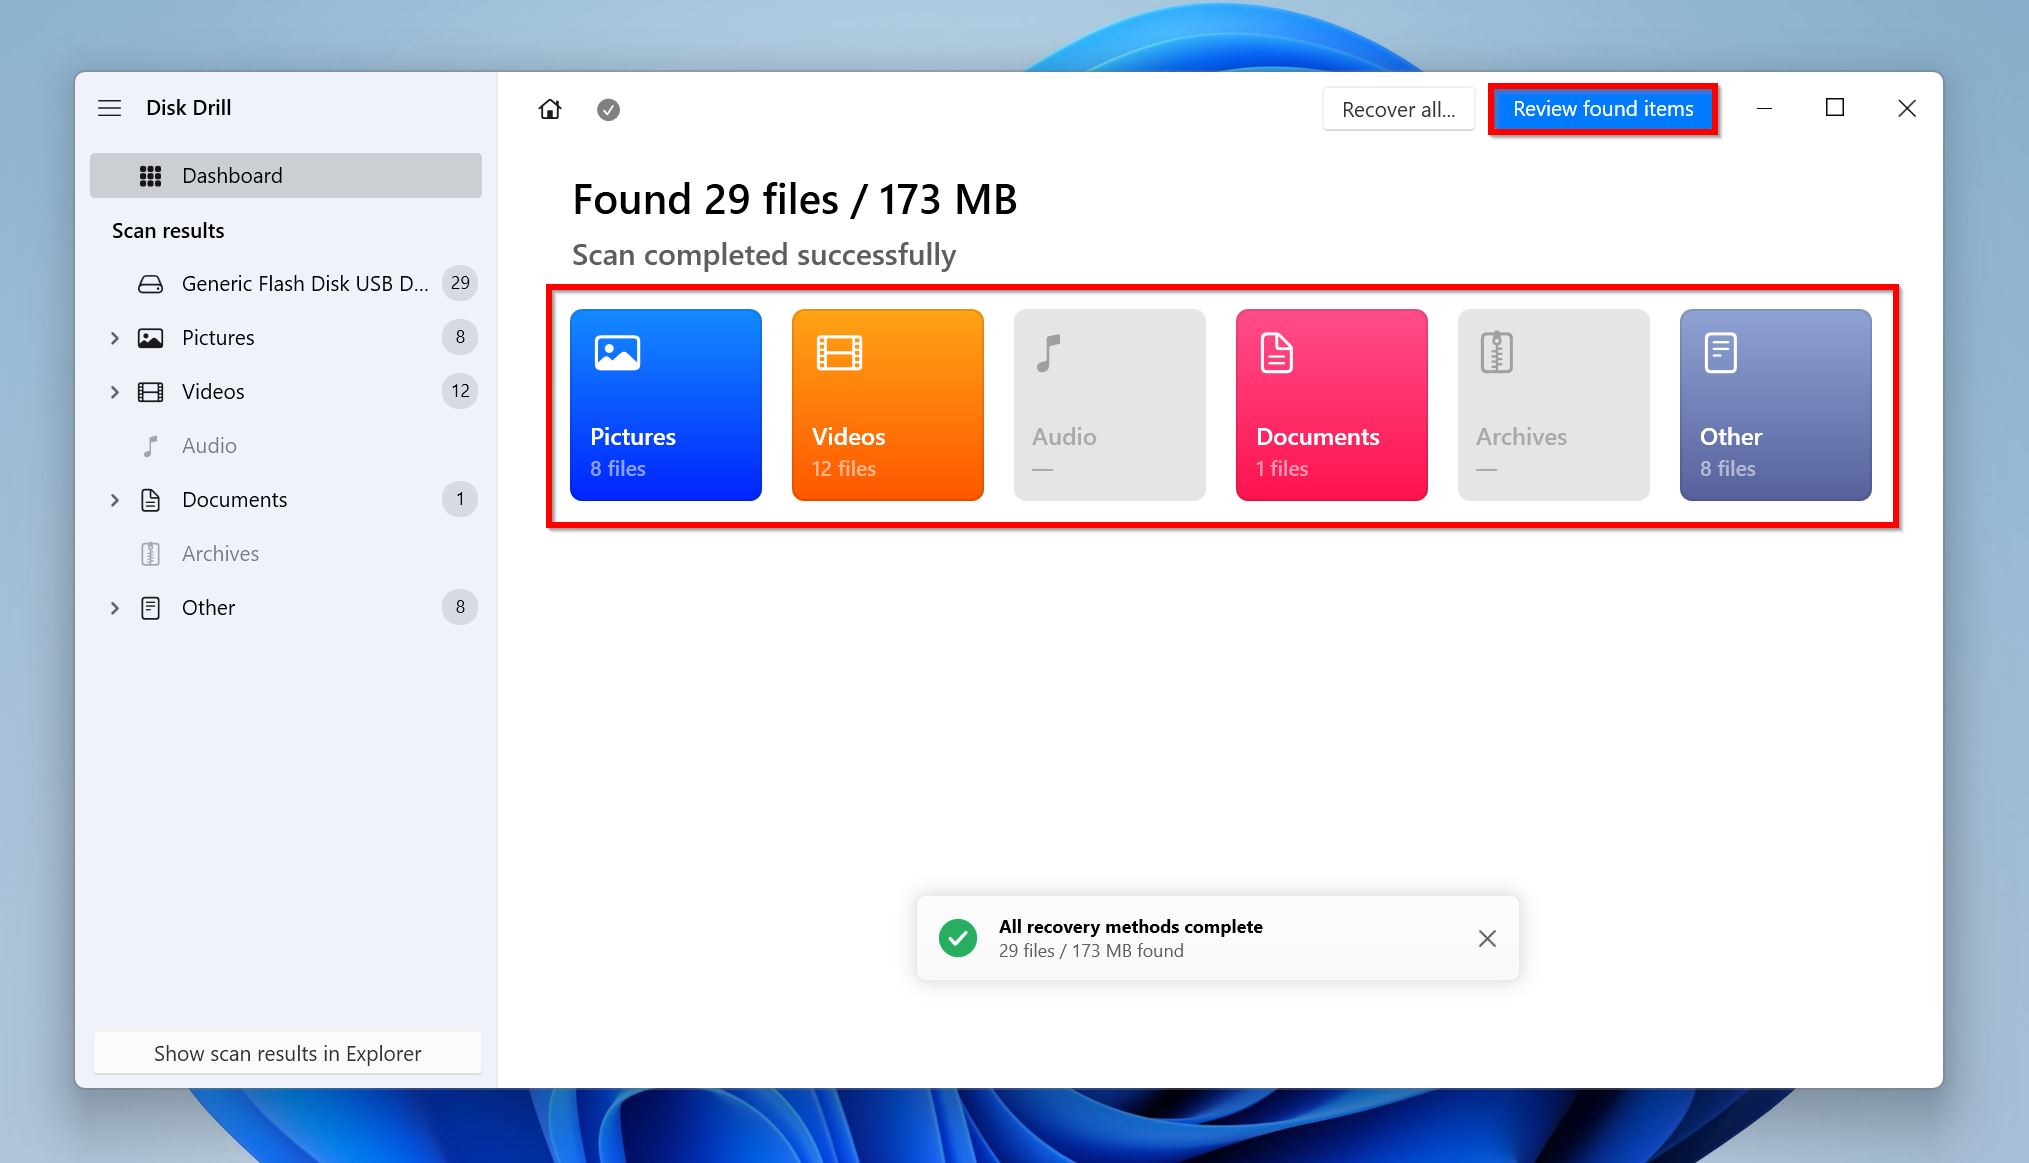
- Click on Review found items to view all recoverable files. To view specific file types only, click on the relevant file type tiles instead—Pictures, Videos, Audio, Documents, Archives, and Other.
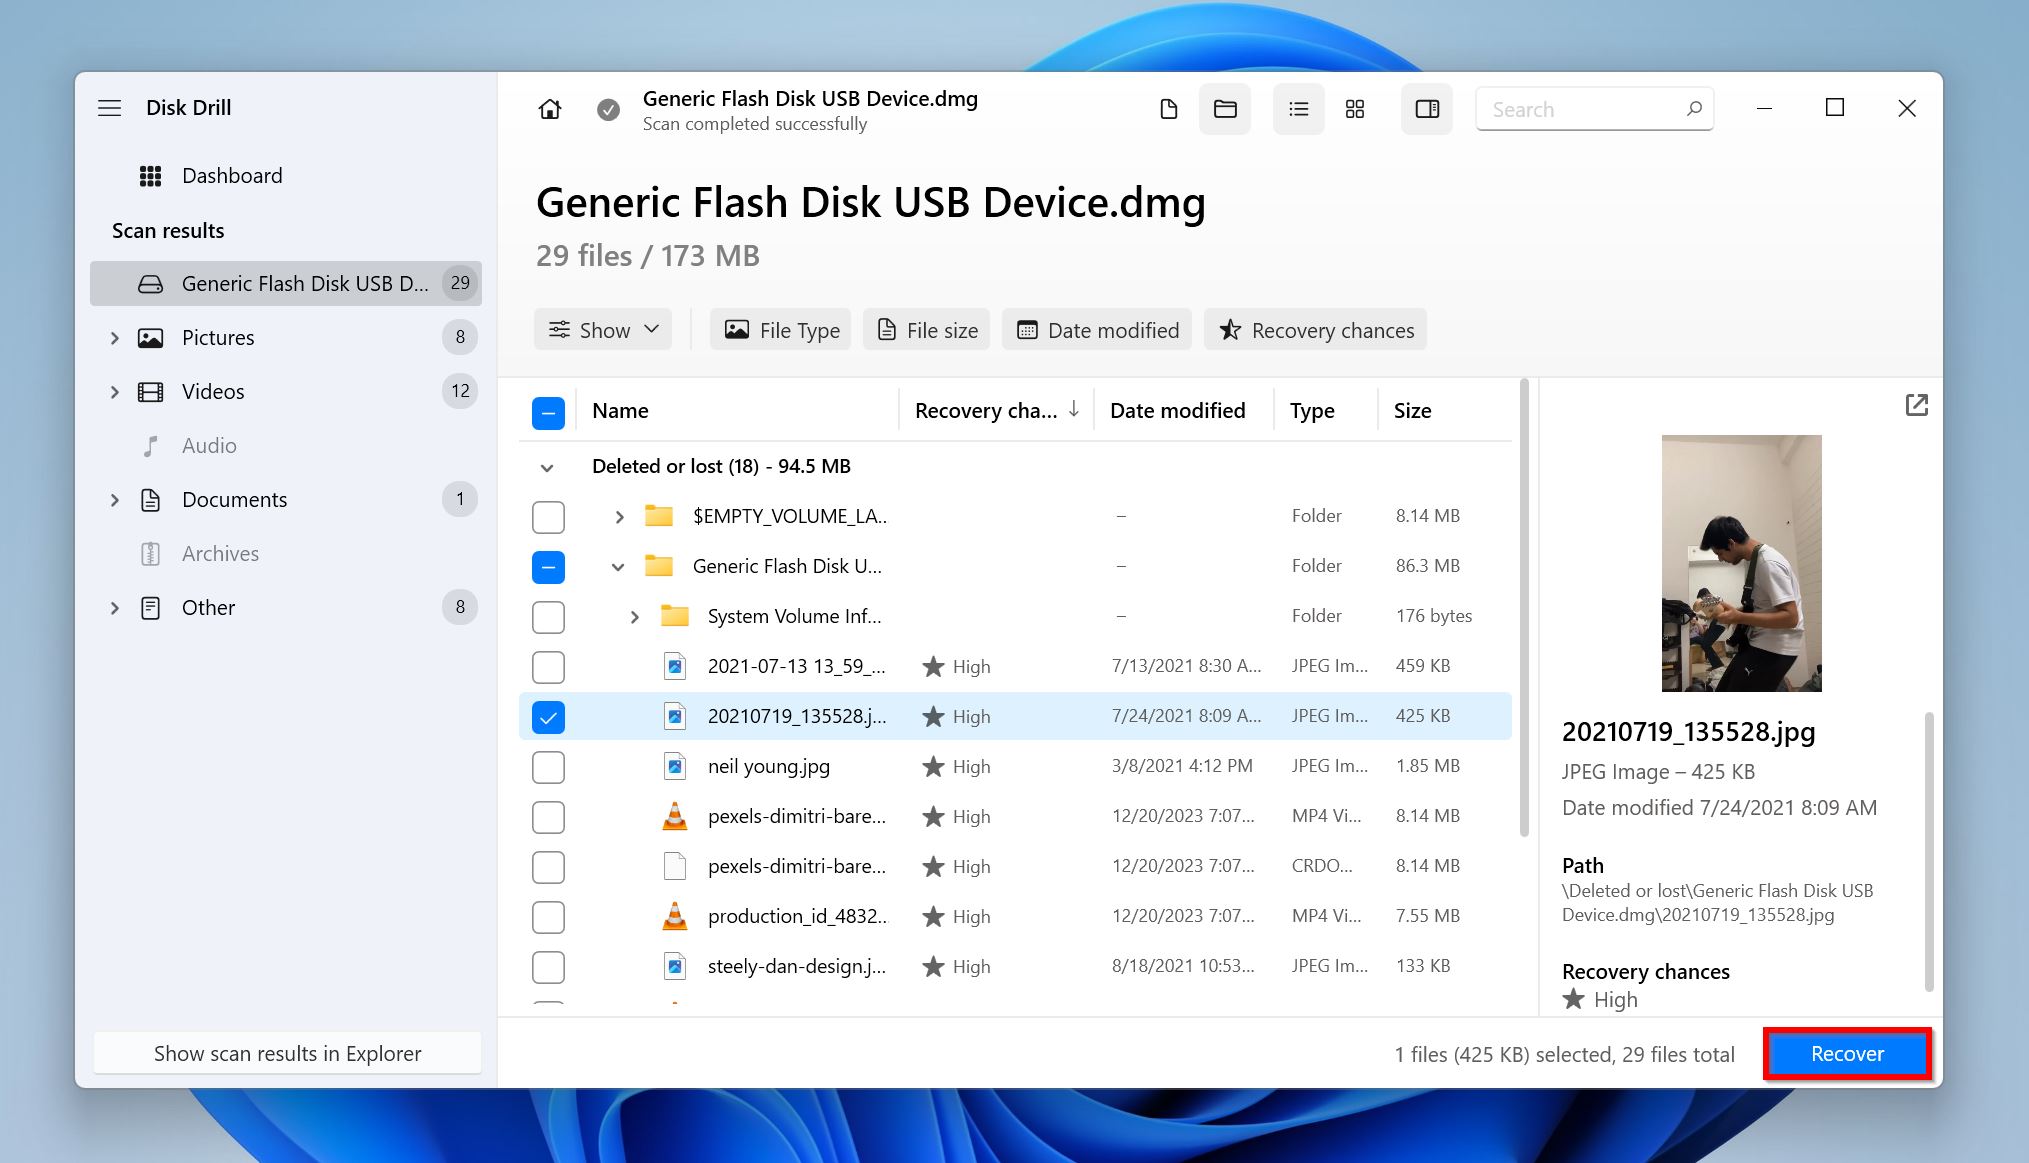
- Expand the Deleted or lost and Reconstructed sections to view deleted files that can be recovered. Expand the Existing section to view currently stored files on the pen drive—useful when you can no longer access the drive using Windows Explorer.

- Select the files you wish to recover. Disk Drill displays a preview of the currently selected file, but you can manually preview any file by clicking the eye icon next to its filename. Click on Recover.
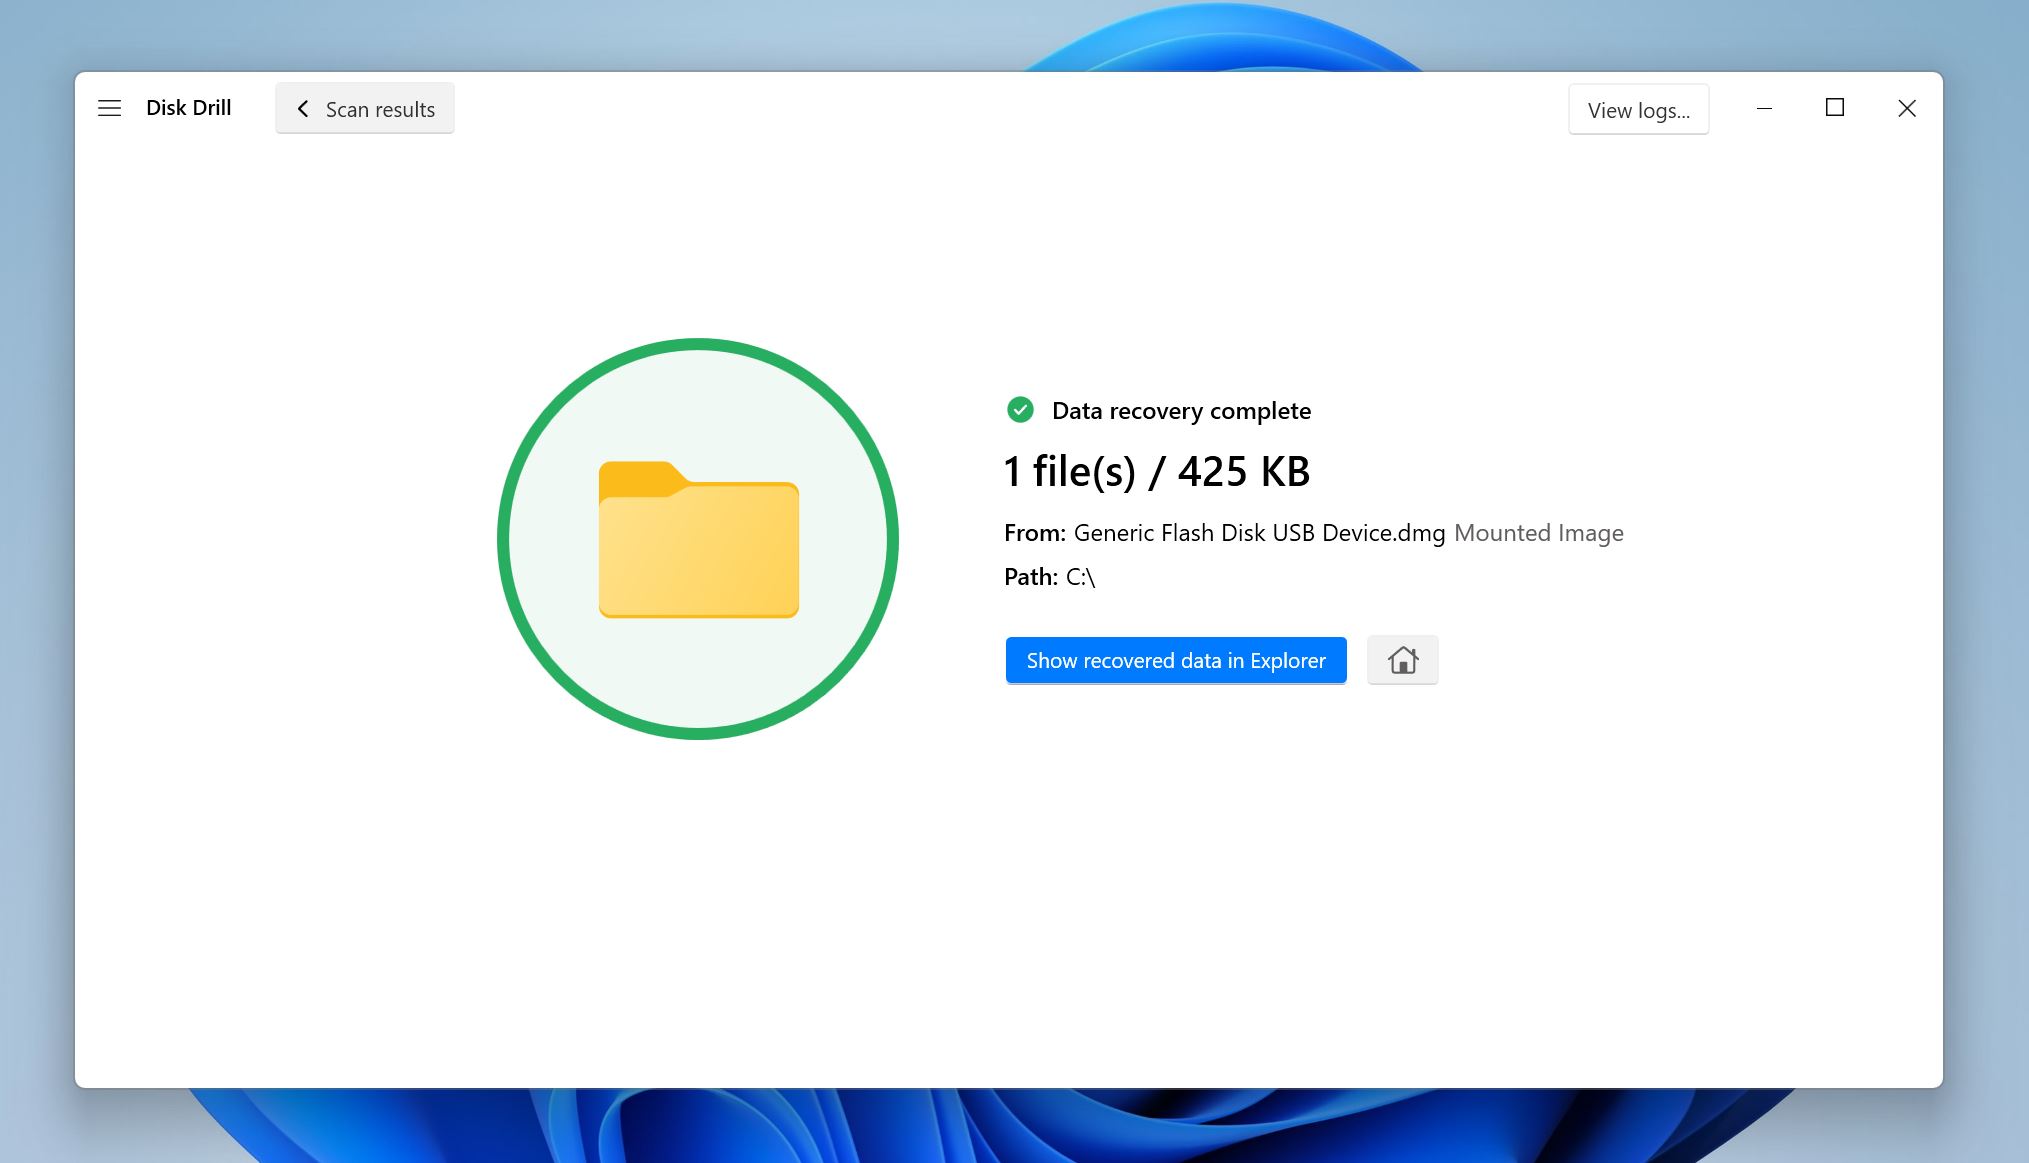
- Choose a recovery destination for the files and click Next.

- Disk Drill will recover the selected files.
After recovering your files, you can safely proceed to check the USB drive’s health.
How to Check Pen Drive Health on Windows: 8 Methods
Checking your pen drive’s health includes inspecting it for physical damage, detection, file system integrity, and more. We recommend you follow the command-line methods if you’re a technical user. For non-technical users, the third-party USB health check tools are a more user-friendly option.
Here are some ways to check your flash drive’s health on Windows:
Basic Methods
When checking a USB drive’s health, start with the basics first—visually inspect the drive for any physical damage. If you notice any bent connectors, cracked casings, etc., it’s best to avoid using the drive any further. Instead, contact a professional as soon as possible.
After inspecting the USB drive physically, ensure that your PC detects the USB drive. If it doesn’t—contact an expert.
1. Visually Inspect the Drive for Physical Damage
A telltale sign of physical damage is a broken, or bent USB connector. It’s the part of the USB drive that slots into the USB port. Broken, or bent connectors often prevent Windows from reading your pen drive. Additionally, damaged connectors may cause the USB drive to short-circuit. Contact an expert if you notice any signs of connector damage.
If the connector seems fine, move on to the pen drive’s casing or shell. Carefully examine it for any cracks and chips. Often, cracks on the casing are superficial, and the printed circuit board (PCB) inside the pen drive is intact.
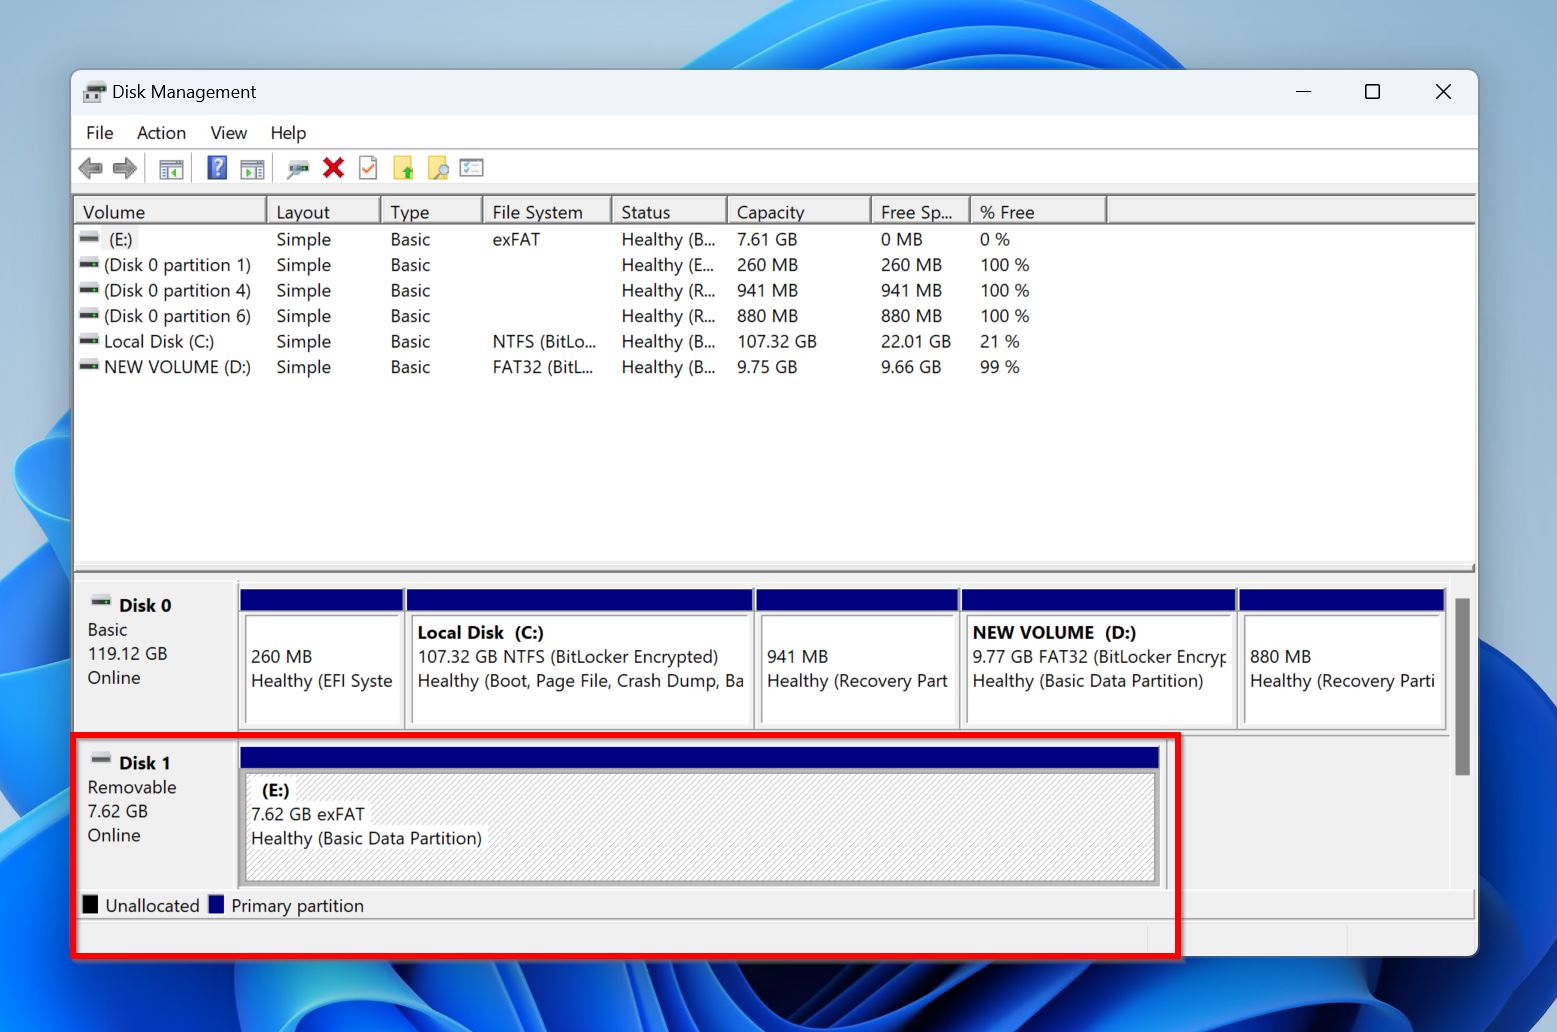
2. Check if Windows Disk Management Detects the USB Drive
Windows Disk Management can help you determine if the USB drive is too damaged (logically, or physically) for any DIY checks. Avoid DIY recovery and health checks in these cases, as it may further damage the drive:
- The pen drive doesn’t show up in Windows Disk Management.
- Windows Disk Management detects the pen drive, but it has a “No Media” status on it.
Here’s how to check if your pen drive is visible in Windows Disk Management:
- Connect your USB drive to your PC. Ideally, disconnect all other external storage drives from your PC.
- Type “disk management” in Windows Search (Windows Key + S), and click on Create and format hard disk partitions from the search results. This will launch Windows Disk Management.
- Look for your pen drive in the lower half of the Disk Management window. It will show up as a separate disk.
Command Line Tools
Windows has two in-built command line tools—Check Disk (CHKDSK), and System File Checker (SFC)—that can check your USB drive’s health and potentially fix any issues on it.
3. Run CHKDSK on the Flash Drive
Using CHKDSK, you can detect and potentially fix any file system errors, and bad sectors on your USB drive.
Before proceeding with CHKDSK, secure and recover all your files from the pen drive, as CHKDSK may cause minor data loss in an attempt to fix bad sectors.
Here’s how to scan your USB drive for errors using CHKDSK:
- Type “cmd” in Windows Search (Windows Key + S). Right-click on Command Prompt and choose Run as Administrator.
- Type chkdsk :X /r and press Enter. Replace X with the drive letter of your USB drive. You can locate the drive letter in Windows Explorer. In my case, the pen drive showed up as USB Drive (E:) in Windows Explorer, so the corresponding CHKDSK syntax was chkdsk E: /r.

- The CHKDSK scan may take a while.
4. Use SFC to Check the Integrity of System Files
Corrupt system files can hamper communication between your USB drive and Windows. The SFC utility checks the integrity of Windows’ system files and fixes them if they’re corrupt.
Like CHKDSK, you can run the SFC utility using the Command Prompt:
- Search for “cmd” in Windows Search (Windows Key + S). In the search results, right-click on Command Prompt and choose Run as Administrator.
- Type DISM.exe /Online /Cleanup-image /Restorehealth in the console and press Enter.
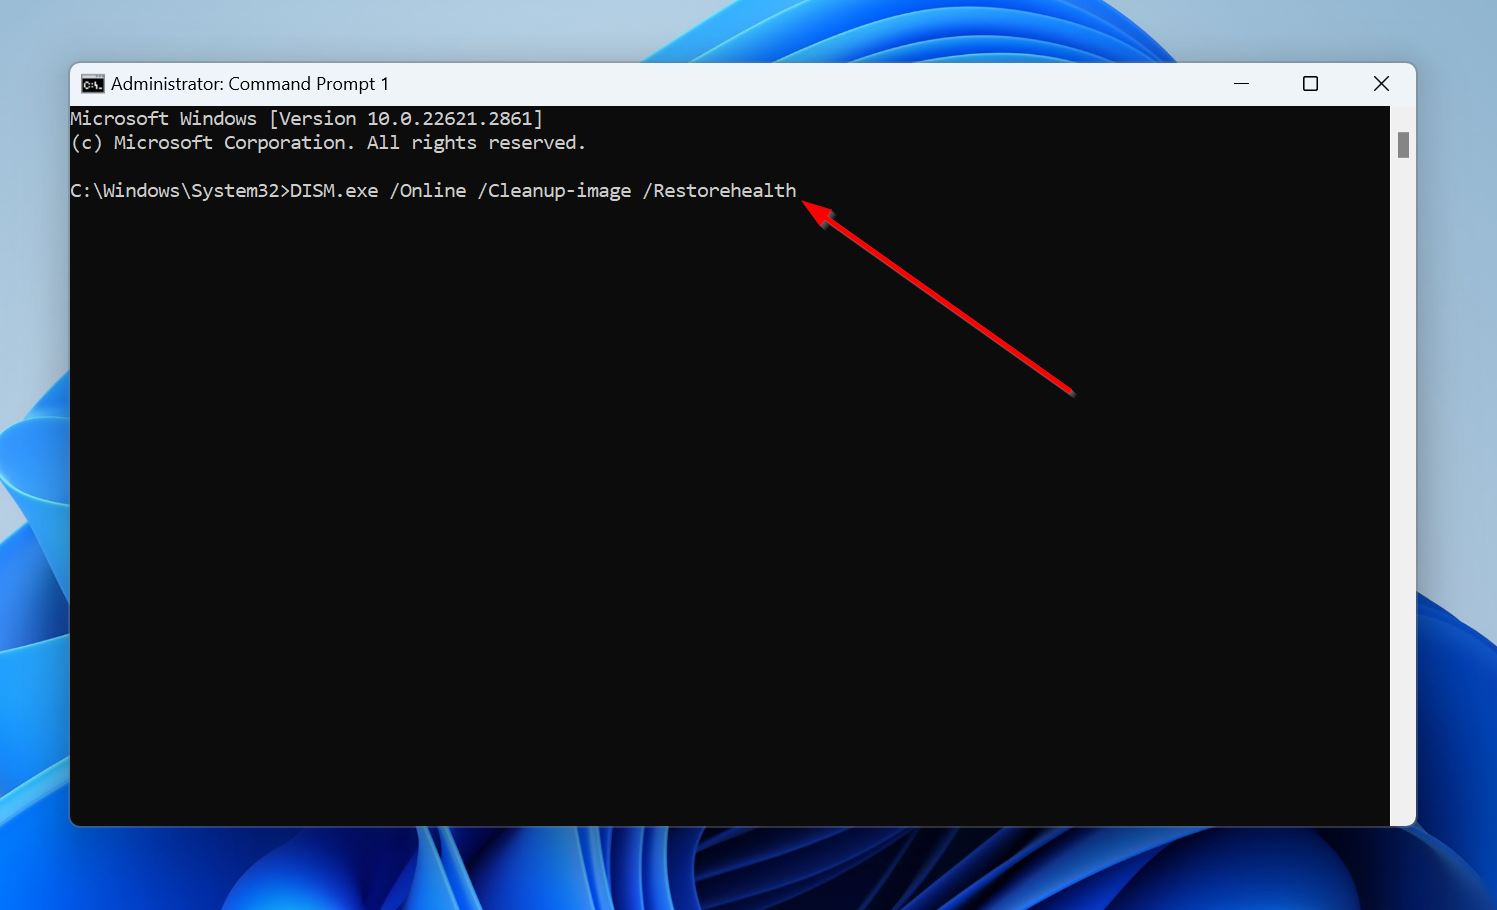
- Type sfc /scannow and press Enter.

- Wait for the SFC scan to complete. Then, reboot your PC and see if Windows detects your USB drive.
Perform a USB Health Check Using Third-Party Tools
Using Windows command-line utilities can be tedious if you’re a non-technical user. Luckily, numerous free third-party tools let you check your USB flash drive’s health using a GUI.
Just a quick note—many USB drives do not support S.M.A.R.T. monitoring. So, if a tool that primarily relies on reading S.M.A.R.T. values fails to detect your USB drive, there’s no need to worry, choose some other tool from our list, instead.
Here are some free third-party flash drive health checkers:
5. CrystalDiskInfo
CrystalDiskInfo reads your USB drive’s S.M.A.R.T. values and displays them neatly. You can use these raw S.M.A.R.T. values to gauge the present state of your USB drive, as well as predict failures. However, not all USB drives support S.M.A.R.T. monitoring.
Note: The screenshots below display the S.M.A.R.T. report of an M.2 SSD. But, if your USB drive supports S.M.A.R.T., you will see a similar screen with many common entries.
Here’s how to use CrystalDiskInfo to check your flash drive’s health:
- Download CrystalDiskInfo and install it. You can also choose the portable .ZIP file, extract it, and run the program.
- Connect your USB drive to your computer.
- Open CrystalDiskInfo.
- Click on Function > Advanced Feature > Raw Values. Select 10 [DEC]. This will simplify the RAW values you need to read.
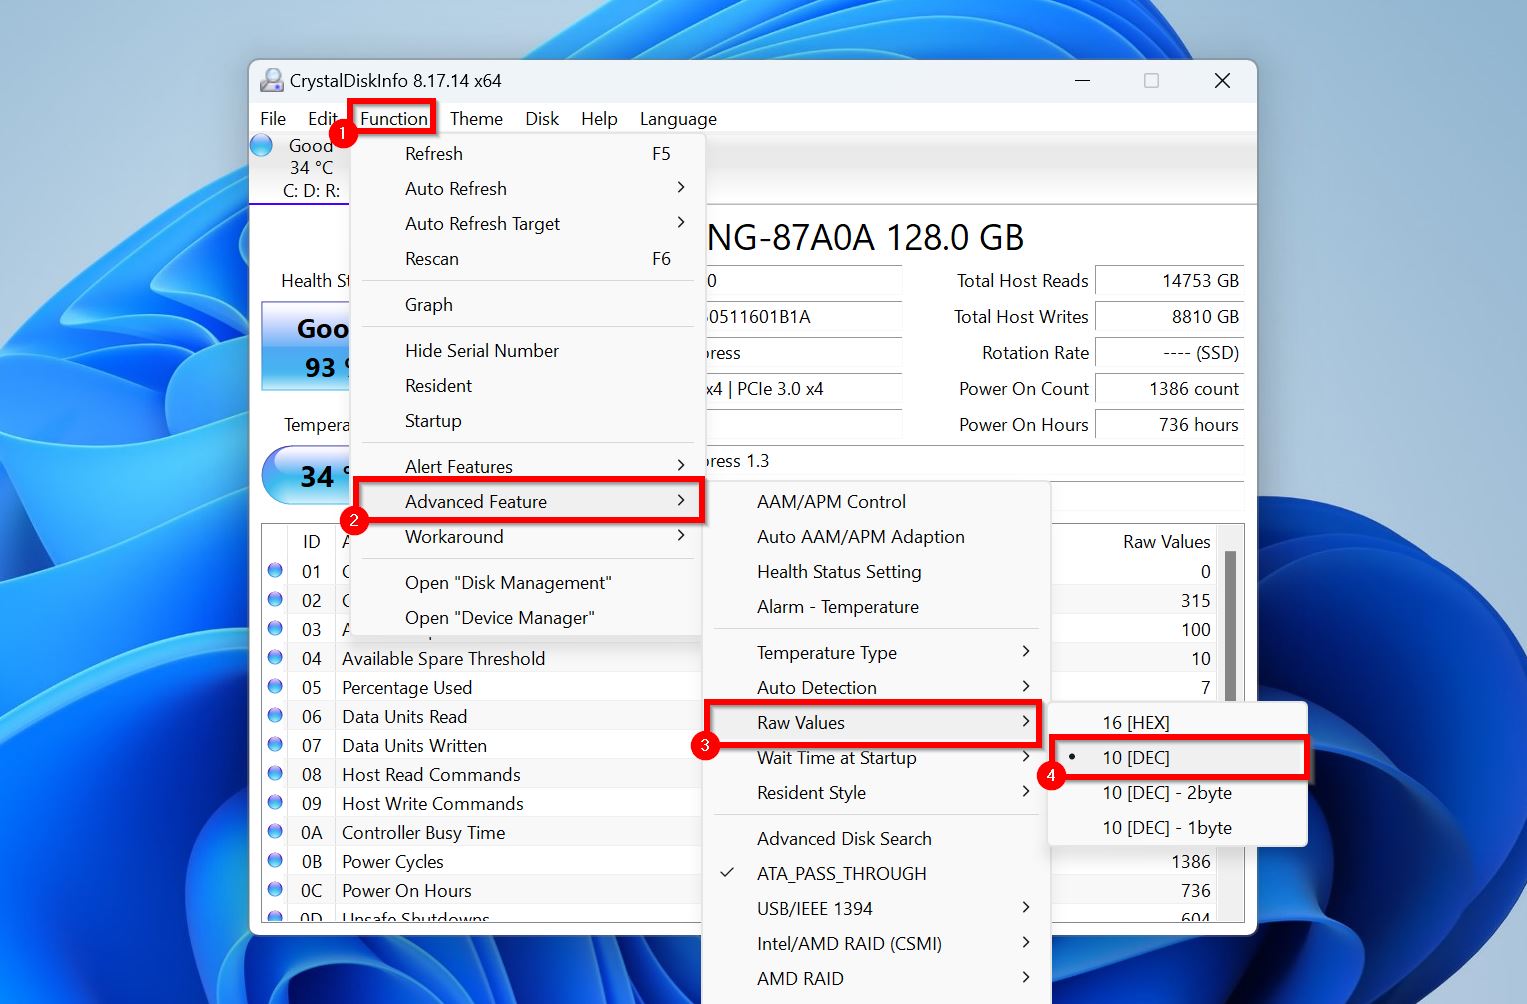
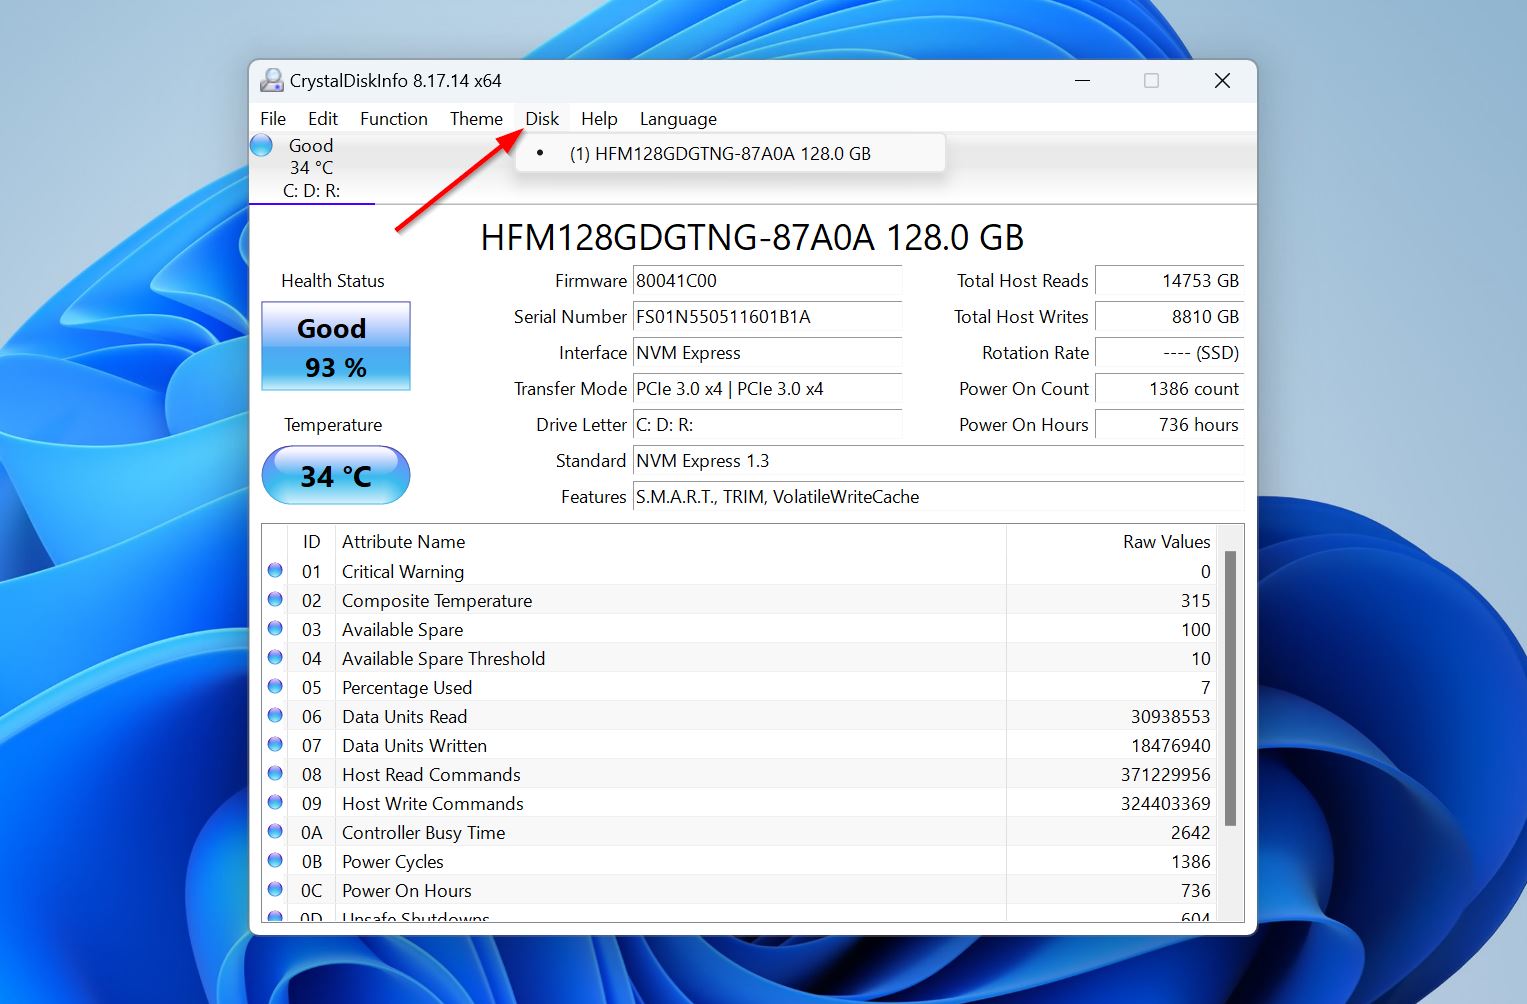
- Click on Disk and ensure that your USB drive is selected.
- Look at the Raw Values next to each S.M.A.R.T. attribute and see if the value is unusually high or low. Use this guide as a reference point.
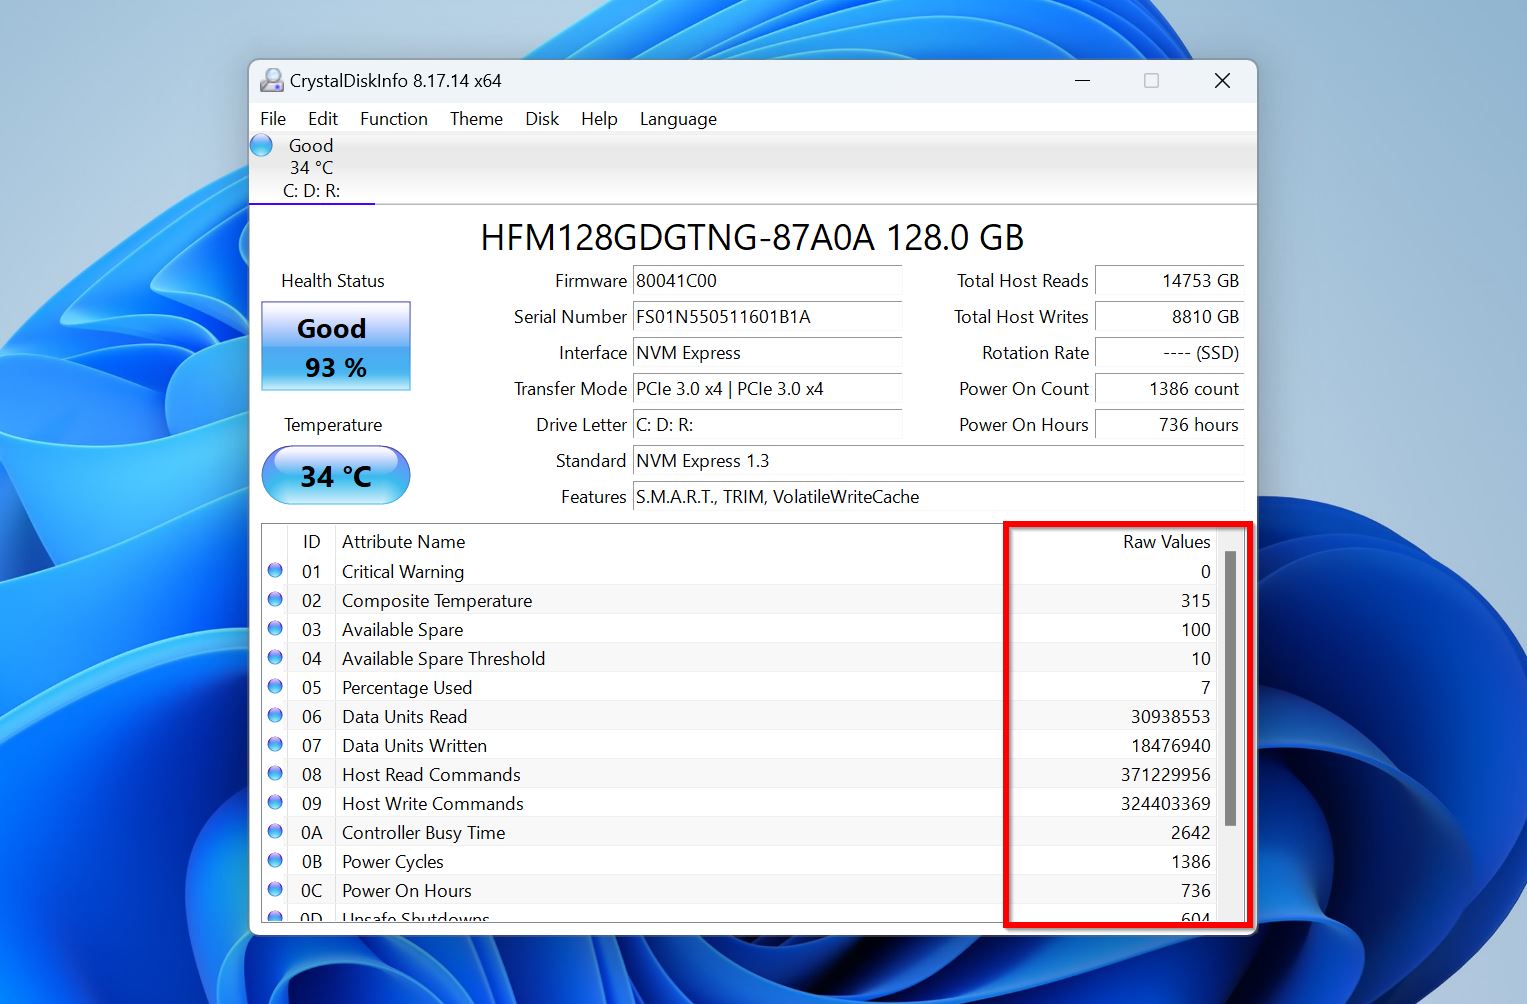
Some S.M.A.R.T. attributes’ RAW values you should pay special attention to, are:
- Critical Warning: The lower the better. Ideally, it should be zero.
- Percentage Used: The lower the better.
- Number of Error Information Log Entries: The lower the better.
- Media and Data Integrity Errors: Should be zero. If the RAW value is more than zero, pay special attention to any rapid increases as it could indicate a failing USB drive.
6. H2testw
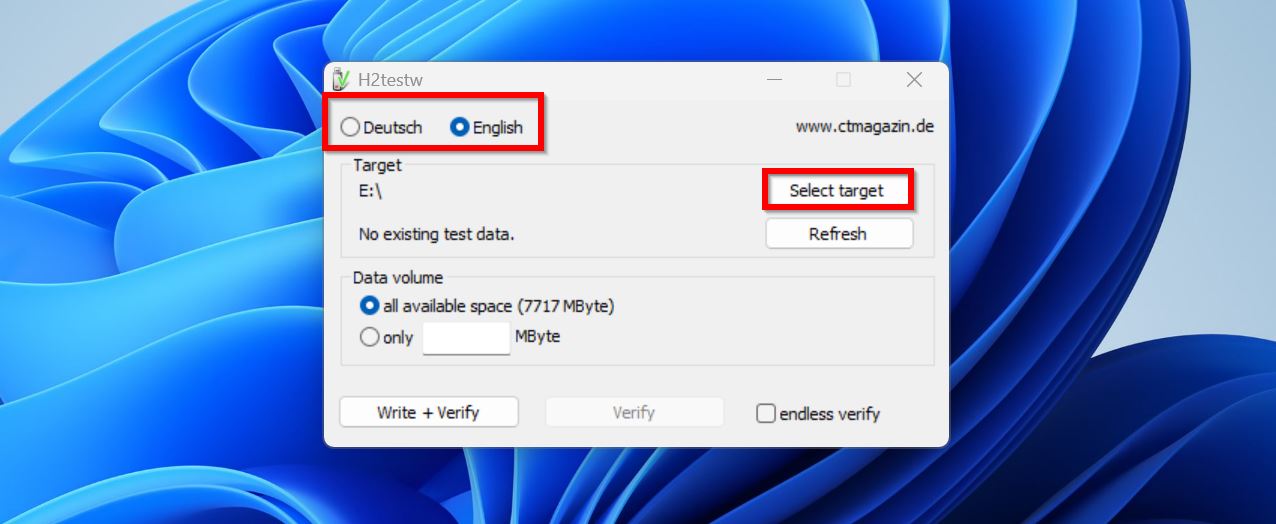
H2testw is a lightweight, easy-to-use tool designed to detect whether you’re actually getting the advertised storage capacity on your flash drive, or SD card.
The program works on a simple principle. First, It generates random data and writes it to the USB drive until it’s full. Then, it reads this data to check if it’s identical to what was written. Once the process completes, H2testw generates a detailed report listing any errors, along with any discrepancies between the written data, and what it read. It also informs you if there’s lesser storage capacity than listed by the drive.
Here’s how to use H2testw to test your USB and see if it’s healthy:
- Download H2testw and download the package (.ZIP). The website is in German, so ensure you click on the translate prompt on your web browser.
- Extract the files in the downloaded .ZIP archive and launch h2testw.exe.Choose the language you wish to use.
- Click on Select target, browse for your USB drive, and select it.
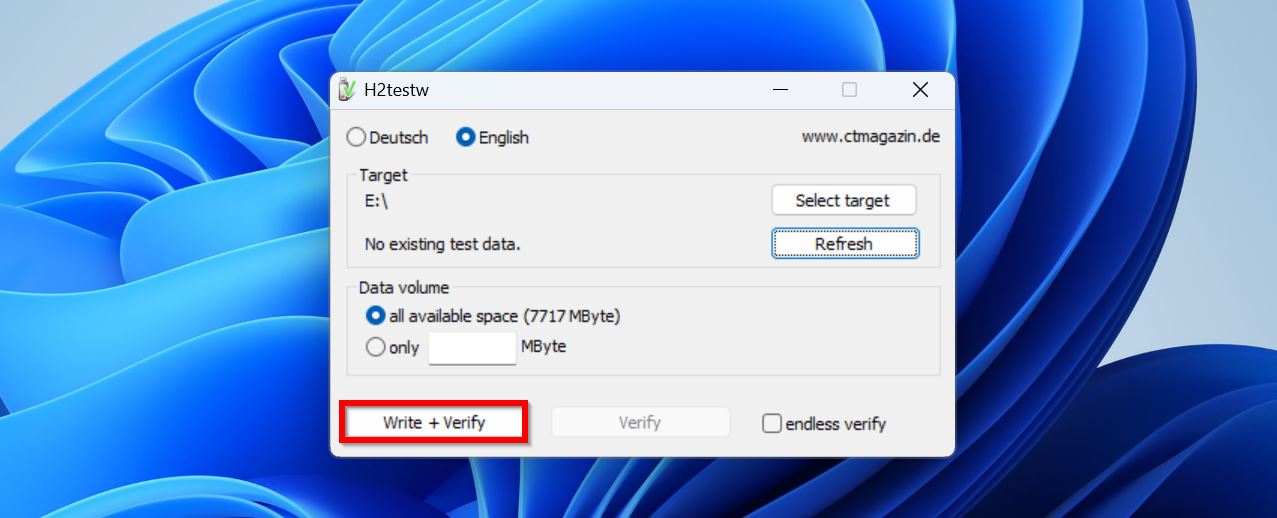
- Click on the Write + Verify button to begin the error-checking process.
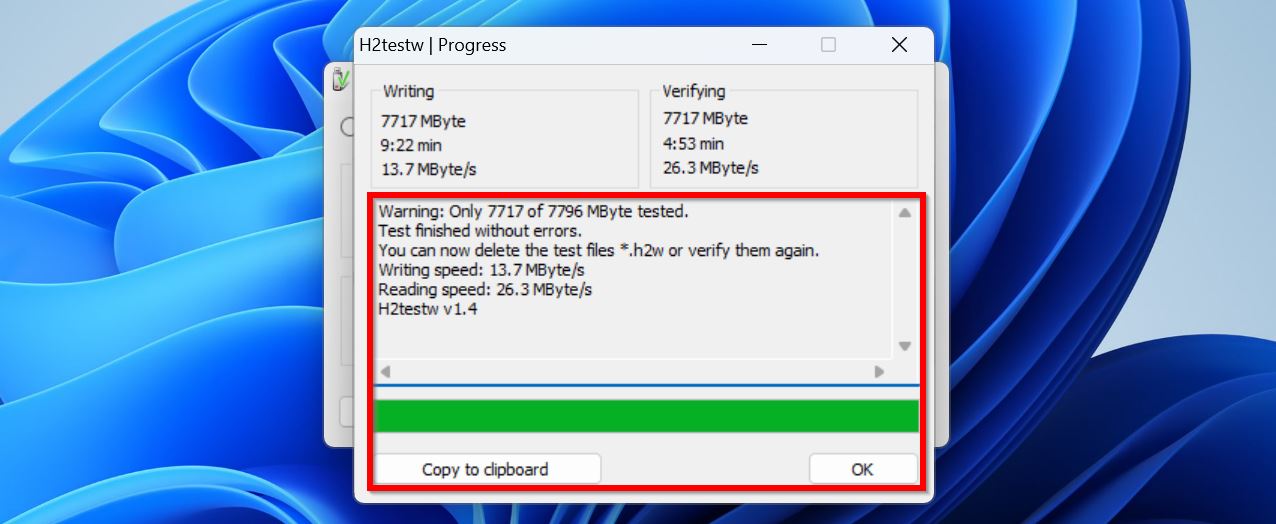
- Once the process completes, see if H2testw lists any errors in the report. If there were no errors, the screen will display, “Test finished without errors.”
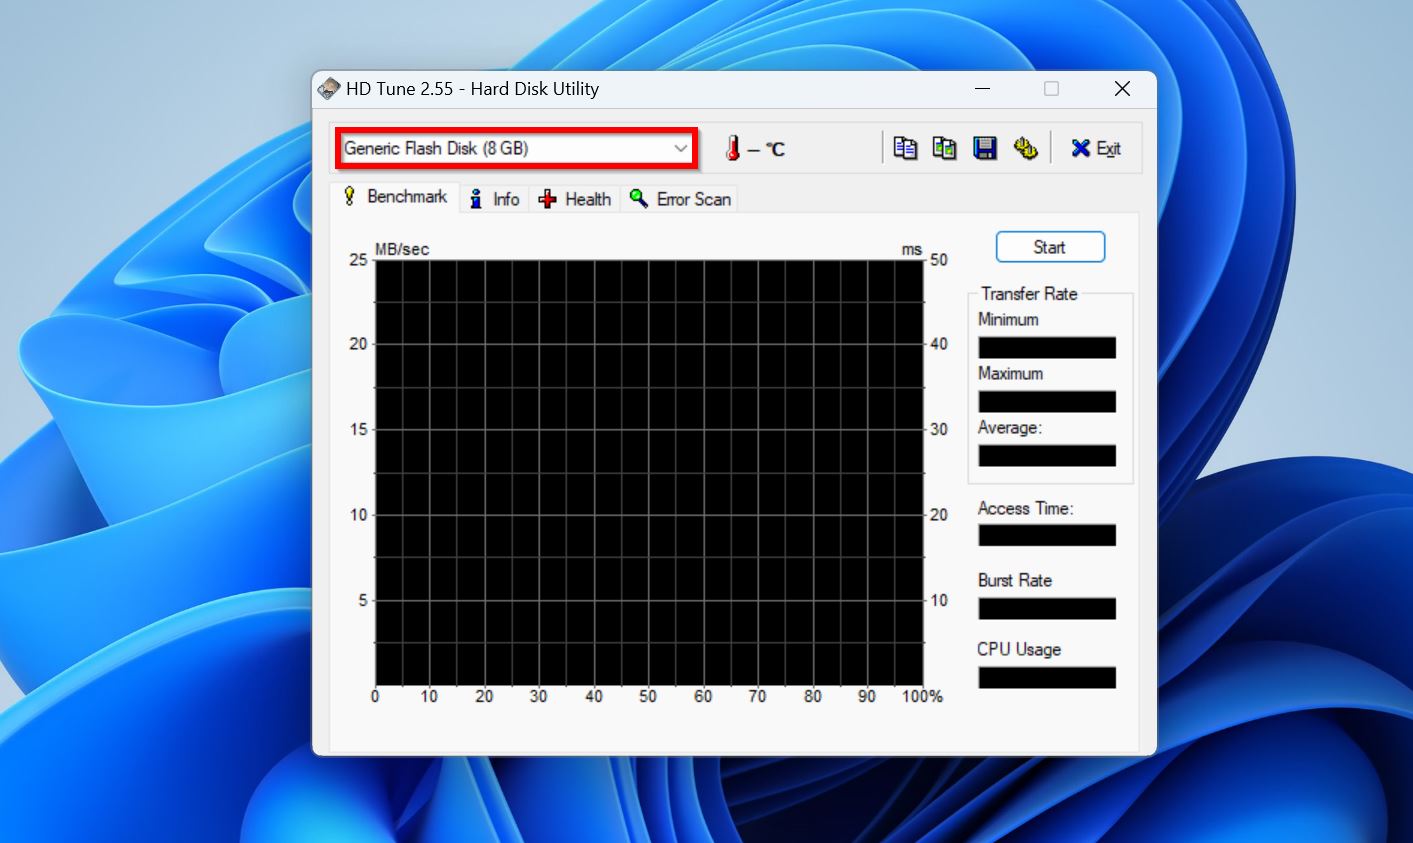
7. HDTune
HDTune is another simple, yet effective USB drive health checker. The program’s regular version lets you benchmark a drive, view its S.M.A.R.T. status (if supported), and perform an error scan.
The error-checking feature scans each data block on your USB drive and marks them as OK or Damaged.
Here’s how to check your USB drive’s health using HDTune:
- Download HDTune and install it.
- Open HDTune, and select your pen drive from the drop-down menu towards the top-left corner.
- Click on the Error Scan tab, and then click Start. Leave the Quick Scan option unchecked.
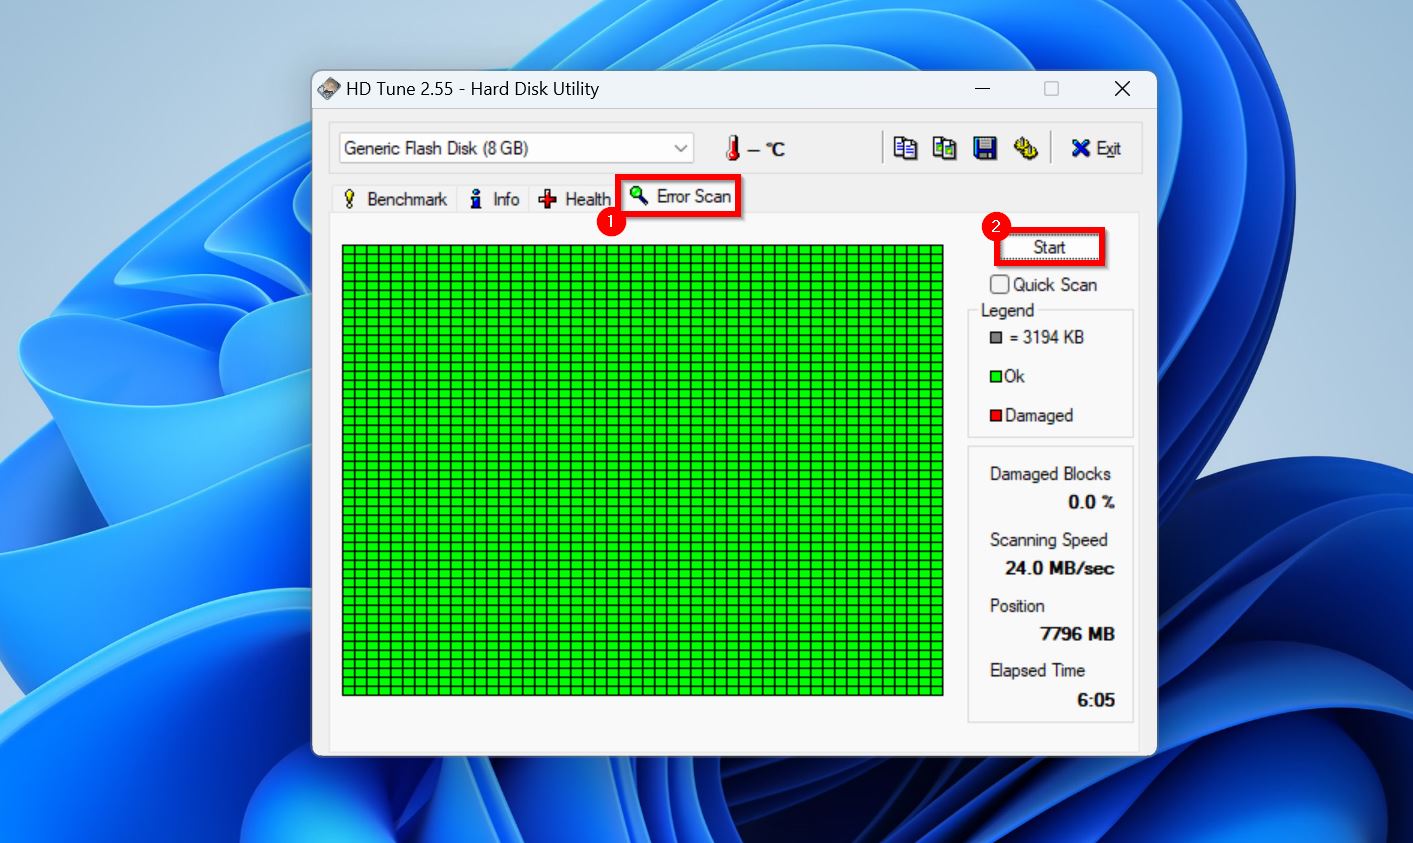
- Wait while HDTune scans your flash drive. Once the scan is completed, check the number of damaged blocks. Ideally, it should be zero. If there are many damaged blocks, the pen drive could be on the verge of failure.
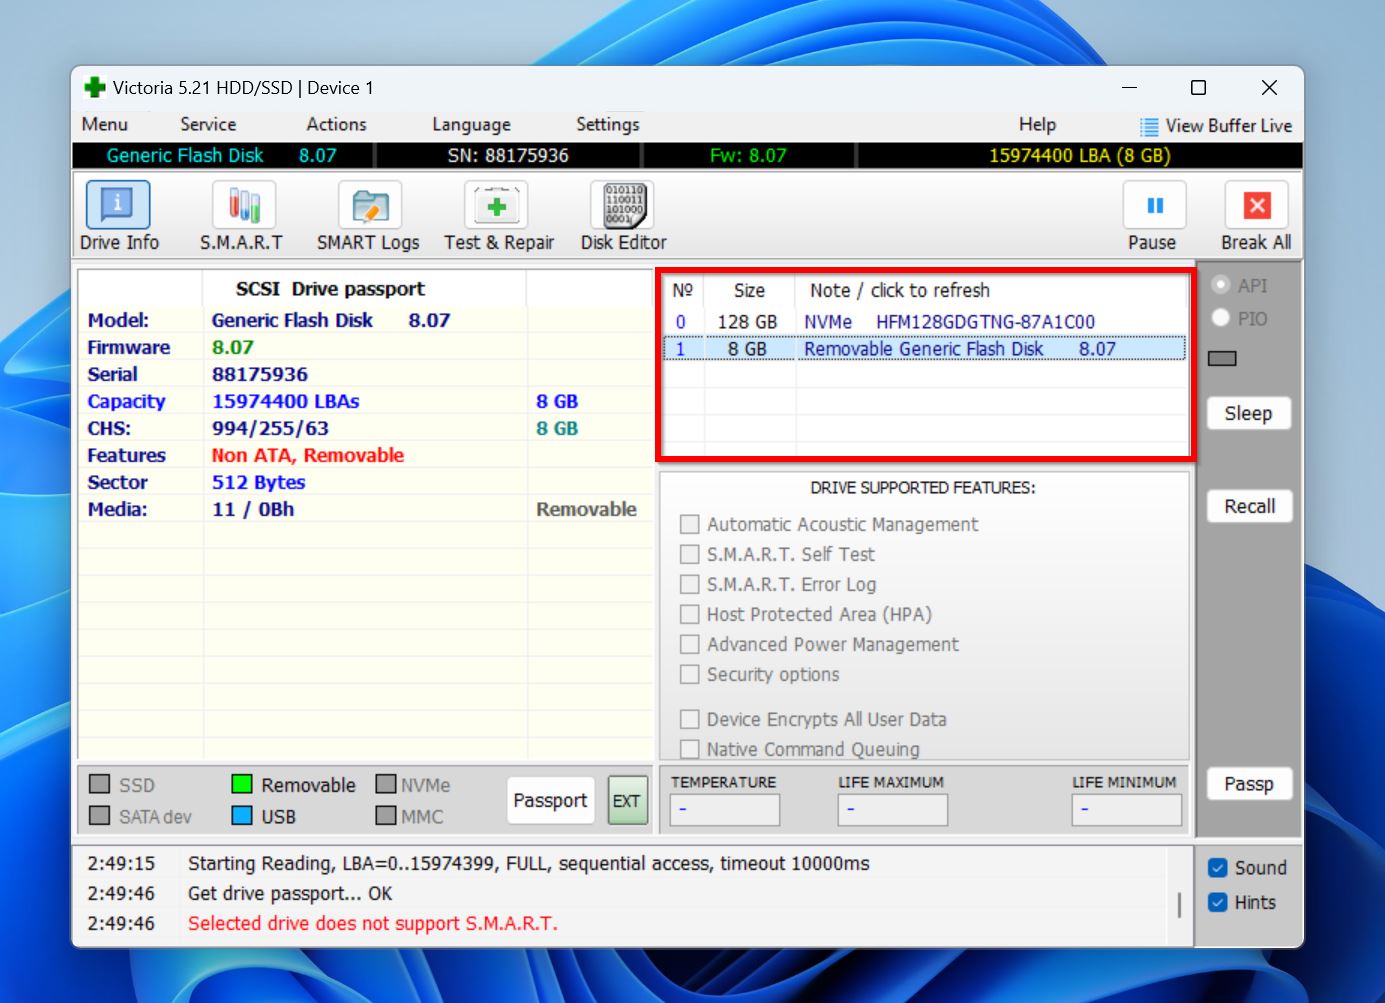
8. Victoria HDD/SSD
Victoria HDD/SSD is a storage diagnostic utility that can test your USB drive’s speed, scan it for errors and bad sectors, and display its S.M.A.R.T. status. Depending on the option you choose when scanning for bad sectors, Victoria HDD/SSD can also erase, refresh, and remap bad sectors.
Unlike HDTune, which simply marks data blocks as OK, or Damaged, Victoria HDD/SSD puts them on a scale that can be confusing to read. The program sorts data blocks depending on the time (in milliseconds) it takes to access them.
Here’s how to check your pen drive’s health using Victoria HDD/SSD:
- Download Victoria HDD/SSD and extract the .ZIP archive.
- Launch Victoria HDD/SSD by double-clicking the Victoria.exe file in the installation folder.
- Select your USB drive from the block containing the list of drives connected to your PC. See the screenshot below.
- Click on the Test & Repair option.
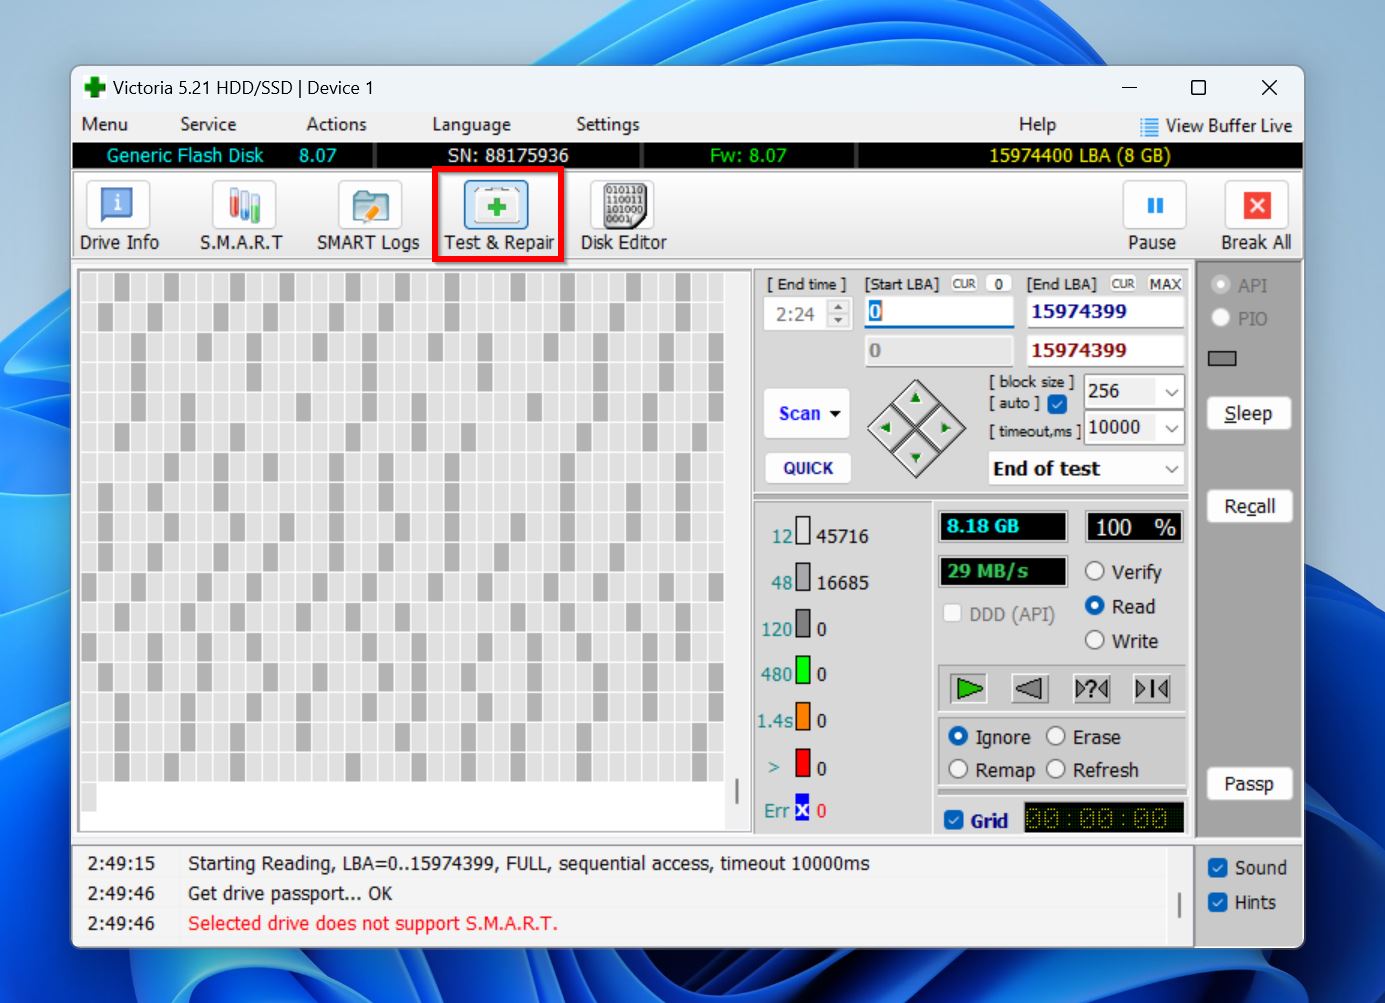
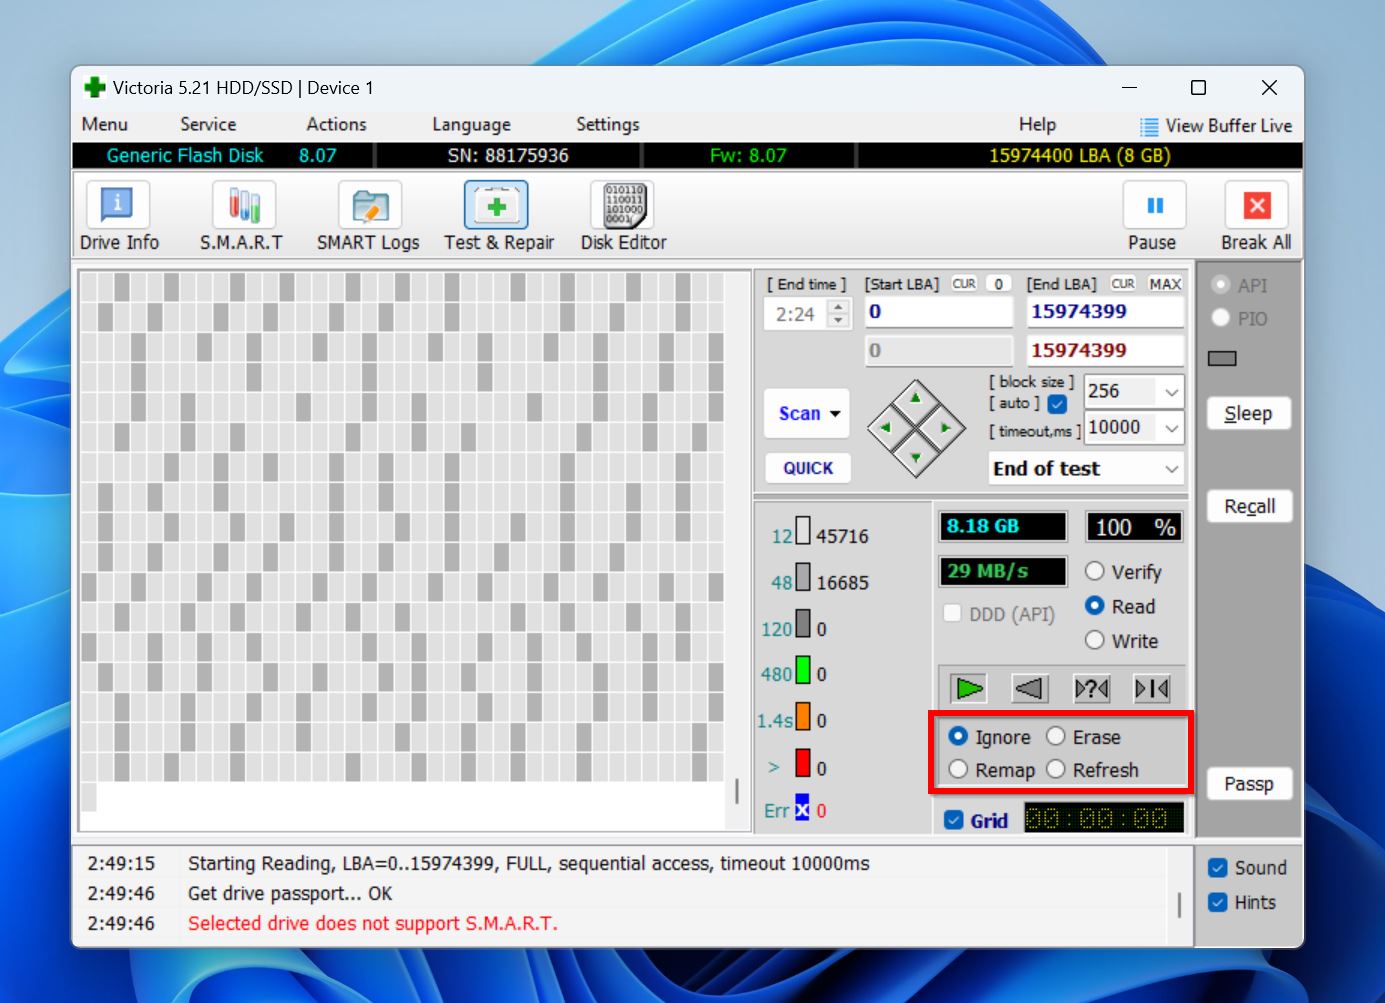
- Choose whether you wish to Ignore, Remap, Erase, or Refresh any bad sectors discovered during the scan. Assuming you’ve recovered all your data from the USB drive, you can pick the Remap option, which assigns a working, reserve sector to the bad sector’s coordinates. Otherwise, just choose the Ignore option.
- Click on Scan and wait for Victoria HDD/SSD to finish scanning the pen drive.
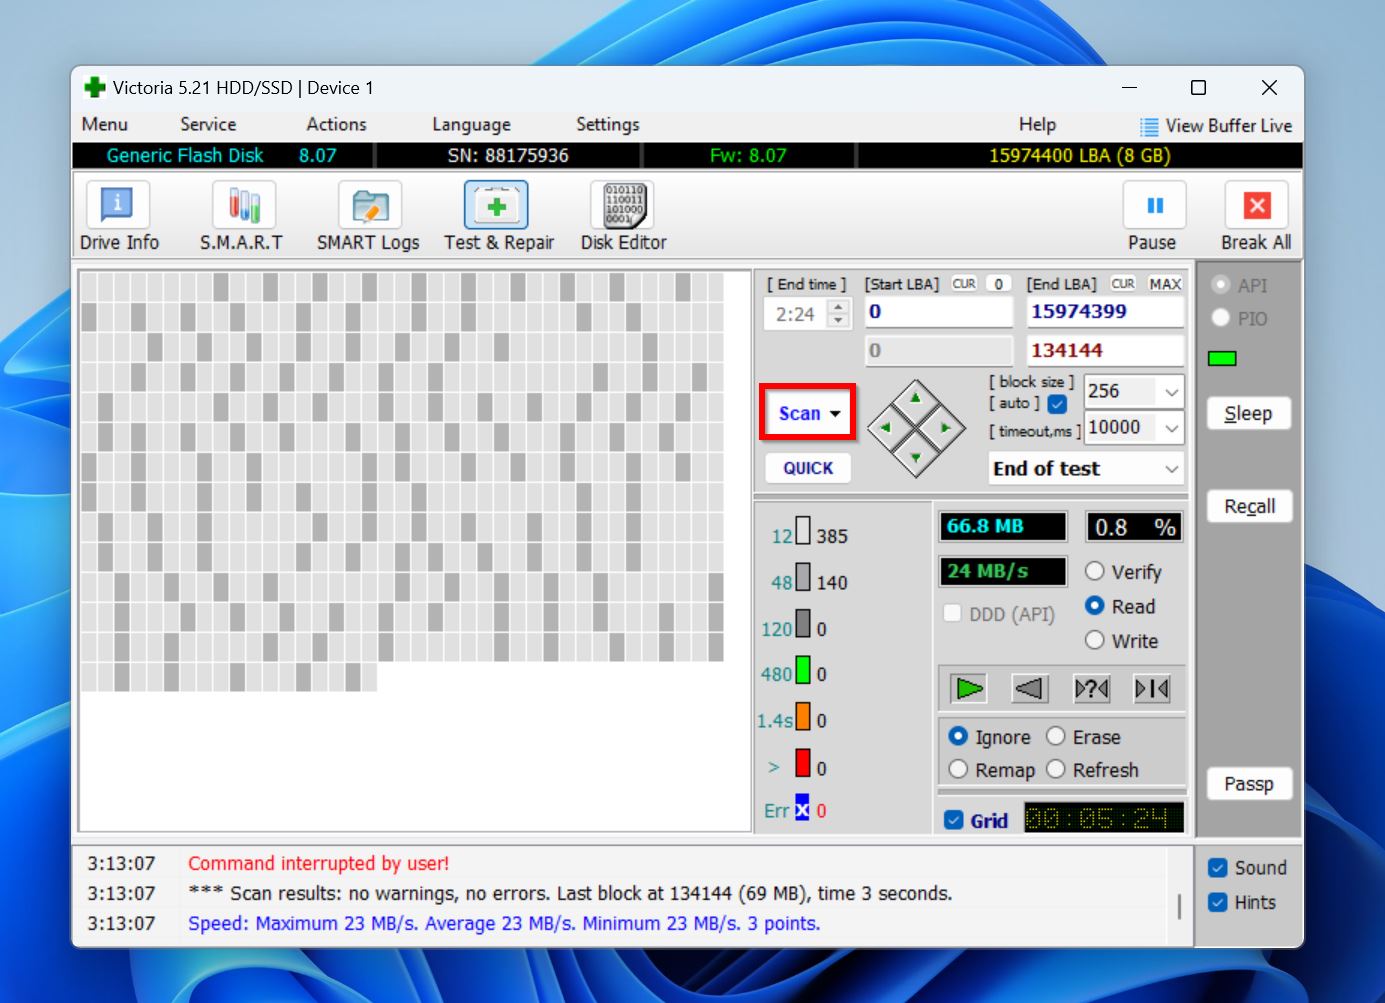
- To read the scan results, look at the sections highlighted in the screenshot below. Ideally, the number next to the orange, red, and Err boxes should be zero. This means there are no problematic, or bad blocks in the USB drive.A message stating, Scan results: no warnings, no errors, indicates the drive is working as it should.

Honorable Mentions
The methods and tools outlined in the preceding sections are typically all you need to comprehensively check your flash drive’s health on Windows.
But, if you’re looking for even more ways, and third-party flash drive health check tools, here they are:
- Perform an Antivirus Scan Using Windows Defender: Malware frequently corrupts file systems, and causes data loss. A virus-infected USB drive is hazardous because it can spread the virus to the computers you connect it to. If you notice any errors, and data loss on your pen drive, it’s a good idea to scan it using Windows Defender, or some other antivirus tool.
- Full Format the USB Drive: A full format overwrites each sector on your USB drive with zeroes, providing you with a clean slate. Additionally, during a full-format, Windows identifies and marks any bad blocks as unusable. To full-format your USB drive, right-click on your drive in Windows Explorer > Format, uncheck the Quick Format option, and click on Start. Keep in mind that data recovery is practically impossible after a full format.
- TestDisk: Using TestDisk, you can analyze your USB drive’s partition structure, and recover any lost partitions that the program discovers. We checked out TestDisk just a while back.
- DiskGenius: While DiskGenius’ is an alternative to Disk Drill, with its primary purpose being data recovery, the program can also view your pen drive’s S.M.A.R.T. info, and verify/repair any bad sectors on the drive. For those interested in DiskGenius, we also have a review of the software.
- Check Flash: Targeted at advanced users, Check Flash performs a detailed USB health check. You can manually select the access type, the test type (read only, or read/write), and the test length.
- Hard Disk Sentinel: You can use Hard Disk Sentinel to view your USB drive’s S.M.A.R.T. information as well as perform two different types of health checks—hardware self test, and surface test.
Do USB Health Checks Differ From HDD Health Checks?
Flash drives, and HDDs fundamentally differ in the way they store data. USB drives use flash storage (NAND) technology to store information, whereas HDDs store data on magnetic disks. This makes HDD health checks slightly different from the ones on USB drives.
On HDDs, various moving parts like the spindle, actuator, read/write head, and the platter need to be taken into account.
Additionally, the connection interface—USB-A in the case of most pen drives, and SATA on an HDD—also plays a big part in the type of health checks that can be performed.
Unlike HDDs and SSDs, most pen drives don’t support S.M.A.R.T. monitoring—which is commonly used to detect impending failures.
Conclusion
Checking your USB drive’s health is usually a simple affair. Proceed in this order—first, check the drive for physical damage, then use Windows tools like CHKDSK, and SFC. If you’re not comfortable using command-line utilities—CHKDSK, and SFC—use third-party tools like CrystalDiskInfo, H2testw, HDTune, and Victoria HDD/SSD.
We cannot stress this enough—secure or recover all your files from the USB drive before proceeding to check its health (especially with methods that simultaneously check and ‘fix’ your USB drive). The safest way to do this is to create a disk image of the pen drive, and scan this disk image for recoverable data.
This article was written by Manuviraj Godara, a Staff Writer at Handy Recovery. It was also verified for technical accuracy by Andrey Vasilyev, our editorial advisor.
Curious about our content creation process? Take a look at our Editor Guidelines.