When Windows informs you that a dynamic disk is invalid, you should deal with the issue as soon as possible to minimize the chances of data loss. But…
- What is the best course of action for dealing with such problems?
- When is a disk “dynamic”? How is it different from “non-dynamic” disks?
- Can you recover data from dynamic disks?
- Is it possible to fix an invalid dynamic disk, or do you have to replace it?
Thankfully, we have the answers to those questions and more.
What are Basic/Dynamic Disks?
Both basic and dynamic disks are ways to organize data on a hard drive in Windows. Dynamic disks offer a new way to organize data on storage devices compared to the classic approach, which is now referred to as “basic disks”. Although dynamic disks are more versatile than basic disks in many ways, they also come with some shortcomings.
As the sizes of hard disk drives increased, partitions were introduced to the mix to increase their versatility.
Splitting HDDs into up to four Primary partitions allowed users to..:
- 💾 Treat them like separate storage spaces.
- 🗃️ Keep data organized by saving different types of files on each partition.
- 💻 Install multiple OSes and choose which to use during boot.
Or, you could use up to three Primary partitions plus an Extended one. The Extended partition could then be split into even more Logical (sub-) partitions (but which couldn’t host OSes).
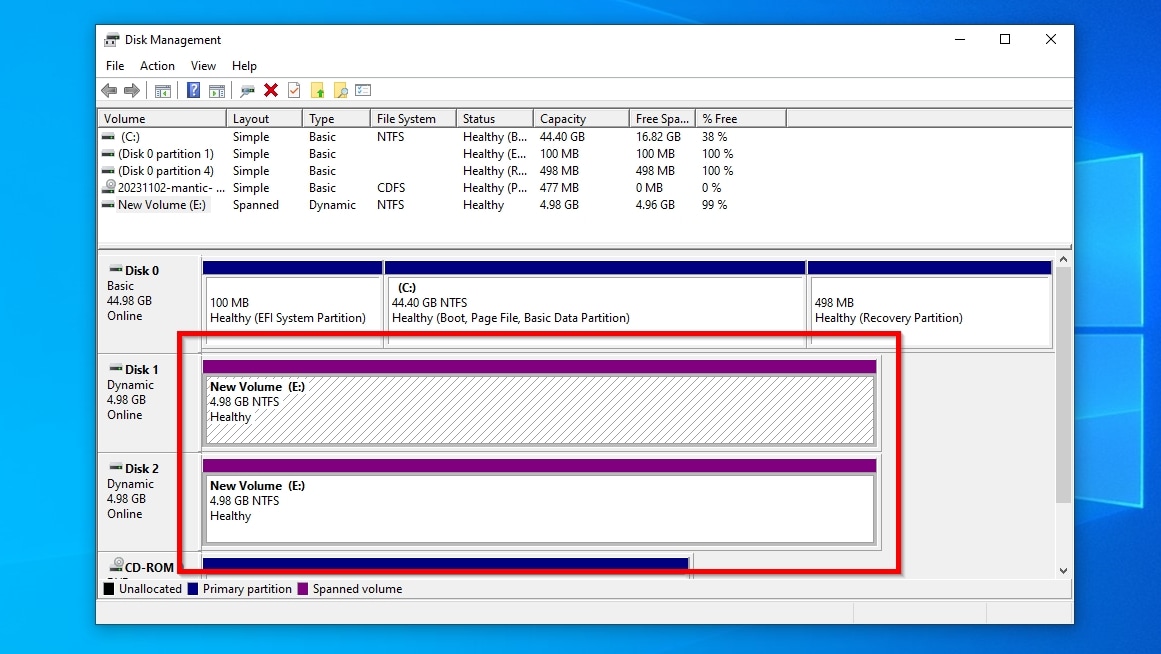
The new “dynamic” storage paradigm swaps Partitions for “Volumes”, and isn’t limited in their number.
Even better, a volume can be expanded to more than one device. Like hardware-based RAID setups, this allows using two or more HDDs as a single storage device for more storage, increased resiliency, or improved read and write speeds.
We won’t dive into how RAID setups work in this article since we’ve already covered that in our guide on how to recover data from NAS using NAS Recovery Software. Check it out for more info on their types and differences.
Still, the increased flexibility of dynamic disks comes with some significant cons:
- 🔨 It can be harder to repair invalid dynamic disks.
- 🔍 It may be almost impossible to recover data from a dynamic hard disk of a particular type.
- 🍎 They might be incompatible with other OSes and older PCs.
- 🪟 You can’t boot an OS from them (except on “mirrored” setups).
Why Does a Dynamic Disk Become Invalid?
Various issues can render invalid a dynamic disk:
- ⌛ HDDs are mechanical devices, and their components wear down with time. A failing board can lead to disconnections, data corruption, etc., while an old and “tired” magnetic surface may accumulate bad blocks. Similarly, the memory chips within SSD and NVMe drives can withstand a finite number of writes. After that, they might start failing.
- ⚡ An abrupt disconnection, power outage, or other “electricity-related adventures” might corrupt the partition table or the file system on a storage device.
- ✍️ An interrupted writing operation or other types of software-related problems (like a misbehaving app, a malware infestation, etc.) may lead to corrupted data. Rarely, they can even “break” the file system and leave you with an invalid disk pack of HDDs.
- 🪟 After an upgrade, a dynamic disk might go missing if it spans multiple HDDs and the new version of the OS fails to detect and mount them as a pack.
Can You Recover Data From an Invalid Dynamic Disk?
Although we won’t cover how dynamic disks compare to RAID setups in this article, you should know about how the way they’re set up can affect the chances of recovery:
Volume Setup | Recovery chances | Details |
Simple | Very High | Works in almost the same way as “simple” basic disks. |
Spanned | High | “Extends” one disk’s storage on others. Since files are stored in a “linear way”, like on basic volumes, recovery is relatively easy. |
Mirrored | Very High | “Clones” half of its disks on the other half. Since it’s like a Spanned Volume with extra backups, there are high chances of recovery. |
Striped | Very Low | “Divides” data among multiple disks to achieve their combined speed. There are low chances of recovery since each drive only holds pieces of each file. |
RAID-5 | Medium | “Spreads” data among multiple disks, also storing parity data on them as a safeguard for recovery. Medium to good chances of recovery since files aren’t stored “partially” on it. |
If you want to recover data from a typical “basic” disk, maybe one you were using on your old PC, check our guide on how to retrieve data from an old Hard Drive in 5 simple steps.
Is It Possible to Convert an Invalid Dynamic Disk to Basic Without Losing Data?
Unfortunately, the process of converting an invalid dynamic disk to basic, or the opposite, doesn’t preserve the data on the device. In practice, the result is the same as formatting the disk from scratch. Still, it is possible to perform such a conversion without losing any data by introducing an app like Disk Drill into the equation.
As we saw when we reviewed the app, Disk Drill is one of the best data recovery solutions. This advanced in capabilities but straightforward to use piece of software can locate your files even on an invalid dynamic disk. It can then recover them to another storage device. With your files safely copied there, you can convert the dynamic disk back to basic without worrying about losing them.
To recover your files from an Invalid Dynamic Disk with Disk Drill:
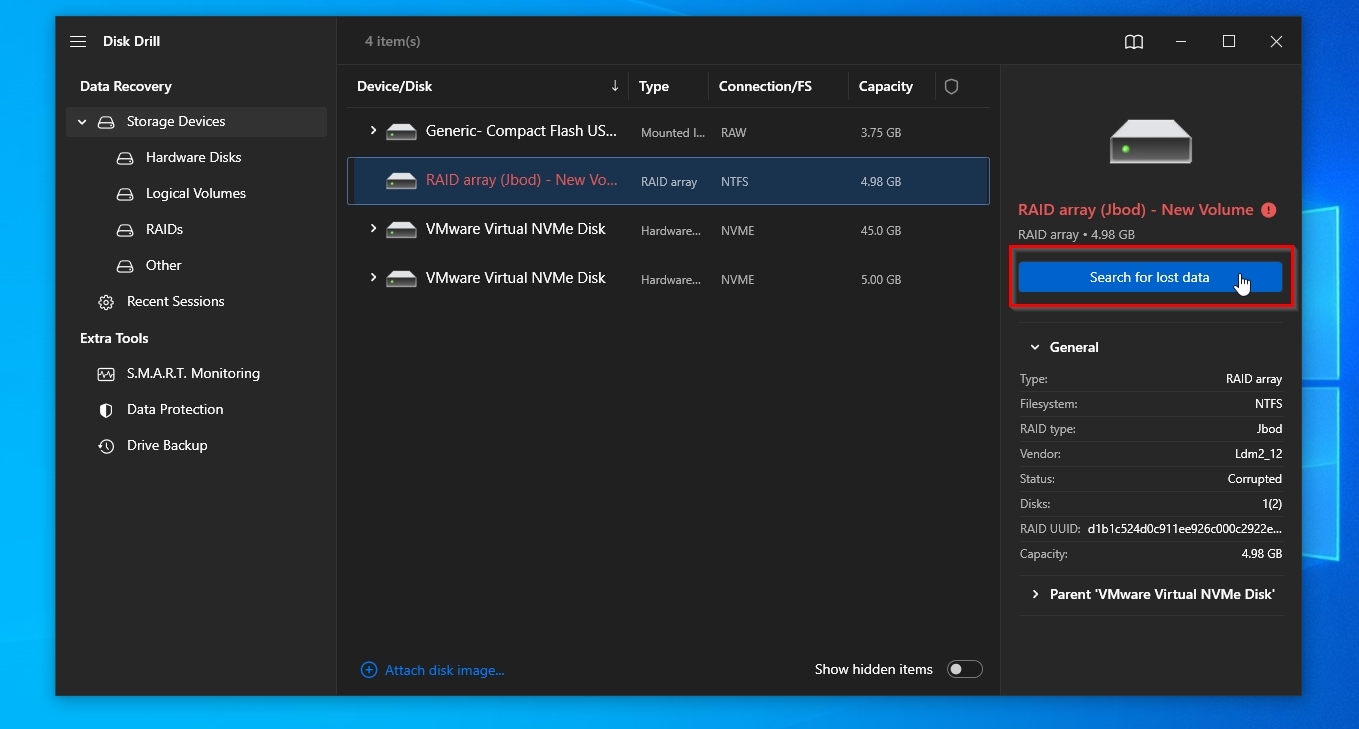
- Download the app from Disk Drill’s official site and install it. Run Disk Drill, and select your dynamic disk’s volume, which will show up as a RAID array in the app’s Device/Disk list. Then click on Search for lost data.
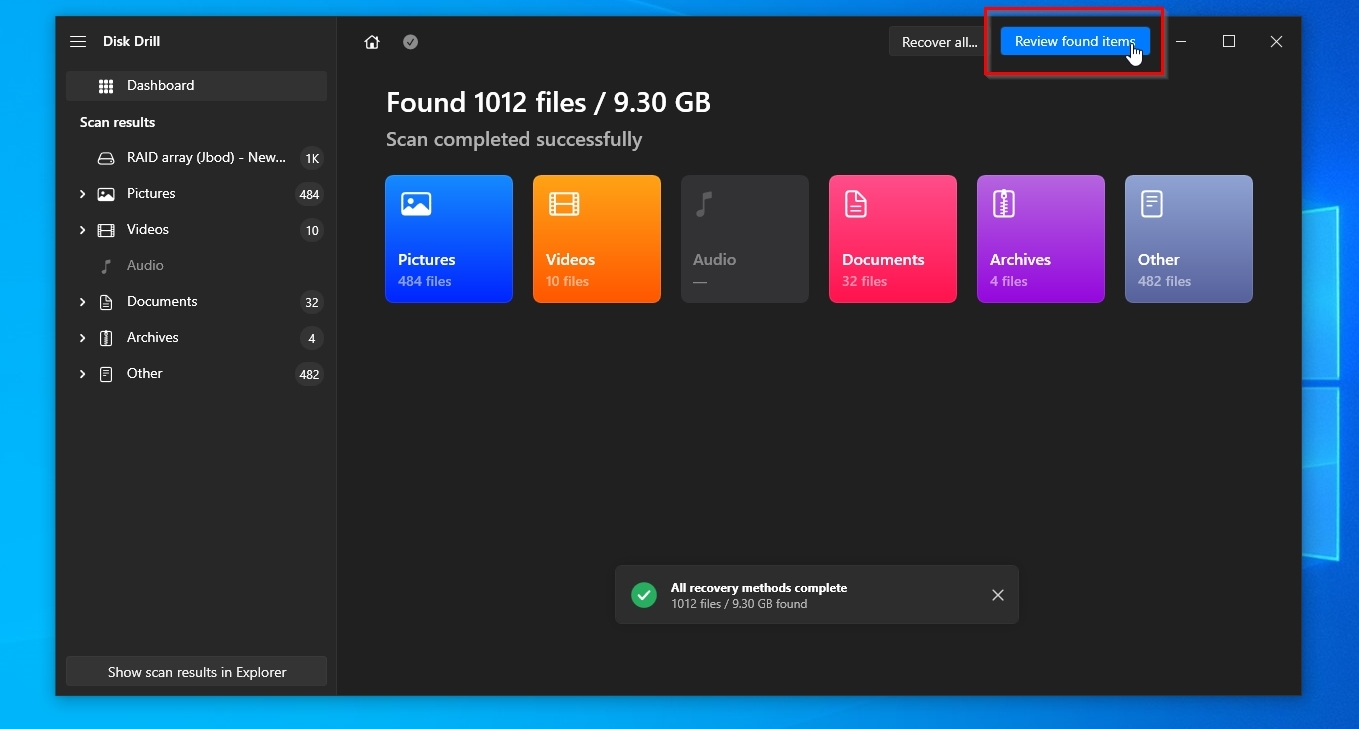
- When Disk Drill informs you that “All recovery methods are complete”, you can close that mini pop-up window and click on Review found items to see the files it detected.
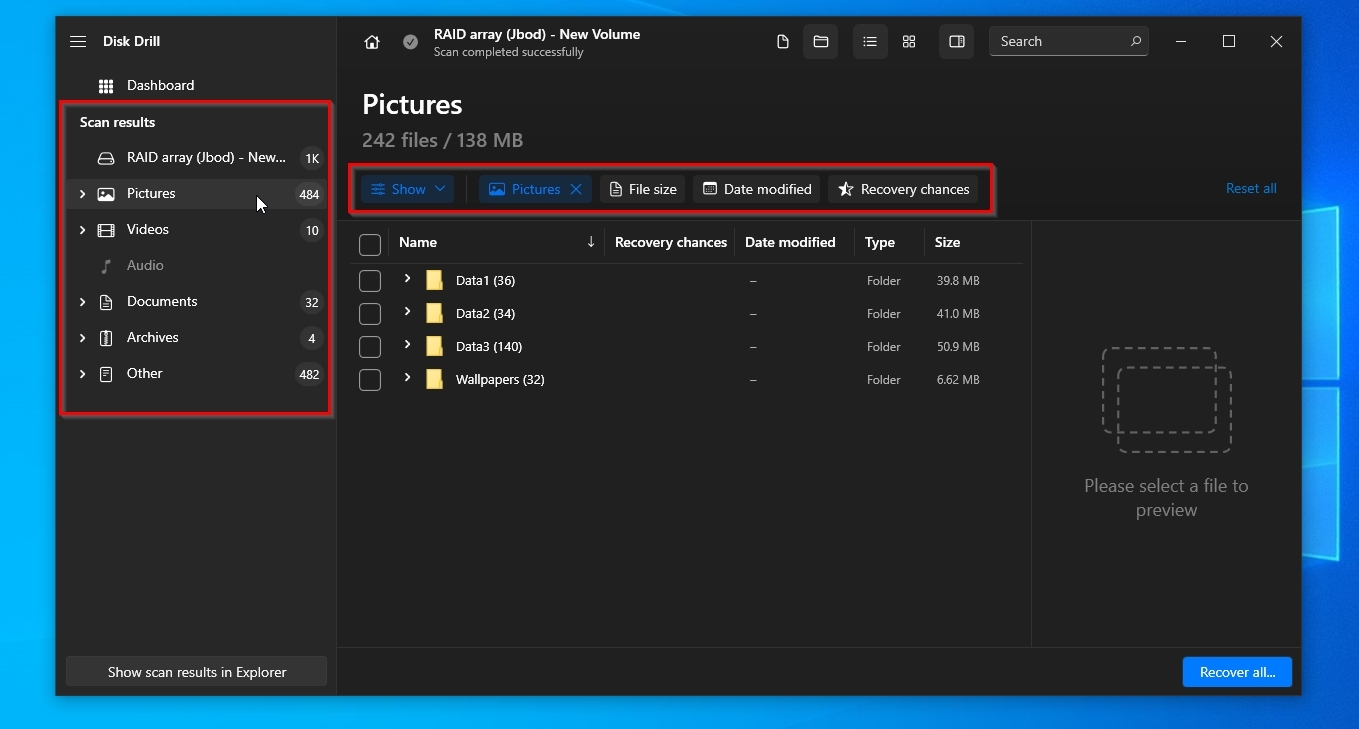
- If Disk Drill found too many files, the categories on the left and the filters above the file list can help you locate the files you’re seeking. For example, you can have Disk Drill only show you pictures or documents, see only files modified between two dates, etc.
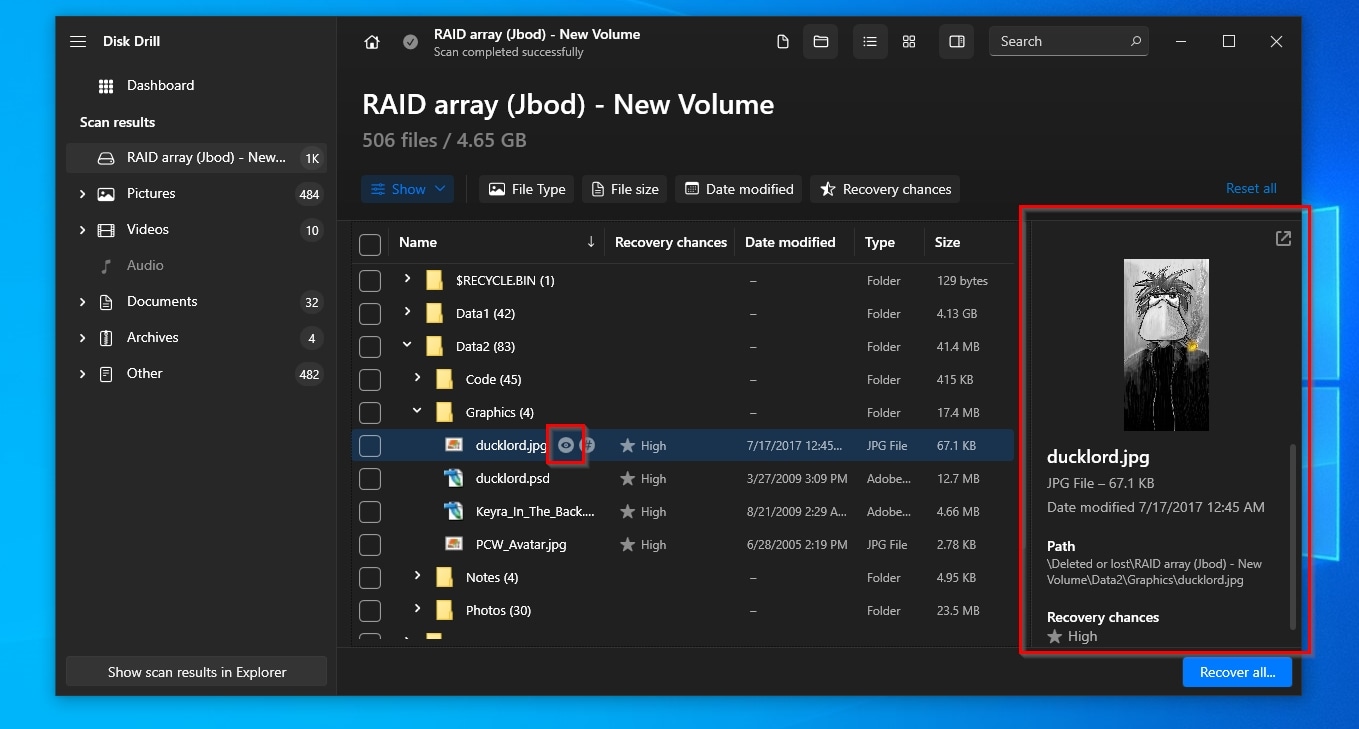
- If it’s not already visible, by clicking on the little eye icon next to a filename, you can enable Disk Drill’s preview pane. Depending on the selected file’s type, this pane will show details about it or its actual content.
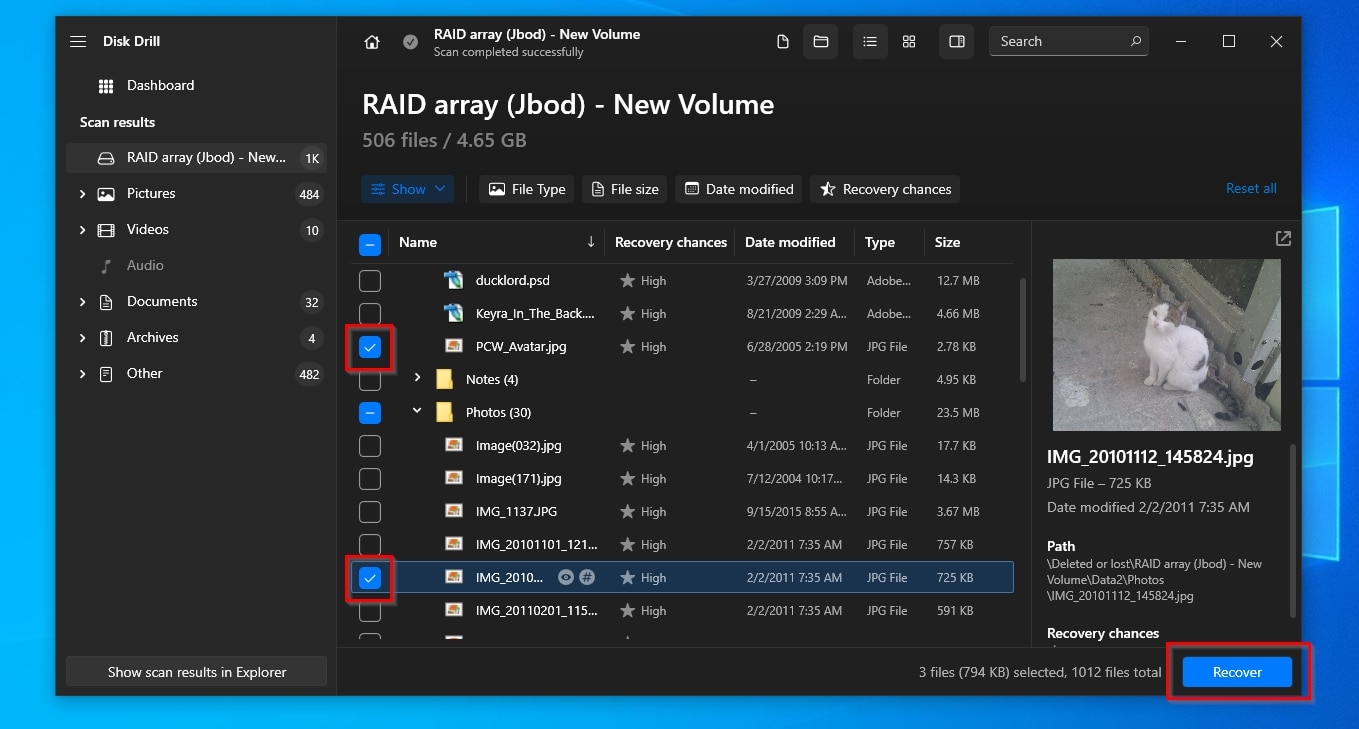
- When you find the files you want to get back, mark them for recovery by placing a checkmark on their left. Then click on Recover.
- Disk Drill will ask you to select a destination folder where it will store all recovered data. Make sure to choose one on a different storage device than the one from which you are recovering files. If your desired destination isn’t listed, click on Choose destination and select a folder. Then click on Next.

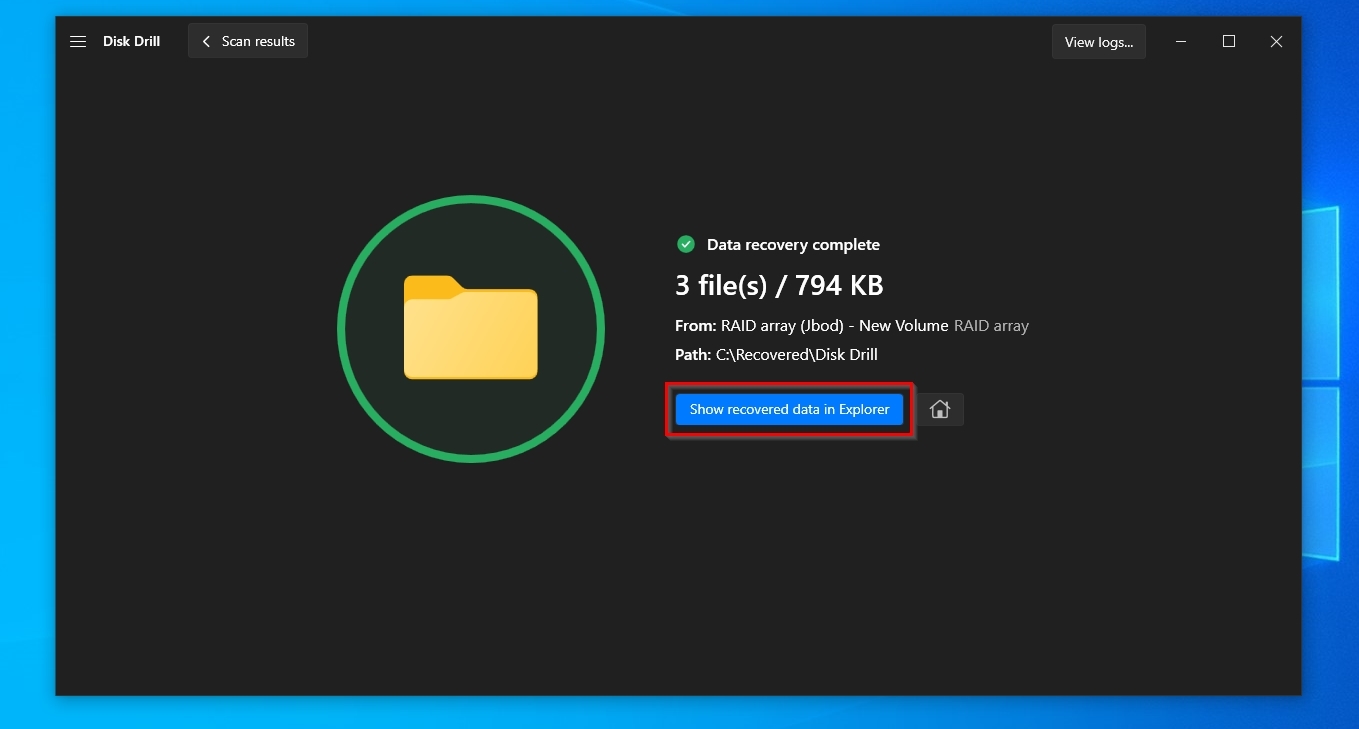
- When Disk Drill completes the recovery, it will show you a summary of the results. Click on Show recovered data in Explorer to see the files Disk Drill brought back using your operating system’s default file manager.
With your precious files backed up to another storage device and out of your dynamic disks, you can now convert them back to basic using one of the following methods without worrying about data loss.
If you’d prefer an alternative to Disk Drill, R-Studio and UFS Explorer are two of the most popular solutions worth checking out. Both have pros and cons, and it’s up to you to decide which is the best for you.
More Methods to Fixing Invalid Dynamic Disks
In this section, we’ll see some ways you can try to fix an invalid dynamic disk. However, we must stress that you shouldn’t skip the section directly above and ensure you’ve safely backed up or recovered all your precious files from your dynamic disk array to another storage device. The steps that follow will lead to irreversible data loss.
Method 1: Re-connect the disk
Often, the solution for dynamic disks showing up as invalid is simple. It might be the last cause you’d expect for such issues, but it’s also the first thing to check: every physical connection related to them.
To ensure your dynamic disk is connected correctly or re-connect it:
- Ensure their power and data cables are fully plugged in and have a firm connection without wiggling. This applies to all of your disks – “internal” in your PC, external standalone disks, and JBOD/RAID/NAS “boxes”.
- Unplug and re-plug your dynamic disks to ensure a proper connection.
Hopefully, the problem will have been fixed.
Method 2: Upgrade Windows
Dynamic disks don’t work the same way on all versions of Windows. If you moved a dynamic disk array from another PC to your current one that uses an older version of Windows, it’s worth updating the OS. This could be all that’s needed for your dynamic disks to be detected, mounted, and working as before.
To bring Windows up to speed with all available updates or upgrade to a new version of Windows automatically:
- Use the Start menu or Search to locate the Check for updates entry, and launch it.
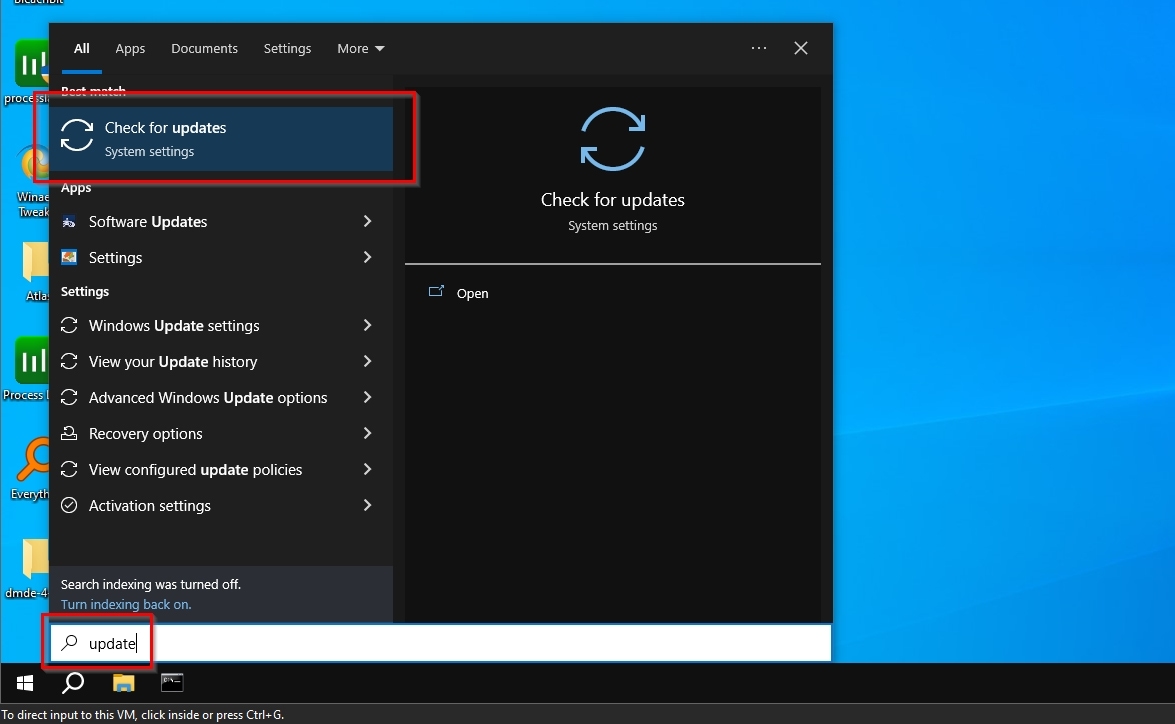
- Click on Check for updates. Install any updates found, and restart your PC if needed.
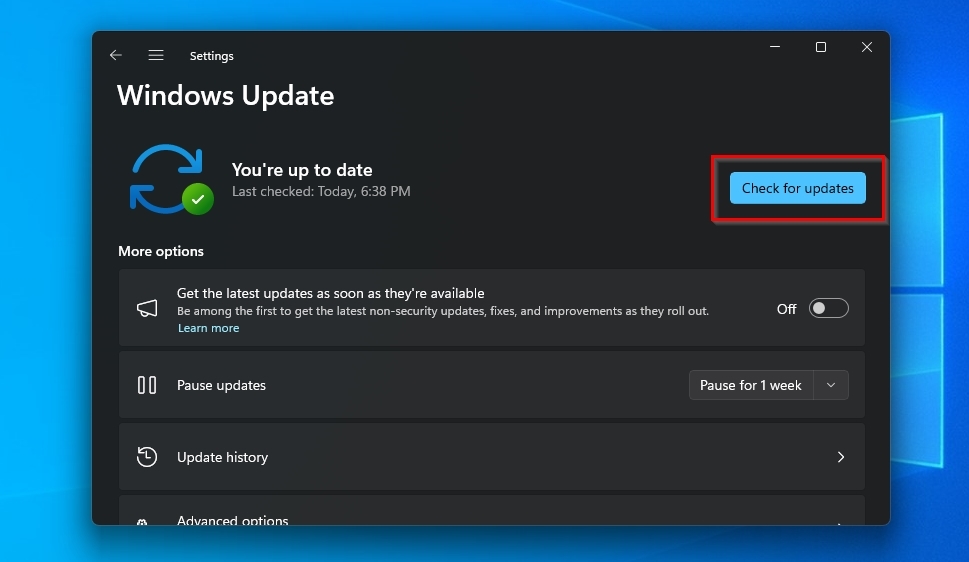
In the latest versions of Windows, complete system updates can be handled by the Windows Update tool, as we saw here. However, if that doesn’t work, or you want more control, you can upgrade Windows using Microsoft’s official Update Assistant or installation media.
Method 3: Convert to Basic Disk
Would you prefer to leave behind the complexities of dealing with dynamic disks? First, make sure you’ve recovered or backed up all your essential files from them. Then, convert them back to basic disks with one of the following methods.
Option A: Using Disk Manager
Disk Manager is a tool built into most recent versions of Windows that allows the user to “manage the disks” that are connected to a PC – where “disks” translate to any storage device, from NVMes, SSDs, and HDDs, to USB flash drives and memory cards. The app can initialize new storage devices, partition them, and format them, but it is also Windows’ primary solution for creating and managing dynamic disks. As we’ll see here, you can also use it to convert disks between basic and dynamic types.
We must stress once more that you should back up your dynamic disk’s contents before performing any process like its conversion between basic and dynamic types. After any such action is completed, all data on the disk will be gone, and your only hope of getting it back will be to try one or more of the best data recovery apps on it.
To convert a dynamic disk back to basic with Disk Manager:
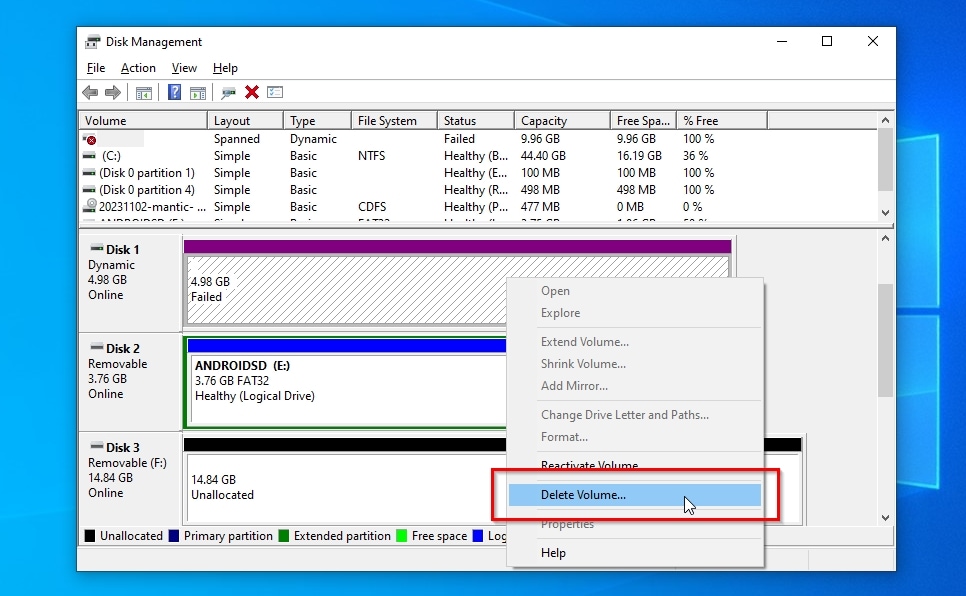
- Press Windows Key + X and select Disk Manager to launch it. Locate (one of) your dynamic disk(s) in Disk Manager’s list, and if a Volume exists (visible on the right side of the app’s window), right-click on it and choose Delete Volume.
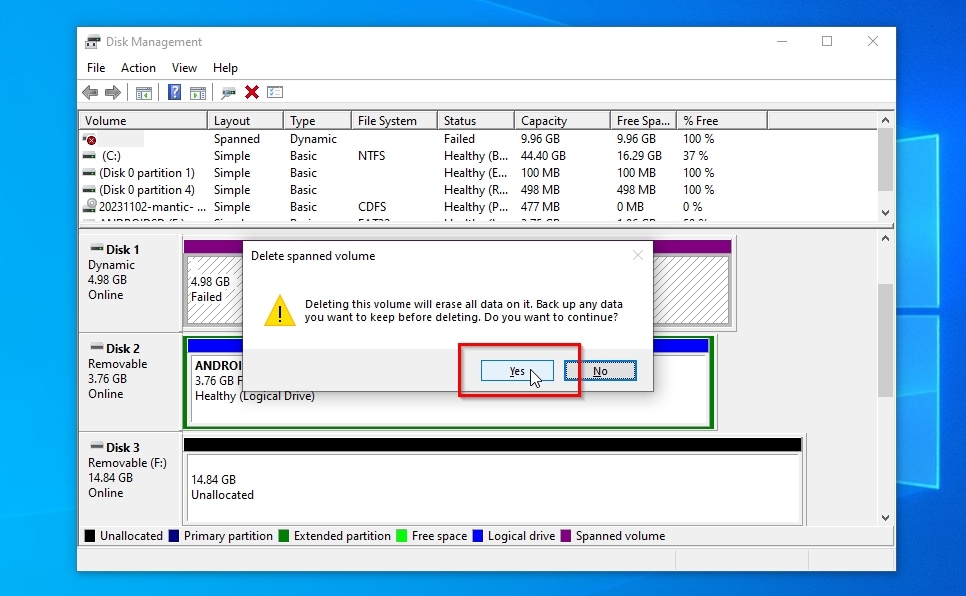
- Answer positively when informed that all data on the volume will be erased.
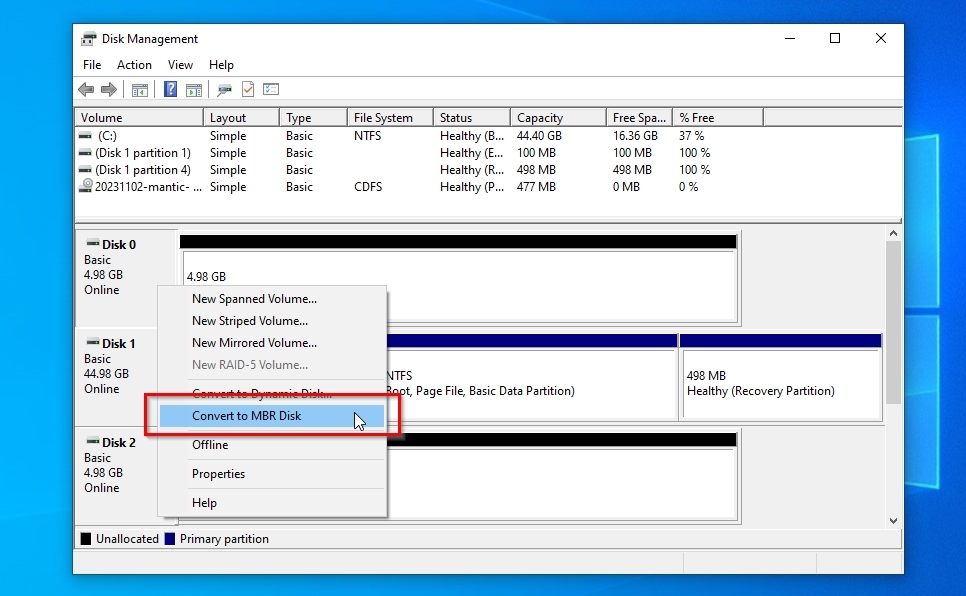
- In many cases, the disk may revert automatically back to basic type, and the option we’ll see in the next step won’t be available. Still, to ensure full compatibility with more devices and older OSes, also right-click on the disk (on the left, not on the volume space on the right) and select Convert to MBR Disk.
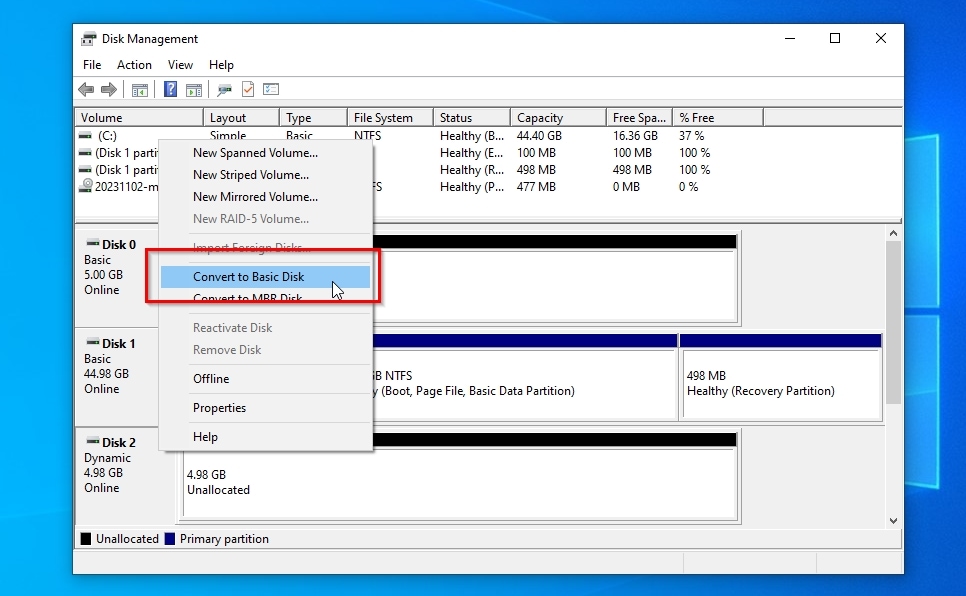
- If your disk’s type stays Dynamic, right-click on it and select Convert to Basic Disk. You can then also convert it to the simpler but also more widely compatible MBR disk format if you wish, as we saw in the previous step.
Option B: Using Software
Although, as we saw, you can convert a dynamic disk back to basic using Disk Manager, Microsoft’s solution is admittedly old and wonky. For example, after such a conversion, the app might “forget” to update a disk’s new type until you restart it. For those reasons, many people prefer third-party solutions for such tasks, with DiskGenius being one of the most popular choices.
As you will see, if you check our thorough DiskGenius review, it’s a pretty versatile app. However, for this article, we will only use its ability to quickly and reliably convert dynamic disks to basic.
To revert your dynamic disk to the classic basic type using DiskGenius:
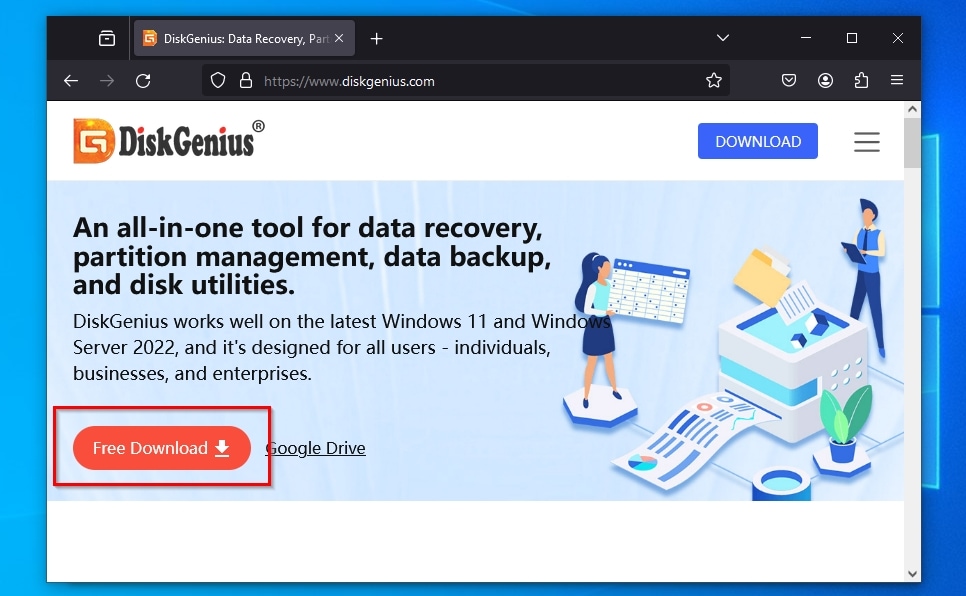
- Download the app from DiskGenius’ official site, install it, and run it.
- Ignore any mention of Dynamic Volumes (that exist on your dynamic disks).
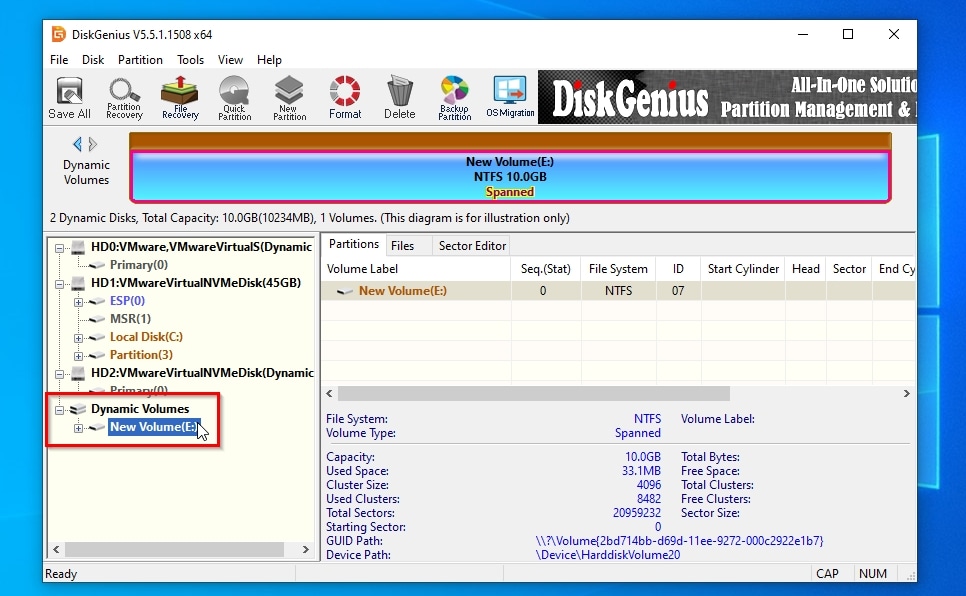
- Select the actual dynamic disk you want to convert to basic. DiskGenius helps to tell them apart from basic disks by appending the string “(Dynamic)” to their name.
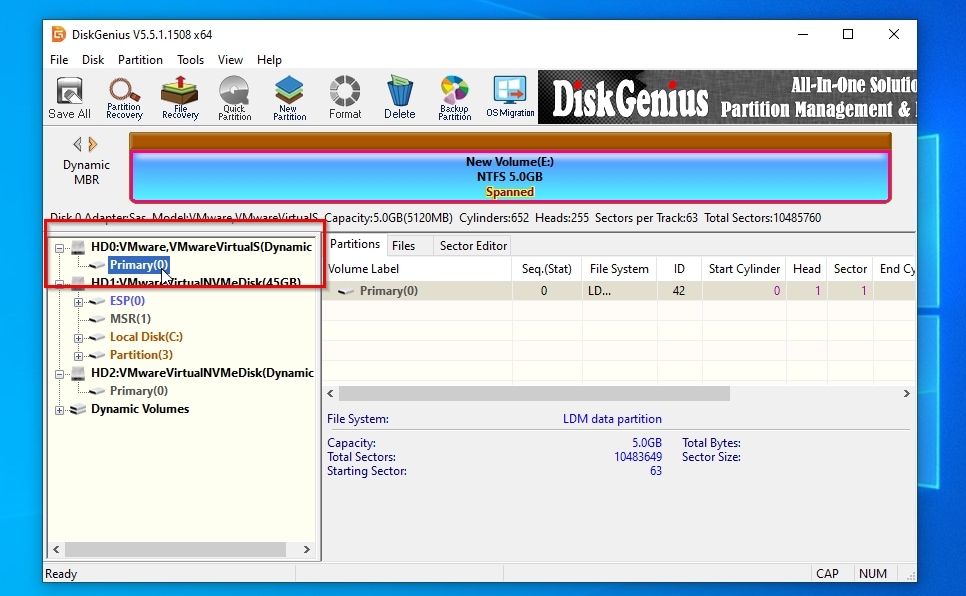
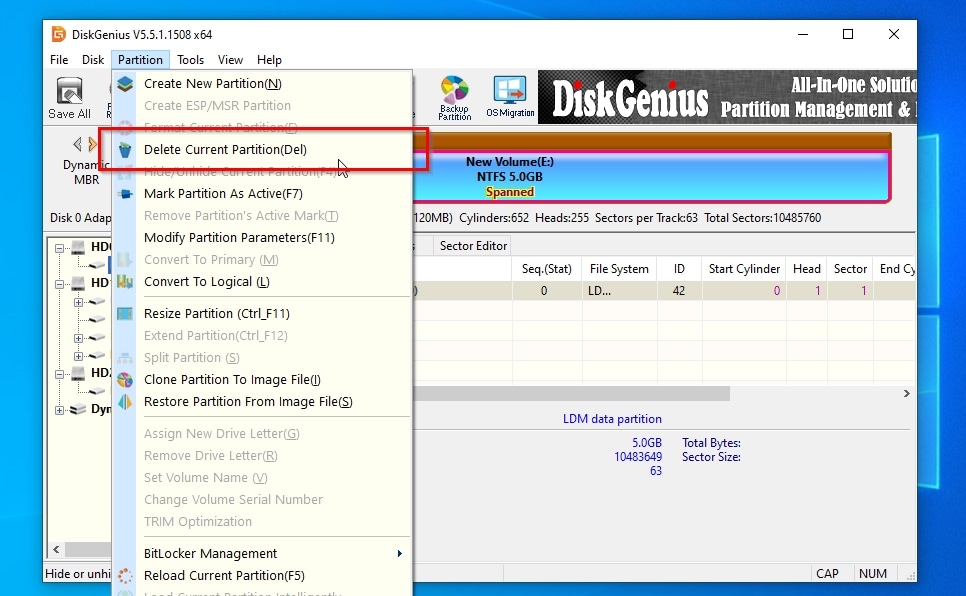
- Right-click on the dynamic disk’s volume, or left-click on it to select it and then click on the Partition menu. Select Delete Current Partition.
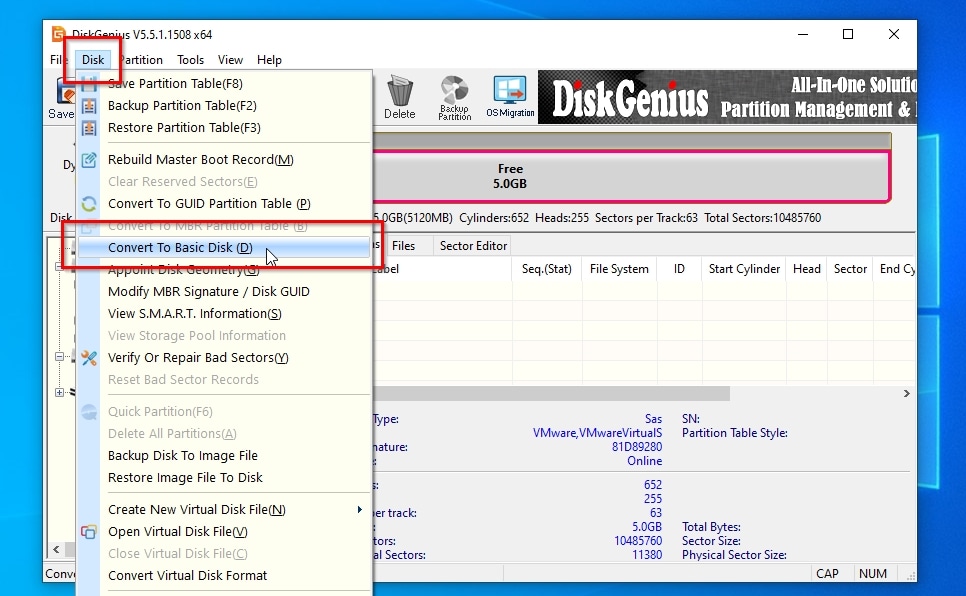
- Right-click on the disk itself, or left-click on it and then on the Disk menu. Choose Convert To Basic Disk.
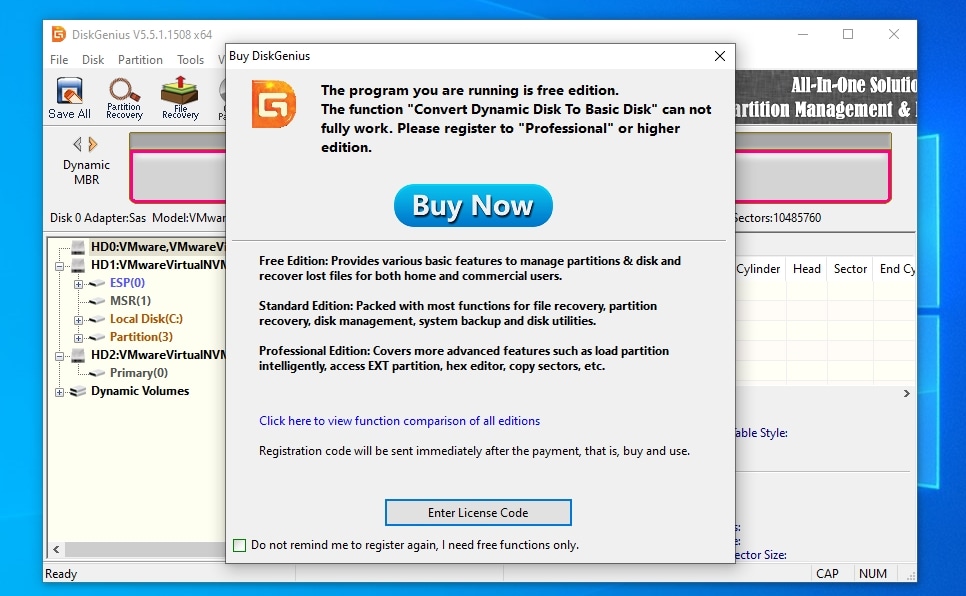
- If you have purchased DiskGenius, follow along with its wizard, and soon, your dynamic disk will be basic again. Otherwise, you’ll be prompted to enter a registration code to proceed.
DiskGenius’ official documentation claims the app can convert a dynamic disk to a basic one without data loss. However, during our tests, DiskGenius refused to convert any of our dynamic disks to basic unless we first deleted any volumes on them. Maybe what the app’s documentation actually means is that such a process is possible if you first go through a recovery/backup method, as we saw above, and then proceed to the actual conversion.
Method 4: Reactivate the Disk
Are you sure a dynamic disk should be accessible, but you meet an error message that it’s “Missing” or “Failed”? You can try reactivating it with one of the approaches that follow.
Option A: Using Disk Manager
As the prominent tool for most disk-related tasks, the Disk Manager also allows you to reactivate inaccessible disks.
To reactivate a dynamic disk using the Disk Manager:
- Use Windows Start or Search to find and run it, or press Windows Key + X and launch the Disk Management app from the menu that appears.
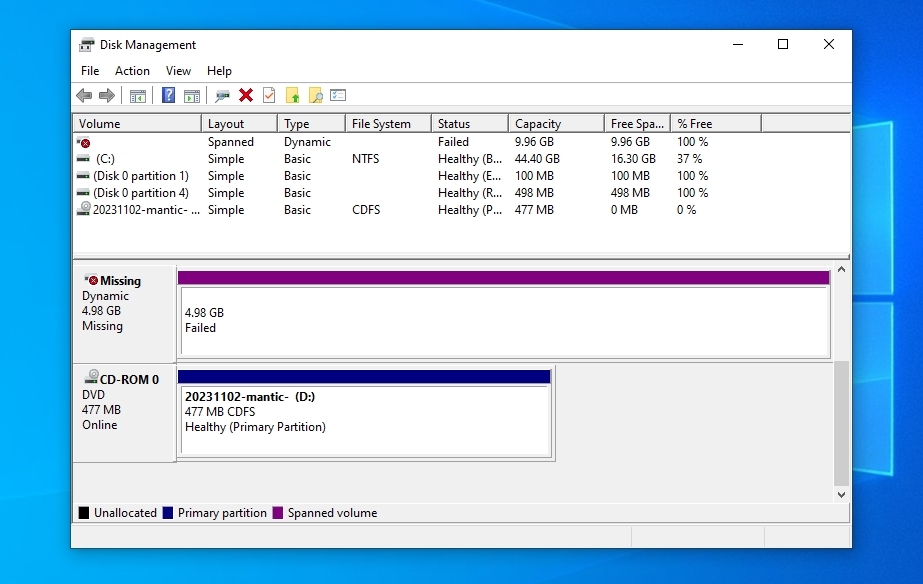
- Locate your dynamic disk on Disk Management’s window, right-click on its Volume (on the right), and choose Reactivate Volume.
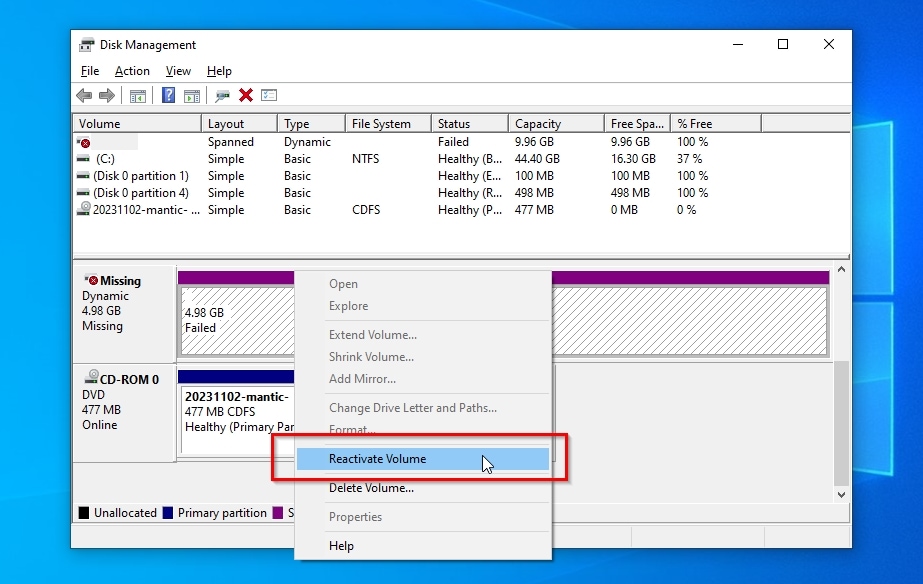
Your disk should be accessible again.
Option B: Using DiskPart
Would you prefer to be more in control and use the classic hands-on way of typing commands to control your PC? You can also reactivate a dynamic disk that appears offline this way with the help of DiskPart.
Note that this approach probably won’t work if you’re trying to access a multi-disk volume where one or more of its disks are missing.
DiskPart is a command line tool for managing disks, partitions, and volumes, that accompanies all new versions of Windows.
To reactivate your dynamic disk using DiskPart:
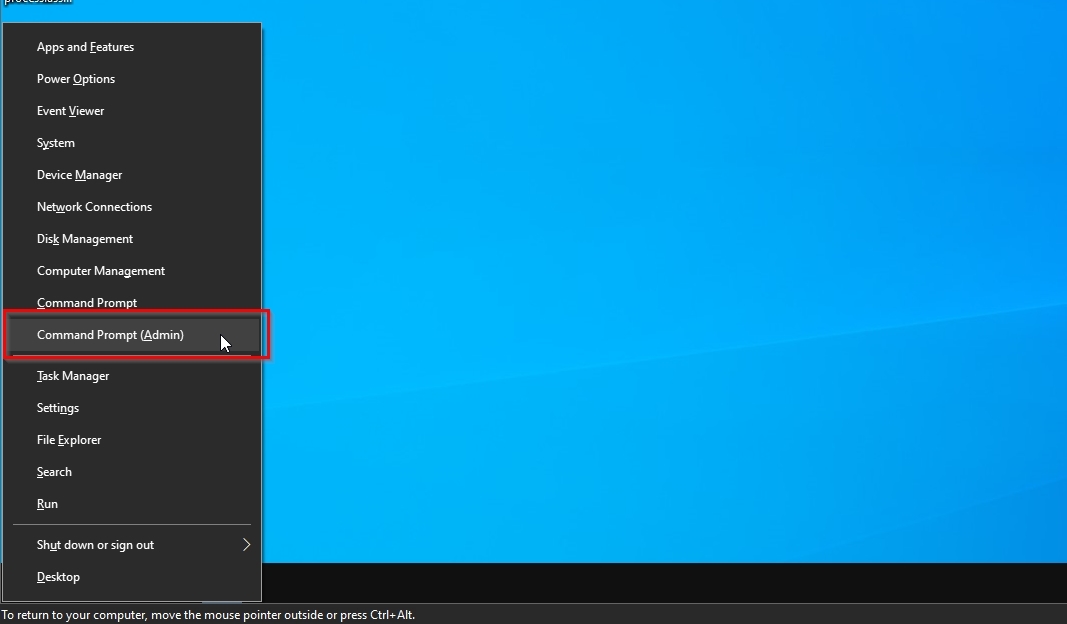
- Use the Start menu or Search to locate “CMD”, “PowerShell”, or the combined “Terminal” app, and Run (your choice) as Administrator. Alternatively, press Windows Key + X and choose Terminal (Admin).
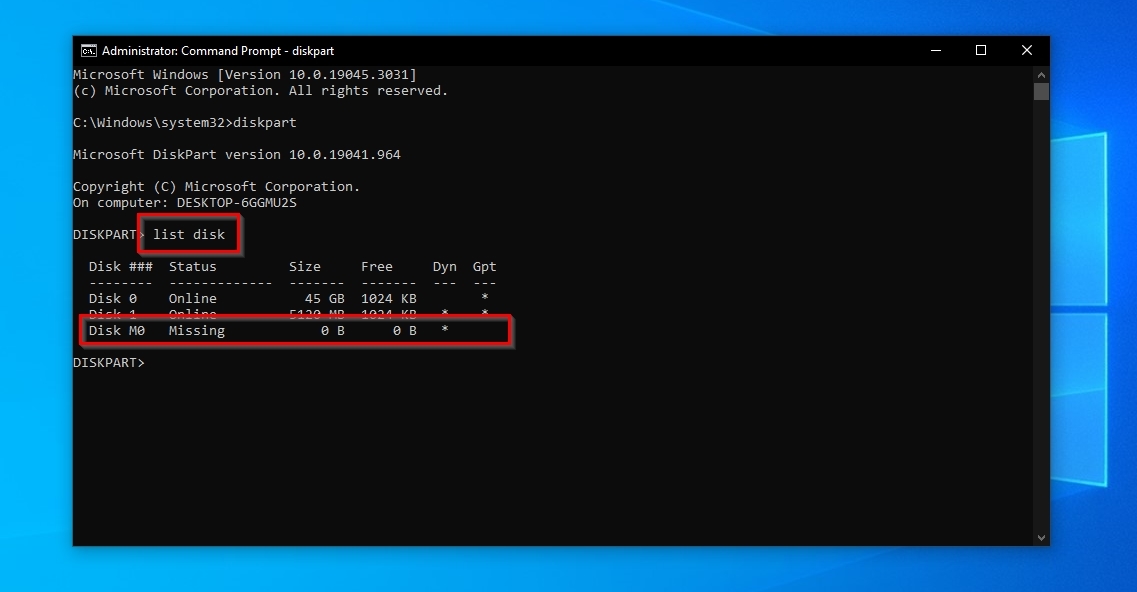
- Type “diskpart” and hit Enter to launch the tool.
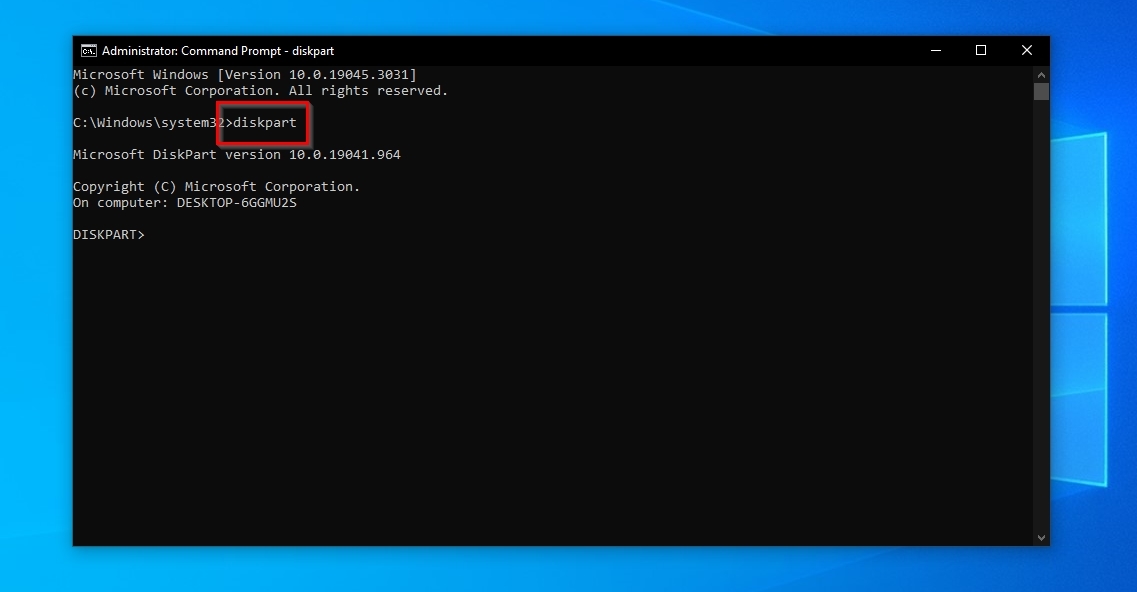
- Use the command “list disk“. Depending on whether it appears missing or offline, your dynamic disk will have a number like M0, M1, etc. or 0, 1, and so on. Note that down.
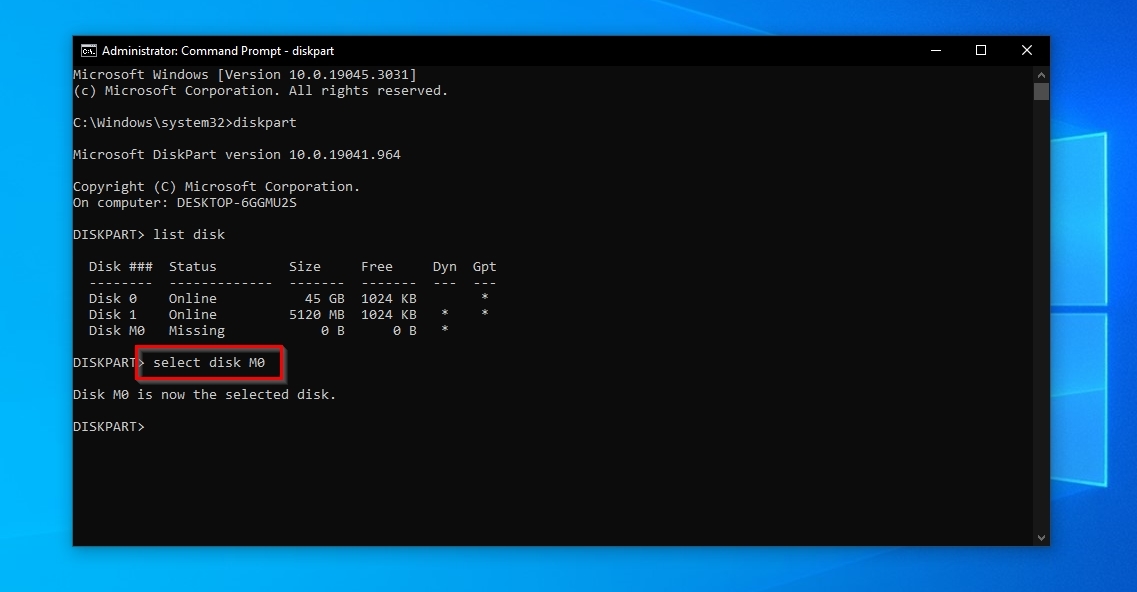
- Type “select disk NUMBER“, where “NUMBER” is the number you noted in the previous step.
- Type “online” and hit Enter to reactivate the disk.
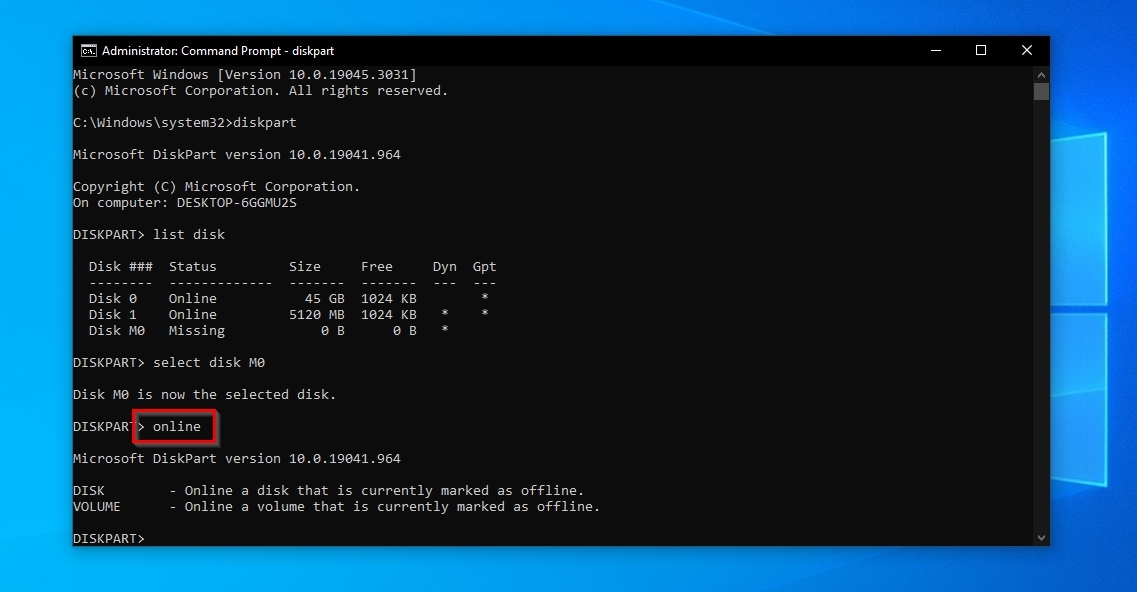
Hopefully, that should have “re-connected” your inaccessible dynamic disk.
Method 5: Manually Mark Disk as Basic via Hex Editor
Another solution for fixing a dynamic disk that appears as “invalid” may almost surely reap results but isn’t for the faint of heart: HEX editing.
The short version goes like this: Using an app known as a HEX editor, you can see the individual bits and bytes on any storage device, including a problematic disk you need to somehow “fix”. Then, you can manually edit those bits and bytes “to something else”. This way, you can mark an invalid disk as valid, change it from a “dynamic disk” to a “basic” one, and “fiddle” with its type, file system, allocated size, and contents.
Since this is a demanding process and requires advanced knowledge of the structure of any type of data you’ll try to “tweak”, we’ll avoid covering it in this article. For more information on how to HEX edit disks, you can check WinHex’s manual, or HxD’s forum.
Possible Errors/Pitfalls During Dynamic Disk Invalid Recovery
You tried one (or more) of the methods we saw, and it failed to convert the specified dynamic disk, but you’re sure you chose the correct disk?
Some of the most usual causes for such issues are:
- ⚡ A faulty controller or logic board on the disk might be preventing its communication with the PC’s controller.
- 🔌 Similarly, a problematic connection could be interrupting the disk’s communication with the PC, or worse, if it’s a power cable, randomly powering it off and on.
- 💾 An HDD’s magnetic surface might be physically damaged (for example, after a bump or drop), preventing the conversion from writing new data on the disk.
- 💻 It might not be the disk that fails but a problematic piece of software or hardware on your PC. The only way to test for this scenario is to connect your disk to another computer.
Those are merely a sample of the causes you might be unable to convert a dynamic disk to basic. Still, they’re also relatively rare. Thus, in most cases, using one of the solutions we cover in this article should be all you need.
Conclusion
As we saw, the way you can repair an invalid dynamic disk is often straightforward and relatively effortless. Various tools can help solve such issues, some of which you will already have in your arsenal if you’re using a relatively recent version of Windows. Sometimes, the solution can be even easier, with any invalid dynamic disk issues entirely gone after wiggling a cable that connects one of your storage devices.
It’s rare, and only in worst-case scenarios, to be unable to fix an invalid dynamic disk, and even when that happens, tools like Disk Drill or DiskGenius will usually manage to save your files from the clutches of such a storage device before it fails.
So, try some of the methods we saw in this article, and soon you’ll probably be able to mark your invalid dynamic disk adventures as “solved”.
This article was written by Odysseas Kourafalos, a Editor-in-Chief at Handy Recovery. It was also verified for technical accuracy by Andrey Vasilyev, our editorial advisor.
Curious about our content creation process? Take a look at our Editor Guidelines.